The Raspberry A600PI AMIGA
Posted: November 6, 2015 Filed under: Amiga, Commodore, Linux, Raspberry Pi, Retro gaming, Vintage Computers | Tags: Amiga, Amiga Pi, commodore, raspberry pi 27 Comments
What do an Amiga A600 and the Raspberry PI have in common? Well at the time of their release, both were considered small micro computers. So what do you get when you combine the quad core power of a RPI-2 Model B and the compact design of an Amiga 600? In theory, a compact quad core Amiga, that runs Linux. But that’s just a theory right? No one’s actually gone to the trouble of making such a freaky hybrid have they? Well actually yes, in fact plenty of people have been putting Raspberry Pi in all sorts of things, ranging from Spectrums, C64s, toasters and pants. Ok I made that last one up, but you just wait, the day is coming when someone will develop digital ‘smarty’ pants. That day is coming my friend. Most of the time the A1200 and A500 are utilised for modding purposes, most likely because of the space afforded in both machines.
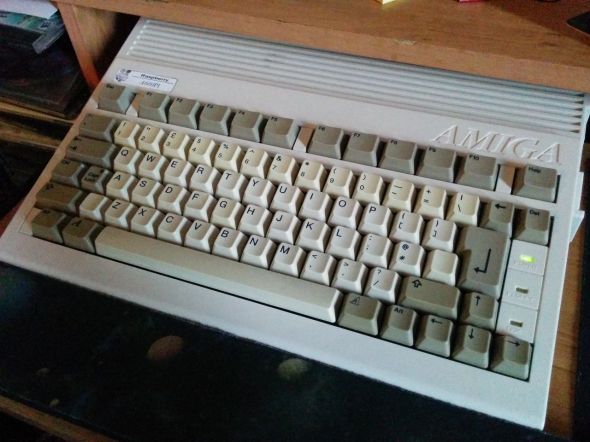
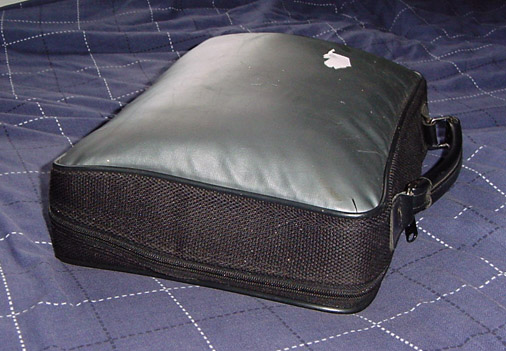
Measuring in at 14” by 9.5” and 3” high, the A600’s small size works against it for modding purposes, it also lacks a full size keyboard, so there is no numerical pad. Even back in 1992, the A600 came under fire from people criticising the short comings of its design. For a machine intended to replace the aged A500+, it did a pretty poor job in many respects. Later the managing Director of Commodore UK, David Pleasance, would describe the A600 as a “complete and utter screw-up”

David Pleasance – Not the A600s biggest fan
As a kid at the time, I recall thinking the A600 looked like a waste of time compared to my expanded A500+. It wasn’t until later that year, when I saw the A1200 in Amiga Format, that I began drooling. Fast forward 23 years and here I am staring at a 600 case, wondering what I can do to it. In my head, I was picturing a useful Linux machine capable of going online, playing games and running UAE (Ultimate Amiga Emulator). I had a Keyrah sitting on the shelf begging to be used, so what am I to do? Initially, I did nothing. Back when the Raspberry Pi was first released, it was intended for hacking LEDs & light sensors together or acting as the brains inside an electronic project. It wasn’t meant to be a desktop computer, it simply didn’t have the memory or power to handle it. Gradually, the Pi evolved, more RAM was added, the design was refined, software was optimised, until finally the Foundation released the Raspberry PI 2 Model B. Upgrading the tiny computer with a quad core Arm Cortex A7 processor, this update opened the door to variety of new possibilities, including my shelved Amiga project.

The RPI 2 Model B is a beast compared to the B+
The Pi is very affordable when you compare it to other SBC boards. It also has the benefit of a rich and active community. Not to mention the copy cats that have emerged since its release. While some people might critisise them, I think it’s ace – competition is healthy. Children are once again wiring up things to their computers, learning how to program, learning LOGIC. Some of these kids might go on to shape our future and possibly develop the next breakthrough technology. But in the meantime, here at ByteMyVdu, we are more interested in seeing if a RPI2 can be merged with 20 year old Amiga…So read on and find out.
In the Beginning
Even before I started drilling or ordering parts, I knew one thing for sure, I wanted the hack to be neat, not just that, I wanted the Amiga PI to look no different to a regular Amiga. I wanted people to see it sitting on my desk and think it actually was an Amiga running Linux. But how to go about it? After all the RPI has vastly different ports to the Amiga. Instead of serial and parallel, we now have USB, and in place of composite there is VGA or if you prefer DVI / HDMI. There is also the RJ45 port, allowing you to hook the PI up to your network. Back in the day, the Amiga used serial or a PCMCIA modem to talk to the outside world. One thing was for certain, the back of the Amiga was going to look vastly different with all the new ports and connections, utilising the existing holes cut in the case would only end up looking odd.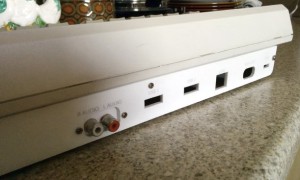 So I decided to craft a new back panel from 3mm acrylic. Taking measurements of the rear panel of the A600, I spent a Saturday designing a vector on my Macintosh Classic. Originally I’d been planning to write an article for BMV about the Manchester Play Expo, but the idea popped in to my head that it would be more fun to design the back panel. Surprisingly the process was very easy and transferring the design over to the main computer went without a hitch. So anyone who says that 68k Macs are useless really needs to have a rethink.
With the back panel cut from white acrylic, I began buying the cables necessary to extended the ports of the PI to the rear of the Amiga case. I shopped on eBay for all the things I needed, while Amazon might have stocked them, I wasn’t so enthusiastic about buying from them after being burnt in the past.
The list of parts I needed was as follows
- 1x Panel mountable, RJ45 extension cable
- 2x Panel mountable USB extension cable
- 1x Panel mountable Micro USB female to male cable
- 1x 3.5mm stereo to female RCA phono cable
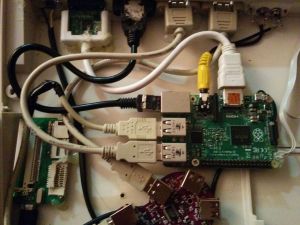
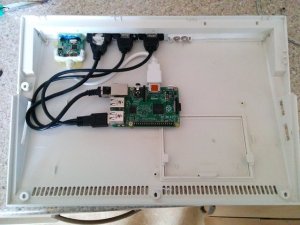 With all the cables together, I went about installing the new back panel. Having already cut out the back from the Amiga case, I offered the new panel up to see how it look. Fortunately for me, my measurement had been pretty good and the new panel fit nicely against the back of the A600. Once the case was together, it was time to attach all the cables, screwing and gluing them in place where needed. While doing this, I discovered a handy Y shape USB splitter on eBay, turning one USB port in to two. It was only after I had installed the cable, that I discovered the splitter was only good for charging. No matter what I hooked up to the ports, nothing would appear. The only device that DID work was a mouse, pretty much cementing the fact, that the cable was complete rubbish. Luckily I’d bought two USB extension cables prior to seeing the splitter, so it was just a case of swapping the cables around. Even though I had glued the splitter in place, I was still able to extract it. With the new cables installed, I now had two fully working USB ports on the back of the case. As for the USB splitter, it went in the bin. The next step was installing the Keyrah. This little device from IndividualComputers turned the Amiga keyboard in to a USB device, enabling me to use it on the PI, so it was important I found space inside the Amiga to accommodate the PCB. Imagine my surprise when I discovered the joystick ports on the Keyrah lined up perfectly with those on the 600 case. I’m not sure whether this was intended, needless to say it made installation easy. The Keyrah does sit rather close to the floppy drive, which might cause problems in the future, should I wish to fit a disk drive. Later models of the Keyrah have a slot for connecting the keyboards ribbon cable, but mine is an early revision. So instead of a slot, the contacts are printed on to the PCB and a bar is used to hold the ribbon cable in place. All I shall say on this earlier design, is that I understand why they changed it. Every time I open the AmigaPI the ribbon cable would move, taking out the keyboard.
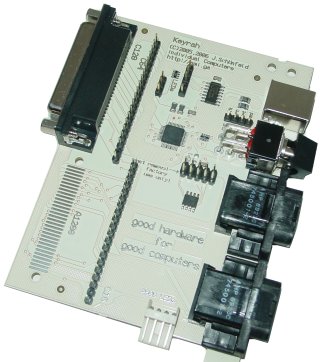
Keyrah, handy kit so long as you leave it alone.
Because of the limitations of the A600 keyboard, the Keyrah has an on board switch, that swaps between two keymaps. Essentially giving you access to a full keyboard. Because the Keyrah resides inside the Amiga, I’m not sure exactly how they expect me to access the switch. Unless I was meant to cut an ugly hole just below the floppy drive, hmm I don’t think so! Perhaps at a later date, I will wire up a new switch and mount it on the back of the Amiga. One final aspect to wiring up the Raspberry PI with the Amiga case, was case lights. In what has to be the most hairy bit of soldering I’ve done. I removed the surfaced mounted LEDs from the Raspberry PI to gain access to the solder points below. Then using some IDE cable, I attached wires from the motherboard directly to the legs of the LEDS. Holding my breath, I turned the machine on and what do you know, the power and drive light came on. Not the sort of soldering I want to do on a regular basis, as my heart was in my throat the entire time I was soldering to the tiny PI board.
Power

Yes, they work!
The combined power requirements of all these devices undoubtedly pushes a PI to it’s limits, at it’s best the PI has 1.2A devoted to the USB bus. If one or two of your devices are power hungry, the 1.2A cap can quickly become annoying. The only solution is to use a powered hub, which is exactly what I did. Due to the limiting space factor, I tried to avoid using as many connectors as I could inside. Instead opting to chop the ends of cables and solder the wires directly to the points on the hub. The PI hub has a 5v 2A port dedicated for powering the PI, so instead of using the intended USB cable, I soldered wires straight to the 5v and ground. I then soldered them to the power points on the PI motherboard, just below the micro usb power port. I also converted the power socket of the hub in to a female micro USB socket, which I glued to the back panel of the Amiga case. This meant I could continue using PI specific power supplies.
Feeling Wired
Soldering all these wires together, I made a very rookie mistake, by not taking in to account the resistance of the wires on the whole circuit. This became apparent the first time I booted up the PI. Even though I was using an official Raspberry PI psu, the square rainbow under volts icon appeared in the top right corner of the screen. Running a volt meter over the ground and 5v pin on the GPIO port, I discovered it was reading around 4.5v, not the 5.15v that I was expecting. If there is one thing I learnt during this build, it is that USB cable makes a poor substitute proper gauge wire. If you want to reduce high levels of resistance, make sure to use a decent gauge wire.
I learnt this lesson the hard way, leading to me to rewire everything a second time. After which the voltage over the GPIO port was restored to just over 5v. The original psu for the PI hub is rated at 5.2V 2A, which is more then enough to power a PI under normal circumstances. In the AmigaPi’s current configuration, it appeared just enough to power everything, the under volts icon appears whenever the rear ports are in use. With this in mind, a 3A power source will likely be on the cards.
Software
War, never been so much fun!
Under the hood the AmigaPI runs the latest version of Raspbian, I have also installed UAE4ARM, the lastest Amiga emulator for the Raspberry PI. Not only does it receive regular updates, but it quite possibly the fastest Amiga emulator you can get on the PI. Configuring it to work can be a little tricky and keyboard support is not all there yet, but anyone who spends time reading on the Raspberry forum have little trouble getting it running.
There are a surprising number of Linux games available for the PI, ranging from Doom clones to arcade Galaga, you can even get point and click adventure games such as Beneath a Steel Sky. All of these work fine with the Raspberry Pi and are definitely worth a look at. DOSbox is also available I’ve yet to test it out, so I can’t say how good it is at emulating a DOS machine. But if UAE is anything to go by, it will hopefully manage 486 games without breaking out a sweat.
Being a Purist
As I mentioned earlier, I wanted the AmigaPI to look like an Amiga, with working Joystick ports, a functional floppy drive and PCMCIA port. Admittedly the rear of the computer looks different, but that couldn’t be avoided. The PI doesn’t have a serial or printer port like the Amiga, nor does it have an composite or RF connector. The only option I had was to give the new back panel an Amiga feel, which is why the power connector is in the far corner, why is has phono connectors for audio and two USB ports, in place of the old serial and parallel ports. The floppy drive is still a work in progress, as the floppy to USB adaptor I bought is sitting on my desk untested. Until I have a new power supply, I don’t wish to risk corrupting the SD card by causing a brown out. But hopefully in the near future the familiar click of a floppy drive will return to the old A600 case. Fitting the Amiga PI with a PCMCIA port seems a little redundant to me, as I had an old CF card reader kicking around, I decided to compromise. After all, when my A1200 isn’t on WIFI, it spends most of its time with a CF card adaptor stuck in the side. Equipping the AmigaPI with CF, meant I could easily transfer files, pictures, mods and ADFs back and forth between the AmigaPI and my regular Amiga’s. Something I envisioned being pretty useful at LAG meetings, when we are taking pictures of the meeting.
Final thoughts
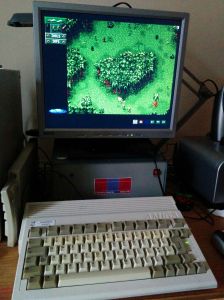
I honestly can’t believe I’ve finished this project, that I’m sitting here at this moment, typing on what looks like a regular Amiga 600. Except the badge bares a berry shaped logo and next to it, reads Raspberry A600PI. Ok it’s not a next generation Commodore product, but then when are we likely to see that happen? The reason people are still rocking Commodore products is because of the mindset behind them. The passion that drove the team who made the Amiga, still lingers, the embers faintly glowing from a fire that blazed decades ago. All I know DO know, is that I get a certain buzz from using a computer that fits inside a keyboard. Unlike my Windows 7 tower, I can thrown the A600PI in my bag and take it with me and who knows, maybe even play a game of Sensible Soccer over at a mates. Yes its dirty filthy nostalgia but on top of that, it’s turning the PI from a mass pile of wires, in to a compact, usable computer. I only have to connect power, VGA and mouse to get the AmigaPi up and running. Everything I need, is self contained within the confines of the A600 case. With a regular PI, I have to find my VGA to HDMI adaptor, WIFI dongle, powered hub, keyboard and mouse, before I even begin to think about powering it on. In short, its a real faff, but not any more!
So if you’ll excuse me, I feel the need to play Cannon Fodder now, till next time keep on geeking!!
No Amigas were harmed during the making of this project, but one ropey looking, long dead 600 was given a new brain.
Tiny Update – Amiga Mods and Raspberry Pi Arcades
Posted: October 26, 2015 Filed under: Retro gaming, Vintage Computers | Tags: Amiga, arcade gaming, commodore, raspberry pi Leave a comment
Greetings faithful readers!
First of all I’d like to thank everyone who reads my blog, on the 24th of October, BMV hit 66 views or put another way 32 visitors. While it doesn’t hold the title for busiest day, it still shows a regular foot fall through the virtual BMV doors and I am thoroughly pleased that people coming visit my tiny corner of cyberspace.
Not one to rest on my laurels, I’ve finally gotten round to working on a project I’ve been mulling over for the best part of four years, the Commodore Amiga 600 case mod. I was given a Keyrah by a fellow LAG member many years ago and its been sitting on the shelf ever since, waiting to be used. I can now finally say that time has come and the project has begun, so be sure to check here soon as I will be posting photo’s.
Next on the workbench is the long awaited Picade! Some of you may recall I did a review of the Raspberry Pi and the Picade and I’ve been waiting to finish the article ever since. Even more shocking was that I received an email asking when I was going to write the follow up! Thats right, some fool is actually reading my blog!
Well dear reader, I’m happy to say I HAVE the Picade kit from the lovely people at Pimoroni and it will be built in the near future, so expect a thorough review of this amazing bit of kit!

image courtesy of Pimoroni Ltd
Retr0-Brite The On Going Saga
Posted: September 5, 2015 Filed under: Amiga, Commodore | Tags: Amiga, retr0-brite, retrobrite Leave a commentTo say that I’ve tried my hand at brightening up some of my older machines would be an understatement. I’ve tried doing it to an Amiga 500, an 1200 and even an old Macintosh ADB keyboard that had gone rather yellow. The only success I’ve had to date, was with an Amiga mouse which I changed from smoker’s yellow to having a slight case of jaundice. I’ve never had the shocking ‘Wow’ factor results that other people have posted online, it’s been something of a white whale. So it’s no surprise that every now and then I find myself coming back to have another go, this time with two Apple Pro USB keyboards. Less than 10 years old, both look like they came from a heavy smoking environment, when in actuality they were white when I put them in storage. Clearly, being boxed in the attic has not done them any good. I started with the worst of the two and began stripping it down, removing the keys into an ice-cream tub. I then painted the main keyboard with some 40% Blonde hair bleach, which you can pick up from Boots and Home Bargains here in the UK. In the past I have tried using solutions of Peroxide, mixed with wall paper paste. This ended up ruining the A500 case I had tried restoring. Using the little gold bottle of hair bleach had been suggested to me by Merlin. No not the Wizard(!) but the Amibay username of the chap who came up with Retr0brite to start with. After a lengthy discussion via Skype, where I felt increasingly in over my head, Merlin aka Dave Stevenson finally said I should forget all about mixing bottles and just go for the easy approach. This was great news as up until then I’d begun to think to do Retr0brite you required a PHD in potions and wizardry.
So cancelling my application to Hogwarts, I waited patiently for sunshine and in Yorkshire you have to be patient. Fortunately I was able to bag two good days of sun, albeit with the occasional shower. The results took me by surprise. While the main body of the keyboard had been covered in cream peroxide and wrapped in cling film. I’d submerged the keys in a solution of 40% vol peroxide and hot water, with a little oxi vanish mixed in. The keys had only slightly brightened up, where as the keyboard while not restored to its original ivory white, was noticeably less yellow.
For now, I’m biding my time until we have more sunshine. Then I plan to apply cream to the keys as well and see what the results are. For now I think it is fair to say that I’ve given up using liquid peroxide, in favour of using cream.
So keep watching this space folks!
Slow posts, Free Computer and Game Reviews
Posted: May 7, 2015 Filed under: Amiga, Classic, Commodore, Retro gaming | Tags: a500, Amiga, game review, n64, return to atlantis Leave a commentThings have been a little quiet here on BMV, but that isn’t to say that there hasn’t been any geeky goings on behind closed doors. At a recent Amiga club meeting, a member of the public brought in their old Amiga rig and software. Left to gather dust in their attic, they brought it to LAG hoping to find it a new home. By sheer coincidence I had brought along my own Amiga 500 Plus to the LAG meeting, along with an external hard drive I was trying to install games to. Having owned an A500 back in the day and only ever used the floppy drive, I was eager to experience all the IDE goodness. Sadly my Amiga was choosing not to work with the GVP expansion, so when the offer came of a free boxed A500, I jumped at the chance. When I opened the boxed, I discovered it was complete, with manuals and polystyrene packaging, just as it had been the day it was sold. From what I gather the A500 is faulty, so I will have to check it out when I can get around to it.
Along with his A500, the gentleman brought in two boxes worth of Amiga games. Sifting through them, I found titles such as Desert Strike, Monkey Island, Rocket Ranger and Castle Master. All classic games in their original boxes. I goes without saying that a number of the games ended up coming back home with me and it’s a sure thing I will be reviewing them here on my blog. Sure there are plenty of places online filled to the brim with Amiga game reviews. But as I seldom review games, I figured what the hell, why not have a go. Besides that is what ByteMyVdu is all about, talking, discussing and reviewing everything old bit of computer kit I can get my grubby hands on.
In the next couple of weeks, I’ll be writing about repairing or trying to repair an Nintendo 64 and also doing a review of “Return To Atlantis”, one of the games acquired at the LAG meet.

Till next time, keep on geeking!
Manchester Play Expo Weekend
Posted: October 28, 2014 Filed under: Retro gaming | Tags: Amiga, Atari, cosplay, oculus rift, play expo, playstation 2 Comments(pictures to follow)
The 11th and 12th of October was a significant date in any gamer’s calendar as this was the weekend of the Play Expo held at Event City just outside of Manchester. I’ve attended several events in the past, most recent was Games Britannia Live at the Millennium galleries in Sheffield. Even though Games Britannia was a much smaller venue, the event was a lot of fun, suffering only from a lack of decent seating. You can find my review of the event here on my blog. After a late start, we arrived at the Play Expo around 11:30am. The traffic was a little crazy and a lot of people were walking on foot towards the event. As we drove up in to the car park, we spotted people dressed in costume: Mortal Kombat, Ghostbusters, Mork & Mindy, Poison Ivy, Batman. There were all sorts and it was fun to see so many people dressed up, giving me a good feeling about the day ahead. Getting in was pretty easy, with very little queueing or standing around, but this could have been down to arriving a little late and missing the early morning rush. When we got in to the event boy was it big. If Play Expo is back next year, I might seriously consider attending both days. If you like arcade, pinball machines, retro consoles, 8 or 16 bit micros, then this place is for you. On top of that was the number of dealers tables offering board games, comics, posters, vintage games and hardware, plus developers showing off their latest indie and commercial software.
Team17
Fans of the Amiga will recognise the name Team17, responsible for such classics as Alien Breed and Worms. In more recent years they have released versions of these games for various other platforms, including iOS and Android. Worms is probably the game most people today associate with the company, given how popular it has been over the years. Flockers takes the cute sheep from Worms and places them in the guiding hands of the player, who faces an assortment of puzzles as they help their flock reach their goal. Throughout each level there are a plethora of nasty contraptions intended to maim, squish, slice, dice and generally eradicate the cuddly creatures. If you had an Amiga 500 back in the 80’s, you’ll be forgiven for thinking all this sounds familiar. Flockers is reminiscent of another rather famous Amiga title. Team17 could be criticized for not being awfully original with this new title, however I’m not so sure it’s deserved.
For the past decade, 3D games have pretty much been the bread and butter of gaming. Titles such as Skyrim, Call of Duty, Fallout3 and Batman Arkham Asylum have all attempted to provide a realistic, immersive environment for players to explore. I’m not suggesting this is a bad thing, Fallout3 and L.A Noire hold a special place in my heart, mainly because of how well they sucked me in. But by the same token, the popularity of 2D indie games such as Super Meatboy, Fez and FTL, should perhaps tell us something about gamer habits. I don’t believe games always need to focus on realistic, high-definition graphics to be appealing. Sometimes simplicity and good game play can be what attract the player. Flockers might remind us of Lemmings, but given that the latter was released in 1991, I’d say the time is well over due for a new spin on an old but otherwise great premise. Flockers has a lot to offer young and old gamers alike, whether you’ve heard of Lemmings or not. Navigating your tiny sheep to the exit and trying to avoid a nasty squishy end will leave you laughing or crying in frustration. It’s a gruesomely good game and well worth flocking to buy….yes, I did go there!
Games, Games, Games!
Where to begin? There were so many tables set out with amazing games, I could fill two articles just covering them. A Pixel Story, The Escapists, Octodad, Kaiju Panic, Raging Justice, that’s just naming the ones I can remember. I tried so many games on Sunday that I need to dig though my bag fo r all the cards and flyers, just so I can remember what they were called! I will at some point cover them in a later article as there really were some impressive titles. For now all I will say is bravo to Play Expo for getting all of those independent developers under one roof and giving players a chance to actually talk to them. Whilst my partner played Pixel Story, I stood and spoke to one of the games developers. Few times have I ever been able to ask a programmer about the inspiration behind their game. Truly a wonderful opportunity and one I really enjoyed. It is also worth mentioning that Pixel Story is a truly fantastic game, it feels like a Mega drive title, but with all the polish and refinement you’d expect from a modern game.
Cinemaware Talks and news about old and new releases
Sitting in on a talk by such a legend as Cinemaware really does leave the fanboy in me drooling with excitement. On the day, Sven, one of their developers discussed old titles and the difficulties faced during production. The Q&A was very laid back and Sven really gave the impression of someone passionate about the old games. He also went on to reveal that after remaking Wings, Cinemaware are moving straight on to another Kickstarter which will hopefully see another of their famous titles “Rocket Ranger” return to our computer screen in a new remastered form. The “special” video that announced the new project was something of an anti climax. So I’m looking forward to seeing how this story develops. As a big fan of Wings, I have to say that seeing these old games get fresh attention is great. Cinemaware games have always had that something extra special about them. Like Sven, I also hope they will get around to “It Came From The Desert”, if ever a game deserved remastering, this classic screams for it. So we can only cross our fingers and hope Cinemaware will get on it.
Oculus Rift, VR and sea sickness
So finally I’ve been able to try out the famed headset; the device people are all in a buzz about. The game I was able to play was “GhostShip” which sets you aboard a large space ship, wandering around in your space suit, shooting anything that takes a dislike to you. Overall the experience wasn’t that bad, but it also wasn’t as good as I’d expected. The headset allows a much greater freedom of view than a conventional monitor. While moving around with a controller, you can look around at your environment using the headset. For example, I was able to look behind myself while walking forward, much as you can in the real world. Looking down I could see the inside of my space helmet and the various instrument readouts. Overall these are cool features, I’m not sure if they improve game play as much as add another dimension to it. Parts of the net are humming about this device and for £500, I expected it to knock my socks off. In reality, the graphics of “Ghostship” didn’t impress me that much. The one and only monster I encountered, looked like something from a 90s first person shooter. Realism wasn’t improved when it became stuck against the wall, walking on the spot behind a bulkhead that was jutting out of the wall. The Oculus rift is a great concept and really improves upon the early VR devices, but it still feels like a technology with a long way to go, perhaps my opinion would be different had I tried a different game. “Ghostship” looked okay, but that’s its, just ‘ok’. I was expecting amazing and for the experience to leave me in awe and wonder, wanting more. In reality I walked away thinking £500 was a little steep for what I’d experienced. While I can’t confirm this, I have read that some users are only able to use the Oculus rift for 30 minute sessions. Using it for any longer, causing symptoms akin to sea sickness. So for now I’ll stick with a monitor, keyboard and mouse setup. Not because it’s what I’m used to, but because frankly Oculus doesn’t bring enough to the table to convince me its better.
-While writing this article, I spoke to a friend who knows a little more about the Oculus Rift than myself. He suggests the game or even the model of headset could be responsible for my less than amazing experience, assuring me that with the right setup, the headset is pretty impressive.
On the subject of VR technology, I had the pleasure of trying out a 1000CS VR machine from the 90s. Powered by an Amiga 3000 equipped with some pretty expensive video cards, the unit I tried out was linked to another 1000CS sitting only a few meters away. I later discovered the game we played was called Dactyl Nightmare. Set in a multi level arena, where the aim of the game is to shoot your opponent as many times as possible before the time runs out, all the while avoiding the nasty Pterodactyls, which have a habit of swooping down and picking you up and dropping you from mid-air. I feel somewhat guilty admitting this, but I had more fun on these dated VR units, than I did with the Oculus Rift. Admittedly I have a soft spot for old technology. Anyone who follows my blog will have noticed this by now. The fact that this article is being typed out on a Tandy TRS-80 Model 100 pretty much says it all, but the truth is I did indeed find the 90s VR units more fun and I can’t honestly say why. Possibly because I was pitted against another player, who was trying as hard as they could to shoot me. If asked to choose between a 1000CS and the Oculus rift. I have to tell you, I’d be inclined to choose the 1000CS. Even with dated graphics, if you get a few friends around, I could see it being a lot of fun.
Dealers
Play Expo had the best assortment of dealer of any retro gaming event I have been to. Games, Consoles, Micro computers, you name it and it was probably there. Boxed ZX80’s, C64’s and original Playstations. The assortment of games was also staggering, I’m only too thankful I couldn’t pay by card, otherwise I might have dug a very deep hole in my pocket! I spotted a boxed pair of wireless Atari VCS joysticks going for £40, which I thought was a very reasonable asking price. However my 2600 controllers have pretty long cables already, so even though I was tempted, I didn’t really see a need. Wireless controllers are a little superfluous to my Atari setup. What surprised me the most were the prices.
At events like these, dealers sometimes will hike prices up artificially high. But for the most part, they were pretty reasonable. Even the boxed ZX81 was priced pretty well. In the end I picked up a copy of ‘X-files’ for my PSone. I already own this game for the PC, but finding a modern PC that will run it is a bit of a challenge, where as setting up the PS2 for a little gaming is pretty easy. Not all of the dealers sold computer merchandise. Some sold old 80s pocket LCD games, board games and clothing. Some even sold cosplay accessories, such as hats, swords and clothing. There was also comics and board games. The selection was varied, with something there for everyone. Having the dealers at the event was a massive plus for me, but never did I feel like it over shadowed the other parts of the event. It all felt surprisingly well-balanced.
Final thoughts
I left Play Expo feeling very positive. If indeed the event is returning next year, I certainly would jump at the opportunity to attend again. It was an amazingly fun day, packed with so many things. If you haven’t been, then seriously you are missing out on one of the best retro gaming events in the North of England.
Til next time keep on geeking!
Amiga Yam Yahoo Fail
Posted: October 9, 2013 Filed under: Uncategorized | Tags: Amiga, email, email client, yahoo, yam Leave a commentNot long ago I promised to take a look in to setting up Yahoo mail on an Amiga using YAM. How hard could it be? After all I had successfully synced my Gmail account on my A3000.
After spending the better part of a morning researching and testing various server settings. I ultimately had to admit defeat, it was true, yahoo had bested me. No matter how I tried, I could not get my mail to download and after digging some more online, it became clear why.
On April 24th, 2002 Yahoo ceased to offer POP access to its free mail service. Introducing instead a yearly payment feature, allowing users POP3 and IMAP server support, along with such benefits as larger file attachment sizes and no adverts.
As my yahoo email is a backup, this occurrence went by without me even noticing. Still I’m sorry to see Yahoo leaving its users to cough up for the privilege of accessing their mail. Though I guess it is understandable, when competing against rivals such as Gmail and Hotmail who hold a large majority of users.
So for all you Amigans out there, the answer to Yahoo mail using YAM is simple. If you want it then you will have to cough up $19 for a year’s subscription that will give you POP3 support. Otherwise you will have to use Ibrowse and log in via the web interface.
Yahoo =1 – BMV =0
Sorry guys
Amiga Yahoo Email
Posted: September 26, 2013 Filed under: Amiga, Classic, Commodore | Tags: A3000, Amiga, commodore, email, OS4, yam Leave a comment
In the next few weeks I shall be looking at setting up a yahoo email account on an Amiga 3000 and Micro AmigaOne running OS4.1
After learning recently that my Yam guide had failed a fellow Amigan, I have decided to get the proverbial finger out and cover setting up email more thoroughly.
If anyone has any questions or would like me to cover something specific, please feel free to send in a message. I would love to hear from you!
So until next time, keep on geeking!
LAG 33, Keyboards and Laptops
Posted: July 7, 2013 Filed under: Vintage Computers, Windows | Tags: Amiga, Amiga 3000, Amiga keyboard fix, Keyboard, LAG, Laptop, repair, Viglen 1 CommentWell LAG 33 was a resounding success, I attended with my trust A3000. The beige box was finally behaving itself on this occasion. With the only real issue being the darn keyboard. Honestly there seems to be running theme with my recent computer
activities, if it is not the keyboard on the Plus, it is the Amiga giving me gripe. Luckily a quickstrip down and cleaning with alcohol wipes and a toothbrush fixed the issue. Unlike the classic Macintosh Keyboard, Commodore took an easier approach using springs instead of Apple’s self sealed key switches, which made my life easier.
Keyboard Repair
(First of all do not attempt
this while your keyboard is connected to the
computer) The A3000 keyboard
comprises of two halves within the outer casing. First you have the
black top portion, containing the keys, below this is the main
keyboard PCB. The two parts are held together by a dozen or so tiny
screw and one large one. Once these are removed the top half should
lift off, be mindful when taking apart the keyboard as the caps
lock LED fell out on to the floor when i took mine apart. Once you
have the black upper half removed, take a close look at the
circ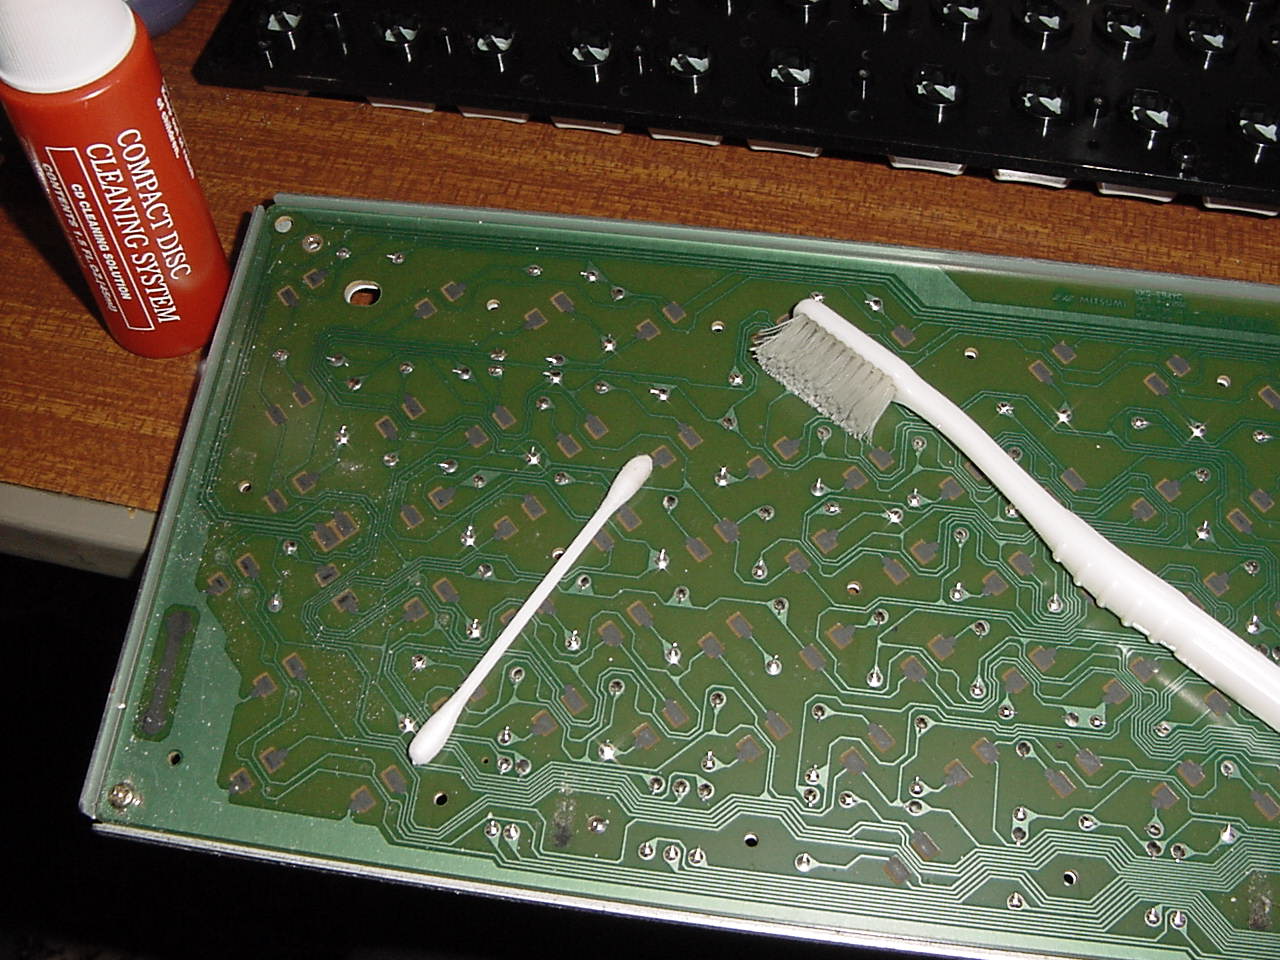 uit board below. The
chances are it looks very grubby with dust build up, so if you have
a spare toothbrush and some lens cleaner solution, give the PCB a
light scrubbing down. Also gently clean the silicon / rubber feet
that are under each key on your keyboard. If they are dirty, this
well prevent the keys from making proper contact with the PCB and
cause your keyboard to work sporadically.
Once you are
done cleaning, remember to fit the LED back in place, along with
the silicon collar. Make sure you have cleaned this too, as it
passes current from the PCB to the LED. With the two halves
together, carefully flip the keyboard over and screw it back
together. Hopefully when you hook it back up your keyboard should
be working. If you still find it is acting up, give it another
clean. I had to dismantle mine twice, the second time to clean the
silicon parts more thoroughly.
Viglen Laptop
What could be
inside?
If you are sat scratching your head
and wondering who the heck is Viglen, you are most certainly not in
the minority. When my friend Gaz handed me this little beastie at
the last LAG. I was left dumb founded at the brand and that was
even after a quick glance on Google. Which usually comes up with at
least a few bread crumbs to follow. Wikipedia says that Viglen Ltd
was first formed in 1975 by Vigen Boyadjian and later acquired by
none other then Amstrad in 1994. In the 80’s the company apparently
dealt mostly in the Acorn computer market, after Amstrad’s buy out,
the company began to focus mainly on the education and public
sector. Developing desktop and server systems.

This takes me
back
The Viglen Dossier 486 laptop has even less written
about it, the model I have is the 486 -SK4. A quick glance of the
bios tells me i have roughly 4mb ram and 120mb of internal storage.
Whats betting it is an old Western Digital or Seagate drive in
there? Originally this machine appears to have been used in the
design and production of printed circuit boards as I found several
apps for designing boards, not to mention the laptop originally
booted in to some custom designing software. Lucky for me the
previous owners had installed Windows 3.11 as well as DOS 6.22.
Eventually I intend to use this machine to test my Xircom parallel
ethernet adaptor. I bought the adaptor a little while ago to use on
the Sharp PC7200, but as that system takes up a lot of room. The
Viglen will be a fantastic DOS platform to test the hardware out
on. Internet via DOS anyone?? Well at the very least email!  Until I can find my USB
floppy drive I’m unable to test the laptop as much as I would
usually like to. So expect a follow up article about this obscure
laptop and also the whopping battery that sits beneath the
keyboard! As expected the cells are long dead and a replacement
will probably cost a small fortune. Instead I’m going to hack
something together, which will be an article all to it’s own.
Lincolnshire Amiga Group 31st Meeting, repair, repair and game
Posted: March 4, 2013 Filed under: Amiga, Commodore, Uncategorized, Vintage Computers | Tags: A3000, A3000 psu fix, Amiga, Monkey Island 2 CommentsSaturday saw yet another congregation of the Lincolnshire Amiga Group, 11 people where able to make it this time round, which isn’t a shabby turn out at all.

“Nothing says Amiga more then Monkey Island”
While my girlfriend took along her trusty A600 for a session of point & click adventuring, I’d brought along my Amiga 3000 still needing attention and my micro AmigaOne with freshly installed 512mb SDRAM. This time around it finally seemed to be working, unlike last time, when the ram I bought produced errors while surfing the net. Just as I had been warned, the Au1 is a picky little bugger when it comes to ram. Hopefully this time I’ve found a stick of SDRAM that will work. While sitting beside my GF who was enjoying a game of Monkey Island II, I realised after all the time spent setting up the Au1 so that it was working with all the right apps, had completely neglecting the subject of games. This left me sitting at LAG without a game to play. Luckily I had packed my A1200 which had one or two games on the HDD, “UFO: Enemy unknown” being one of them and also one of my favourite Amiga games. Ok I might keep getting wiped out by the Aliens, but there’s something about the isometric game which I find very appealing. I’ve tried playing other newer incarnations of the game, but frankly nothing beats the original for me.
One of the reason I had took along the A3000 was in the hope Gaz would be able to give it a looking over. The man knows a heck of a lot more than I do about the A3000, not surprising when I’ve hardly had one more than two years. In anticipation of meeting up with him, I had printed out the pin configurations for the A3k. My plan was to return the A3000 to its stock settings and then slowly add hardware a piece at a time. Getting it to even boot would be a result, given it would turn on and display nothing at all, except a blank screen!
The last time the A3k had worked, was prior to installing an A3640 processor card and a brand new ZoRAM 128mb card. After installing the two cards, the power supply in my aging A3000 finally decided it had enough and decided to pop, perhaps taking offence to being asked to power more demanding hardware. A bright spark and puff of smoke and the PSU was toast, leaving me with a major problem. Where  the heck was I meant to find a replacement? I couldn’t really phone Commodore for technical support. Fortunately I was in luck, some boffin had worked out how to use a modern ATX power supply in an A3000 and A4000. Glancing at the how-to, it was unlike any project I had taken on before. Now I will take on most things for the hell of it, but playing about with the guts of 240v power supplies and transformers just makes my spider sense tingle. Thoroughly convinced I was going to electrocute myself or fry my Amiga. I spoke to Gaz, who was more than willing to help me rewire a PSU at the next LAG. In the mean time I found a mini ATX psu, the sort found in Compaq and Dell compact office computers. By all counts, it looked like it would fit inside my existing A3k PSU casing, which would keep the Amiga looking original.
After a lot of help from Gaz, the new PSU was up and working, with only a few wires left for me to tidy up, the more hazardous work having been done already. Installing the new PSU in the A3k, I was actually rather nervous, the explosive memory of the old PSU was still in my mind. So I donned a set of insulated gloves before switching the A3k on. With a whir of the fan and a blink of the front LED the Amiga powered on. Except it wasn’t booting from the hard disk drive or posting an image on the screen. Something was up and this time it wasn’t the power supply.
Now we fast forward to LAG 31, remember I wasn’t playing games? Right well instead of a romp of Monkey Island 2, I decided more fun would be had taking the A3000 apart, because that just how rock and roll I am!
Dragging Gaz away from his machine and sitting him in front of the A3000, I explained what I’d done so far and my plan with the jumpers. The print out really wasn’t needed, as he poked his head in the Amiga and adjusted most of the jumpers from memory. See? I told you he knew more about the A3k then I did, any doubters should get to the back of the class.
Switching on the machine I held my breath, a few moments passed then finally the screen came to life! Hurray! My Amiga was alive! It had narrowly dodged becoming a glorified paper weight on the shelf. One after the other we slowly installed the zorro cards until the machine was up and working with my Picasso II video card, X-surf network adaptor and 128mb ZoRAM memory expansion. The new psu was handling everything that was thrown at it, in addition the inside of the Amiga looked no different to any other A3000, aside from a few shrink wrapped wires. Overall I think this mod / repair scores an awesome on my fix-o-meter!
A big thank you has to go out to Gaz for all his help, Rockape for the A3640 and several guys on the Amiga.org forum, who kindly pointed me in the direction of the jumper settings for the A3000 motherboard.
(Written on an Macintosh Plus with 4mb ram & 500mb Hard disk.)
Retro Tinkering In 2013
Posted: January 4, 2013 Filed under: Classic, Commodore | Tags: Amiga, NDS, Nintendo, PS3 repair, Winuae, wordperfect 2 CommentsHAPPY 2013!!
First of all, let me wish you all a happy new year! Hopefully
like me you’re recovering from Christmas and want to get away
from turkey sandwiches, chocolates, funny paper hats and reruns.
Never one to sit around twiddling my thumbs, I’ve found myself
with 2 Sony Playstation 3’s to fix, as well as 2 broken Nintendo
DS consoles. Now why should I be excited about that? Well I was
given a pink NDS a year ago, with the understanding it would get
swapped for a black one. Sadly that didn’t happen and I’ve hardly
touched it, I just don’t like pink, green, blue, red, black yes!
but pink? Not so much. So one of these broken NDS’s happens to be
black! it has a minor crack on the left hinge, but nothing a bit
of superglue wont fix. So hopefully I shall be covering
dismantling the NDS and swapping the cases.
The two PS3’s are both suffering from the yellow light of death,
which means they needs stripping down and the heat gun applying
to them. This wont be the first time I have done this, but it
shall be the first time I covering it in a BMV blog.
Last but not least, there will be further coverage of the
Raspberry Pi and getting it to run arcade games. Some of you who
follow my blog, may have read about the Picade. Certainly a fun
project for this tiny computer, but not the last. There are
dozens of projects this Raspberry Pi can be put to. It’s just a
matter of thinking it up.
So till the next blog, keep geeking!
As I’m currently I’ll with the norovirus, I’m going back to
playing on the Amiga CD32 and feeling sorry for myself.
Written on wordperfect with Winuae.
