
Psion II LZ Repair
Posted: December 14, 2018 Filed under: Handheld, Uncategorized, Vintage Computers | Tags: LZ64, organiser, psion, psion II, Psion LZ, repair 3 Comments

I thought I would post this sooner than later, as this is something I’m presently working on.
For those who might not be familiar, the Psion II was an early form of pocket organiser produced and sold by the British firm Psion. During its lifespan the organiser went through several versions. Beginning with the CM, a very basic unit with just 8kb of memory and ending with the top end LZ64, which has a 20 column 4 row display as well as whopping 64kb ram.
As part of an ongoing series of pocket computer reviews I’m writing, I have covered several models of the Psion II. Sadly the LZ64 suffers from a persistent and quite irritating whistle, which I believe comes from aging capacitor.
Today I removed all but two of the nine electrolytic caps inside my LZ in a bid to rid my unit of the blasted whistling. Here you will find some info on the capacitors I removed and their location on the PCB. If you own an LZ or LZ64, this information should be useful. As always the same rules apply, you repair your own gear at your own risk. If you set your shirt sleeve on fire, pour hot coffee on the cat or fall out with the postman, you can’t blame me! I’m simply providing this information as is. Hopefully it will result in a silent LZ, except for the for the odd beep and click of course!

Fig.1 A single screw holds the top PCB in place
After you’ve removed the screws and popped open your Organiser, you’ll find the motherboard screwed to the front half of the case. Laying the device face down, unscrew the top board which is held in place by a single screw (see fig1).
The main logic board is still connected to the keyboard via a ribbon cable just behind the pins for the ROM slots. This cable is pretty stiff and will take some gentle persuasion so as to bend the logic board up enough to remove the screws holding the keyboard PCB to the front case.
Once you have the boards removed turn them over so you can view the logical board the right way up. Remember to handle the two PCB’s with care, after all they are 30 years old and tend to be delicate.

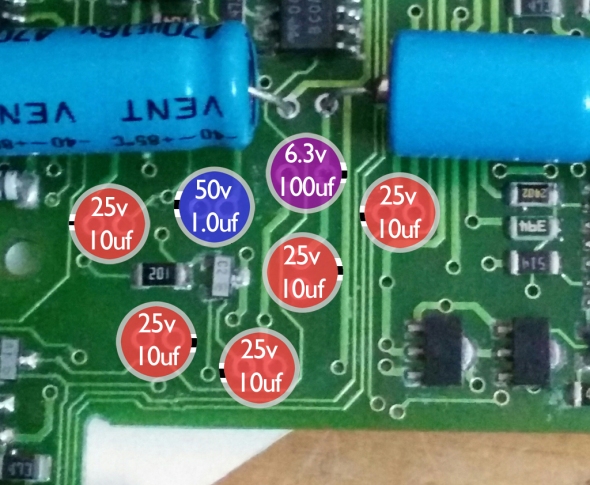
You should now see something similar to fig.2. Note the already exposed pins below the cluster of caps, this is because one of the 25v 10uF capacitors has already been removed from the board.
Using an already warm soldering iron, I removed each cap, recording their values as I went along.
Of the seven radial electrolytic caps, the LZ has;
5x 25v 10uF
1x 50v 1.0uF
1x 6.3v 100uF
For now I’m leaving the two large axial caps in situ, as I want to try the LX with radial caps replaced but the axial caps remaining. If the whistling persists this might indicate which caps are the culprit.
Until the new caps arrive there isn’t much more I can do, so I shall leave you with this pretty diagram, which shows the values and orientation of each cap.
-Keep on geeking!
Palmtop and Palm PCs Part One
Posted: December 8, 2018 Filed under: Handheld, Uncategorized, Vintage Computers | Tags: 200lx, dos, hp, palmtop, pocket pc Leave a comment
image courtesy of http://www.200lx.net
Whether you owned one or lusted after them on the shelves at Tandy or Dixons, during the late 80s and throughout the 90s, the personal assistant (or PDA) reigned supreme to anyone after a portable computer but not wanting spend the hefty price tag of much larger, more powerful laptops. Covering the history of these devices would cover more than a fair few articles alone and is a little beyond the scope of what we are going to do today.
Last year I was lent a Hewlett Packard 200LX by my friend Darren, who thought I might get a kick out of using this tiny DOS compatible palmtop. As it happens, he was right. Playing around with the 200LX has been interesting to say the least, even leading to the purchase of a Psion 3a for my own personal use.
The HP boasts a chiclet keyboard similar to those found on calculators and industrial equipment and features many of the same functions found on modern keyboards today, such as functions keys and a numerical keypad for quick data entry.
While using the HP, I have to admit I’ve held something of a love/hate relationship for the keyboard. In the beginning I struggled to type on it with any proficiency, often mashing the keys with my apparently podgy fingers. Only by the second week did things begin to change and suddenly I found myself typing with relative ease. I’d still occasionally catch the wrong key but overall I could turn out text at an acceptable pace. I wouldn’t say the 200LX is the best device for writing, blogging or any decent jaunt of typing for that matter. As a note taker it isn’t half bad, but to be honest there are better options available, but we’ll get in to that later.
The QWERTY keypad takes up roughly a third of the physical width of the device with a numerical pad occupying the remainder. What you’re left with feels awkward and slightly squashed to use. I can’t help thinking this might have been avoided had the designers simply used a full size keyboard, assigning the number pad down the right side, accessible via an FN key, a feature that was not unheard of in the late 80s and which is still used by laptop manufacturers today.

image courtesy of www. keesvandersanden.nl
Setting aside my issues with the keyboard, the 200LX is actually a very capable portable PC or as it was known back then, IBM compatible. Written in gold above the screen is reads “Palmtop PC-2MB RAM”, that isn’t a gimmick or HP trying to use some fancy words to make the 200LX sound better than it is. The 200LX is as much a PC as any IBM XT, running DOS 5.0 on an 80186 compatible HP Hornet CPU. You can run a variety of DOS programs ranging from early DOS versions of Microsoft Word & Wordstar, extending even to a few old CGA games. Just don’t go expecting Wolfenstein or Doom, as I honestly struggled to get much more thank Zork to work for me. Sadly the display on the 200LX doesn’t lend itself well to fast moving graphics, ultimately suffering with motion sickness inducing screen blur. That being said, it doesn’t mean you can’t have some fun with the tiny computer, just so long as you work towards the machines strengths and not its weaknesses.
It’s due to DOS support that the 200LX, as well as the 95LX and 100LX are still popular today. Should you happen to own industrial equipment such as a CNC machines that uses DOS specific software to input data. A HP Palmtop might offer a compact, inexpensive means of communicating with your machines without the need of a bulky desktop computer or laptop. In addition both the 100LX & 200LX are capable of reading from compact flash adapters through their PCMCIA ports, making it easy to transfer files to and from the device without need of the data cable.
The 200LX also comes equipped with an IR port, offering the latest in 90s wireless data transfer. By today’s standards the baud rate is lacklustre and you’ll be hard pressed to find much to interface it with. There were some compact infra red printers manufactured back in the day, which I believe will link up to the 200LX.
Overall the 200LX has some good points about it, which include
-Decent Display
-Long Battery Life on 2xAA batteries
-Built in DOS 5.0
-PCMCIA port
-Rugged design
Software
The 200LX comes packed with an impressive list of built-in applications;
- Appointment Book
- Application Manager
- Database
- Filer
- HP Financial Calculator
- Lotus 1-2-3 release 2.4
- Memo Editor
- Notetaker
- Pocket Quicken
- Phone Book
- World Time and Stopwatch
All of which does not include any software you can choose to load from compact flash. Aside from all the available DOS software you can run, there is also a library of HP specific titles to install. Once loaded in to the memory of the 200LX, there it will remain until such time as it is deleted or the device is reset. Access to a limitless DOS library obviously has its advantages, which makes the Palmtop such an appeal device.
Taking all that in to account you could be forgiven for overlooking some of the devices other failings. Were you looking to buy one today, the 200LX still retains a relatively high asking price as a bit of collectable retro kit, valued anywhere between £50-£140.
Personally I’d find it hard to justify paying more than £60 for one of these devices, as great as they are, there are better examples of pocket sized computing. In fact while I was writing this article I discovered they addressed my issues with the keyboard in a later model, doing pretty much what I had suggested. Other companies such as Atari, Amstrad, Psion, Sharp had devices which rivalled the HP Palmtop PC. While some were less compact than others, each took a stab at offering portable computer for users on the go. Only a few however offered you an IBM compatible computer that fit in your inside coat pocket, fewer still did it as well as HP had with the 95LX and later models.
Stay tuned for the next part of the article, when I take a look at another pocket portable, the Psion Series 3.
Keep on geeking
Atari Lynx Screen Mod By McWill
Posted: April 21, 2017 Filed under: Atari, Classic, Handheld, Retro gaming | Tags: Atari, Lynx, mcwill, screen mod, screen replacement Leave a comment
The Atari Lynx arrived on our shelves 27 years ago in the winter of 1989, only two months after Nintendo released the Gameboy and a year before the Sega’s colour handheld the GameGear saw light of day. Featuring the first backlit colour screen on any portable gaming device, the Lynx boasted accelerated 3D graphics.
Developed by former Amiga designers R, J Mical and Dave Needle, the ‘Handy Game’ came about after former Amiga manager David Morse approached them about designing a portable gaming system for Epyx. In 1989 faced with financial difficulties Epyx found itself partnered with Atari Inc, who agreed to handle production of the ‘Portable Colour Entertainment System” leaving Epyx to handle software development. Between 1989 and 1995 the Lynx was reported to have sold 3 million units world wide, but ultimately failed to beat the Gameboy even though technically superior in many ways. The Lynx is a fantastic system to add to any collection with 72 games released officially, varying from run of the mill to great titles like Chip’s Challange,

Lines the bane of any Lynx owner
Todds Adventures in SlimeWorld and California Games. However like most systems from this time its not without problems, the most predominant of which is screen failure. Usually this appears first as one or two lines running vertically or horizontally across the screen, more follow until the display is unusable. The root cause of this is the ageing ribbon cable that links the logic board to screen, over time becoming fragile and brittle. As it is an integrated part of the LCD display the only way in which you can cure the fault, is by swapping to screen for a new one. Which wasn’t a problem back when the Lynx was new, but in 2017 you might be faced with a problem, that is until now.
A Proper Solution

Stock screen looking less then great.
On AtariAge back in 2015 a user by the name of McWill came up with an interesting solution to solve the problem that had been plaguing so many Lynx owners. By developing his own custom display board he was able to replace the old failing screen with a modern LCD which not only offered superior picture quality but an optional VGA out. Unsurprisingly the board was an absolute success with Lynx owners far and wide, who finally had the means to repair their ailing consoles. Last year I was lucky enough to buy one of McWills kits, the board requires some self-assembly and a reasonable understanding of how to solder is needed. McWill does offer and installation service for those who don’t feel confident installing the kit by themselves. I was completely blown away with the image quality, which is ten times better then the original 90s LCD. The picture is sharp and the back light more linear, the full screen is now illuminated and gone is the incandescent tube glow of the original florescent light. The new screen uses modern EL technology which has come on leaps and bounds from when the Lynx was originally released. Ghosting and trailing has been significantly reduced, if not illuminated compared to the original 90s screen. If like me you’re accustomed to viewing your games on the old screen, seeing them for the first time on the new one can be a pleasant if not slightly shocking experience. I was honestly left wondering how the heck I’d managed for so many years without McWills screen mod.

McWills screen, there’s no denying the difference.
Priced at around 100 Euros the kit isn’t cheap however if you figure in the fact you’re getting a custom printed PCB and LCD its actually not bad value for money. The PCB is well made and laid out easy enough for even the budding amateur to follow. However the single sheet manual could have been written a little better as I stumbled to following it wiring to the TPR solder point. The wiring for this can depend on your model of console and what I didn’t know at the time was that I needed to close a jumper on the custom PCB. Labelled in small print as JMP1 in the printed manual its easy to miss and nowhere else is it referred to by this name. For instance here is an excerpt from the instructions.
‘For LYNX-II with chipset 1 (C104129-001) you have to use TPR (testpoint 27) only. For using TPR jumper is closed, for using RES jumper is open !’

Well laid out, McWills screen mod is relatively easy to install.
The instructions feature several diagrams with all the solder points labelled with names such as GRD, TPR, RES, CL2. I’m not entirely sure why the solder point is referred to as ‘Jumper’ and not JMP1, but it definitely threw me and I was left poking around the board until I consulted AtariAge. There I thankfully discovered I wasn’t alone and others were also being thrown by the same issue. This isn’t to say the manual is bad because it isn’t, only that it could probably benefit from a slight bit of revision to prevent others from getting stuck. Fortunately Marco aka McWill is a very helpful and friendly chap and after shooting him an email I was back on track.
Assembly will probably take you a couple of hours and I certainly advise taking your time and not trying to rush it. Some of the soldering can be fiddly, especially when it comes to attaching wires to the display pins on logic board. Using a fine tipped soldering iron is highly advisable. For wiring I used a good old trusty IDE cable, fine enough to fit on the small traces and flexible enough that i can manipulate the screen and board without working loose a connection. You will need to remove seven components from the main logical board before you can begin hooking in the new screen. You may also have carry out a 5 Volt check after removing the require components, so as to make sure the board isn’t exceeding 5.45 volt.

A fine tip is your best friend when soldering these pins
According the instruction the screen mod also has the ability to emulate the scan line effect of the original Lynx display, however I’ve been unable to get this to function. Not that I think I would really use it as the crisp look of the new display is pleasing enough and the games simply look amazing. If your Lynx is looking a little tired and you fancy giving it a face lift, I highly recommend getting one of McWill’s kits. While admittedly pricey, it will likely out live the life of the Lynx itself and beats replacing one old screen for another. As it’s only a matter of time before the ribbon cable degrades and your left looking for yet a replacement from a donor system.
Until next time, keep on geeking!
A Hand Held Console That is Modern ‘ish’ & Battery Revival
Posted: June 18, 2015 Filed under: Handheld | Tags: batteries, battery repair, dead psp battery, psp, psp 2003, retro gaming, sony, Sony PSP Leave a comment
A few months ago, I came in to possession of a Sony PSP otherwise known as a PlayStation Portable. Released in 2005, this handheld console boast graphics comparable to the Playstation 2. Perhaps the best way to think of the PSP is actually to imagine it like a PlayStation 1.5, sitting somewhere between the original PSx and PS2. Graphically the PSP seems significantly ahead of the Nintendo DS, which is no surprise as Sony designed the handheld to more powerful then the competition. Comparing the two handhelds is almost like comparing a PSone with an N64. However, as many N64 owners will point out, raw processing power doesn’t automatically lead to great games. The NDS has many hidden gems and with such an impressive list of titles it should not be overlooked. One particular favorite of mine is “Dragon Quest IX: Sentinels of the Starry Skies”, in my opinion this games shows the NDS at it’s best. The graphics and sounds are fantastic and the story is engaging, what more can you ask for?
Because I’m fan of RPG’s, I was eager to see what the PSP had to offer and as I’d never owned one before, this would be fresh new territory. The PSP boast an impressive library with a good number of quality role playing titles. The first game recommended to me was “Persona 3 Portable”. This game is unlike anything I have played before, more like an anime movie then a computer game. I couldn’t get over the feeling that I was playing some sort of visual manga novel. It is by for one of my favorite PSP games to date. I understand the Persona series began on the PS2, perhaps one day I’ll have to look in to this.
Support for the PSP ended in 2014, its replacement the ‘Vita’ apparently is not doing as well as Sony might have hoped. At least that is what I read from various quarters online. Now 10 years old, the PSP is a good retro console for anyone to start out on. Not to mention it has PSx compatibility. So you’re getting two machines in one, hows that for a deal! You can still buy accessories and will be able to do so for some years to come, games are plentiful and reasonably priced. All though some games are already seeing premium price tags.
Batteries
I’m dedicating a section of this article to batteries, as I recently had a nasty experience with a replacement I bought for my PSP. If you’ve recently bought a second hand PSP or just in the market to replace your tired stock battery. Buyers beware, finding a good replacement battery for your PSP online can be a little hazardous. Especially if the extended 2400mah or 3600mah batteries caught your eye. Many of these are either fake or cheaply made. But as Sony no longer sell baatteries for the PSP, third party batteries are pretty much our only option. The first thing you should do, is check reviews, buyer feedback. Be it Amazon, eBay or where ever your thinking of buying from, it pays to check if other people have bought the same item and what their experience was. If in doubt, join a forum like Gamesfaq and post a question or asking your friends. The first battery I bought didn’t fit my PSP 2003, even though the item description said it did. The second battery I bought, fit but didn’t charge or power my PSP. At least not until I discovered I could get it working by pressing the battery down with my thumb. After several days use, the PSP still died while I was using it. This is apparently a known problem with using clone batteries.
Reviving a clone battery
If you’ve already bought a clone battery and it has died, this might help. If not, there is a good chance you will face this problem while using a third party battery in your PSP. If your battery has stopped charging, being recognized or simply fails to power the console, then the following method might help.
Method 1
(Warning, the following should only be carried out by a competent adult. I take no responsibility for the results. By continuing to read you accept the dangers, so if your PSP sets on fire or your underpants explode, it’s on your own head.)
This method fixed my 3600mAh battery after it died without warning.
Get two thin pieces of wire, bare the ends so that the metal wire is exposed. Then insert one wire down the + connector of the battery and the other wire down the – connector. Briefly touch the two wires together, you might see a spark if your battery holds a charge. Do not leave the two wires joined for longer then a couple of seconds, as you are shorting your battery. By doing this, you should have reset the circuit inside the battery which holds data on charge capacity. Remove the wires and try the battery in your PSP, hopefully it will start charging.
Method 2
Instead of shorting the two wires, you will need to find yourself a low voltage light bulb, such as one from a battery powered torch, internal car light, I’ve even read that Christmas tree lights work. Another alternative is to use an internal computer fan, if you have one lying around. Remember your PSP battery is rated at 3.6volt, so don’t try using a 12v fan as your risk burning out the battery. The key here is to hook it up to your PSP battery and run the battery down until it is fully discharged. Then place it back inside the PSP and hook up your charger, hopefully your battery will be recognized and you will be back in business.
S9920 Star Alps Update
Posted: August 8, 2014 Filed under: Android, Handheld | Tags: digitiser, fix, phone, repair, s9920, screen, screen fault, star alps 2 CommentsThe procedure described below could cause unrecoverable damage to the s9920, by proceeding you are accepting full responsibility for any damage, loss of limbs, exploding sheep that might occur. In other words don’t blame me if it doesn’t work!

S9920 Repair Update
A while ago I wrote an article regarding S9920 handset, covering some of the short comings of the S3 Mini clone. I have to say since I writing that article, I have received messages from several of you. Many asking if I had figured out how to fix the phone and where to source spare parts. Sadly I wasn’t able to offer much help. Aside from a few threads regarding rom’s, there isn’t all that much on-line covering this device.
After writing the article, not much has happened. The phone has sat in my desk drawer awaiting its fate.
So what has changed you ask? Well recently I did a little on-line research, to find out whether anyone had figured out a way to resolve the problems with the S9920. Namely the ghost touching, which almost renders the device useless as a phone. As it transpires, there might actually now be a fix.
The information I found wasn’t posted one any forum, nor was it that easy to find. In fact when I came to write this article, it took me almost 30 minutes of retracing my steps before I found the original source. So if you’ve been looking recently and not found anything, seriously don’t be kicking yourself, it’s easily done.
The original author of the fix, user “Speedylaci”. Believed the fault with the touch screen resided in the cable connecting it to the logic board. More specifically two solder points, which they believe are weak and causing a bad connection. They suggest disassembling the device and reflowing the two points. Other posts I have read suggest using a small amount of glue to fix the digitisers connector down on to the logic board. After some users observed the connector comes off too easy and could contribute to the digitisers odd behavior.
If you have not performed or read about the fix previously described on ByteMyVdu, now might be as good a time as any to check out the following link and familiarise yourself with it. Needless to say the fix outlined in the aforementioned article did not solve my problems. So reading about another possible means to fix came as welcome news. Better still that it is a very easy repair to perform.

Fig.1
Following the instructions from my previous article, unscrew and remove the back panel of the phone. This should now leave you with the PCB and camera module exposed (see fig 1). Above the power button you should see a small cable connected to the motherboard, this is the connector for the LCD which needs securing in place. It is up to you how you do this, some people have used glue, others adhesive tape. If you decide to use glue, keep in mind that too much could irreparably damage the phone. The last thing you want to do is gum up the connector and prevent it from making a circuit. A little glue on the outside between the connector and the cable should be fine. Leave it to dry before re-assembling the device.
With a little luck this might improve the digitisers performance, it certainly can’t make it any worse. My handset had been sitting in my desk drawer for over 6 months, so I didn’t care whether it worked or broke the phone even more. The fact is I’d written off the S9920 long ago, so bricking the phone really didn’t worry me. If this is something you’d rather avoid, then I suggest you don’t perform the procedure above. Having performed the fix on my handset, I sadly can’t tell you if it solved my problems or not. The screen has not acted up since doing the repair, but given that the fault occurs randomly, only time will tell.
Keep on Geeking!
Ref: http://www.needrom.com/mobile/star-s9920-official-rom/comment-page-3/#comments
Star / Alps S9920 Screen Repair
Posted: January 14, 2014 Filed under: Android, Handheld | Tags: alps, digitizer, repair, s9920, screen, screen fix, star 9920 15 CommentsIs Your Phone Acting Up?
A week ago I wrote a review of the Alps / Star S9920, in which I highlighted some of the highs and lows of buying this popular S3 mini clone. Shortly after after writing the article I began receiving messages from fellow S9920 owners, who were also struggling with their devices. While I still don’t have a solution to all the problems that have been put to me (and I did look) there just isn’t that much documented on the S9920. This isn’t much of a surprise, when you think of the number of phones that come out of China. Unlike major brands such as Samsung, HTC or Apple, Alps constitute but a footnote in the Android device market.
In this article, I’ll try to address one of the main issues experienced by users of the S9920: ghost touching. It manifests itself in the form of icons randomly selecting themselves without the screen ever being touched. This fix may also help with some of the other problems associated with the digitizer / screen on the S9920.
Before we begin, I must stress that this is a very tricky fix and requires you have a steady hand for soldering. I would only recommend you attempt this fix after exhausting all other avenues. Make a mistake and you could very well damage your phone beyond repair. Know that you do this at your own risk, and I cannot be held responsible if you kill your phone. With the disclaimer out of the way, let us continue.
The Phone Blues
A month after receiving my phone, the tell tale signs that something wasn’t quite right, began to emerge. Sometimes I would pick up my phone and the screen would not register my finger swiping the screen, while on other occasions the phone would act as if it had been possessed, randomly opening apps, usually located at the bottom right of the screen, close to the back button. The only way I found to make it stop, was to place the phone on a flat surface and run a finger firmly across the screen, directly over where the back button icon is located.
A few minutes doing this and the phone usually would begin to act normally. However these bouts of the ‘crazies’ were becoming ever more frequent, making the phone very unreliable for daily use. After contacting Dracotek, the company I bought the phone from. I explained the problem I was having with the phone and their representative kindly offered to replace the faulty handset. This really is a Chinese company with good customer support, in fact the best I have encountered. Generous as the offer was, after reading all the articles I could about the S9920, I realised that a replacement would only delay the inevitable, as the S9920 clearly has an inherent flaw in regard to the touch screen. After making sure I had a back up phone, I decided to try out a suggestion I found online while reading up on the S9920. This involved carefully disassembling the phone, detaching the screen and removing the motherboard. Then, with a fine tip soldering iron, reflowing several points on the rear of the board. Without any photos to go on, this possible repair was really a shot in the dark, but I decided I to give it a go.
Things you will need:
To perform this fix you will require:
1x 25watt soldering iron
1x Set of Phillips screwdrivers
1x Small flat screw driver or plastic separating tool, as used in opening iPods
Disassembling your S9920
First make sure your phone is turned off, then remove the back cover and the battery, place them to one side. Next using a small Phillips screwdriver, remove the eight screws from the rear of the phone. The bottom right screw is covered with a white sticker. By breaking this you will void the warranty of your device, which means you won’t be able to return your phone, so be certain that you wish to continue.
With the screws removed, pick up the phone and examine the edge. You should see a series of small slots, this is where you will need your small flat headed screwdriver. Start by inserting it into these slots and gently prying the plastic apart. The back and front of the phone should gradually come apart. With the back removed, carefully unclip the two connectors indicated in the photo. These are for LCD screen and front facing camera. Before you go lifting out the motherboard, you will need to un-stick the power and volume buttons. First remove the plastic buttons that cover them. Underneath these are the switches, held in place with sticky back tape. Using a flat blade screwdriver, pry them away from the case. Remember be careful, replacement parts for the S9920 are scarce on the ground. Once you have them unstuck, lift the board up and away from the front case. You should now have the three parts of the phone laid out in front of you.
  The black rear shell, logic board and front case, which includes the LCD screen (See picture). Don’t lose the plastic home button, located at the bottom of the front case. Turn the logic board over so it looks like it does in the picture above. Now gently remove the yellow tape covering the solder points. There should be one large square at the top of the board and a smaller one at the bottom for the hardware button.
A steady hand will be needed for the next part. Using a fine tipped soldering iron, heat up the contacts you uncovered from under the tape and ONLY those. Don’t spend too long with the iron on the board, you only need to warm up the solder enough for it to reflow. You should be able to see it happen. The solder will visibly change in appearance, becoming shiny.  The contacts pictured above are very fine and tricky, take your time and try not to rush. Once you have done these, finish off by reflowing the contacts you uncovered on the bottom half of the board.
*Additional note: After I reflowed all the contacts, I took a Stanley knife and scored the board between the tracks, just to eliminate the chances of bridges between the lines. You can do this as well if you wish, simply use a sharp blade and run it down between the contacts your have reflowed. Make sure you do not score the brown ribbon cable, it is fragile and will not react well to sharp blades.
Before you reassemble the phone, take a look at the board containing the hardware buttons (see picture). On my S9920 this narrow board was not sitting level, which meant it was not aligned well with the front case.  This could easily have attributed to the problems I was having with the back button. The board is stuck down with double sided tape, but can be lifted off by sliding a something under it. Apply a little pressure with a flat bladed screw driver or Stanley knife, be careful as the board does flex and you do not want to snap it. Once it is unstuck, carefully reposition it and press it down, the tape will keep it in place. You can see how mine was slanted in the photo.
Well done! You have done the fix and hopefully your phone should behave a little better. Now you can carefully begin reassembling your phone. You can do this simply by reversing the process of taking it apart. Remember to be careful of the screen and camera cables as well as the volume and power buttons. Remember to place the home button back in the front case before you replace the motherboard.
Update
So it has now been five days since I took my S9920 apart in a last ditched effort to get the phone performing properly, specifically the screen. I’m happy to report the repair seems to have worked! So if your screen is acting up as described above, this fix might and I must emphasis might! Restore your phone to normality. I was dubious as to whether reflowing the contacts have any effect, but it has. I can only conclude the traces on the board are simply not very good or perhaps scoring the board as I did, isolated the tracks and stopped any bridging that might have been occuring.
That’s all for now folks, keep on geeking!
Review of the Star / Alps S9920 Android Phone
Posted: December 23, 2013 Filed under: Android, Handheld | Tags: alps, android, S3 mini clone, s9920, star 7 CommentsLast November I found myself in need of a new smart phone, having opted for a sim only contract with “Three”.
Looking for a new phone is like shopping for any new device, if you don’t do your research, your taking a gamble with anything you buy. Which is why I spent several weeks simply researching Android smart phones. My budget wouldn’t stretch to a new model from any of the main brands, such as Samsung, HTC or Sony. So I was left to choose between a 2nd hand model or at the android phones being produce in China’s Shenzhen district. Most of which are clones of popular brands, iPhones, Samsung S3’s and Galaxy Tabs to name but a few. Admittedly, not all of them are good. It has only been in the past couple of years the quality of these clones has begun to resemble anything respectable. Usually these devices require a great deal of hacking before they can be usable. Which brings me to another issue. With almost any generic droid device you buy from China, support from the manufacturer is near on non-existent. More often the only support you will find, comes from online forums and user groups. That is so long as the device you have is popular enough to have a large user base.
Choosing A Smart Phone
While eBay is a great site to see all the handsets available, it does not really offer any insight to whether a device is good are bad. Which is where Amazon really does pick up the slack and offers a good alternative. From toasters to curling tongs, Amazon has amassed a impressive collection of user reviews for almost every device available via its website.
While I was looking my eye caught sight of the Star 9920, also known as the Alps S9920. Essentially a Samsung S3 Mini clone, the S9920 boasts the following specs.
-Dual core MTK6577 1.0 GHz CPU
-512mb ram and 4Gb Rom (2.5gb usable)
-GPU PowerVR SGX 531
-4” Capacitive Touch, TFT Display, 260K colours, 800×480 resolution
-Camera 5 MP 2560×1920 (Up to 12.0MP interpolation 4000×3000)
Price £72.99
Compared to the Samsung S3 mini which has
-CPU 1 GHz dual-core Cortex-A9
-1GB Ram, 8/16 GB Rom
-GPU Mali-400
-4” Display Super AMOLED capacitive touchscreen, 16M colors, 480 x 800 pixels
-Camera 5 MP, 2592×1944 pixels, autofocus, LED flash, check quality
Price £171.93
The S9920 may not compete with the S3 mini, but for a sub £100 smart phone. The specs offer good value for money to anyone who can’t afford the real thing. As I found myself in such a situation, I decided to order one from Amazon, after reading the reviews left by previous customers. I decided to buy my device from a company called Dracotek, who appeared to have developed a good reputation for delivering on time and offering good customer support. Something I later would later come to appreciate, after my first handset arrived with a paint defect. Dracotek happily replaced the device and had another out to me within a week.
Hardware
The S9920 is ready to use out the box, it comes with two sim slots, but only the full size, secondary slot is 3G compatible. I had some issues with my 3G, which I later discovered was down to my sim being old. Three kindly upgraded my sim for free and I was soon experiencing faster 3G connectivity.
The S9920 apparently comes with a stock install of ice cream sandwich 4.1.1, however there is evidence to suggest it is actually ICS 4.0, which has been hacked to report a false version. Th version number isn’t the only part of the OS to have been altered. While using the S9920, I have noted missing menu’s and features, that are stock to ICS, but appear to be missing from the install on this phone. The built in music player and camera are an improvement over the stock apps on my HTC Wildfire S and perform pretty well.
Camera
For a sub £100 phone, the camera is not too shabby. In the time I have had the S9920, I have used the camera a fair deal and found the pictures more then adequate for Facebook, I wont be replacing my digital camera anytime soon. One of my first mistakes was to ramp the settings up to 12 megapixels, BAD BAD idea! The S9920 has a 5mp lens, interpolating pictures taken at higher resolution such as 12 megapixels. This results in images that are washed out, blurry and generally pretty poor quality. Even the Apple Quicktake 150 I reviewed recently, would laugh at them. Really do not use the 12mp setting, unless you want photo’s that look like a 90’s digital camera took them.
Display & Touch Screen
The display is pretty reasonable and I would say on par with my Wildfire S. Pictures are crisp and web browsing is a pleasant experience. The touch sensitivity is a little off, which can lead to typo’s and occasional bouts of phantom screen presses. This will manifest with the phone randomly acting like a part of the screen has been pressed when it has not. Causing text to be selected or buttons to be pressed. I’m not entirely sure why this happens, but you can bet it has something to do with the screen being constructed of plastic and not glass. I’ve notice after a months use, the phantom screen touches seem to be happening more and more often.
The screen seems hypersensitive to finger grease and as there is no calibration tool in 4.1, you can’t adjust the touch screen. The only way I found to make typing easier, was by installing the Google keyboard and enabling the gesture typing feature.
WIFI & Network
Occasionally the wifi does not connect to my router straight away. I think this is more a bug then a hardware problem. Also sometimes when I make a call, on connection the sound will be distorted and garbled. This is something I have had to put up with while on the Three network, but occurring with greater frequency since I switched to the S9920. Overall both wifi and antenna functions work fine 95% of the time.
Calling and Haptic feedback glitch
Now here is a real sore spot for me, that was driving me to despair. Something I noticed when making the first few calls using the S9920, was how the handset would vibrate whenever a call connected. Tried as I might, I was unable to find any settings within the Haptic feedback menu to disable it, and the longer I used the phone, the more it annoyed me. Especially when the vibrations were being picked up by the phone’s internal microphone. Making it audible to other people during a call. I spent the first week after receiving my S9920, searching for a means of turning the vibration off, which wasn’t made any easier due to the S9920’s hacked install of ICS. Which is missing parts of the OS, including those that control the vibration and haptic feedback settings. I was beginning to feel like I was truly up the creek without a paddle, when I fell upon some software on Playstore.
Vibrafix
This handy piece of software is freeware and was made for the very issue the S9920 was suffering with. I can’t give enough praise  to the developer for making this app available on Playstore and for free no less! Vibrafix requires a rooted android phone to work and superSU privileges. Once up and running, it completely disables the vibrate function of your phone and allows you to select what notifications are permitted to use the vibrate function. If you have bought a phone from China, the benefits of rooting your device really outweigh the zero chance of warranty support you can expect from the company you bought it from. In short, it’s a no brainer in my opinion.
After selecting “On Call” from the Vibrafix menu, I made a call and sure enough no annoying vibration. Finally my woe’s where over!
Phantom screen touch
While I’m still not sure why this is happening, I’m sure it is due to the budget construction of the TFT display. There are several reviews from customers on Amazon, who have experienced faulty screens on their handsets. This fault usually occurres several weeks after purchasing the device. So whether my handset will suffer a complete TFT failure as well, I don’t know. It could be a design fault with the device, so I will have to keep an eye on it.
Conclusion
The S9920 has proved to be a good handset, especially for the price. For the £79 that I paid, I honestly am impressed with what I have. There is still some room for improvement. Such as the plastic screen, which is more susceptible to scratching and bending than the glass alternative.
While the stock ICS install of Android is missing some functions, it does not hinder the phone from working as intended. As I found with Vibrafix, you can often find an app on the Playstore that will fill in for the part of the OS that is missing.
Gaming 90’s style Part I
Posted: September 11, 2012 Filed under: Handheld, Retro gaming | Tags: Gameboy, Lynx, Nintendo, repair, repairing Lynx, retro gaming, serving gamegear 2 Comments
I’ll begin this post by explaining my background in gaming with handheld consoles. Which began back in 1991, with my first Gameboy. Which was later succeeded with the Gameboy pocket and then Gameboy Colour. I was never a massive fan of the Gameboy Advance. As I always felt Nintendo had once more missed the point. The one thing all Gameboy fans where screaming for was a back-lit screen. Which wouldn’t come until the arrival of the Gameboy Advance SP. By that time, I’d lost my interest in Nintendo handhelds. The appeal of 3D games on the GBA was lost on me. My Sega Game Gear was far more fun to play, ok the screen could induce epileptic seizures, but with titles like Columns, Sonic and Shinobi, it was worth the risk.
I confess when they first came out, I was too busy with my Gameboy to notice. Tho I did drool with envy at the colour screen and it’s wonderfully lit screen. How many play ground standoff’s did this cause I wonder? As many as the Atari vs Amiga debate? Who knows!
Getting in to the Game Gear in 2004, made a refreshing change to gaming on the PC. With it’s simple 2D graphics, I was 13 once again. As my library of games increased, I found myself pretty much sold on the Game Gear. While Sega may have missed me in the 90’s, I was now hooked. Aliens 3, Star Trek Holodeck, Cool Spot and almost every Sonic title are amongst me GG cartridge library.
Sadly tho my trusty GG has been showing it’s age. Having already repaired the failing caps on the sound board twice. I couldn’t help notice that the screen was
becoming increasingly dimmer over time. This is due to the capacitors on the main board wearing out. Slightly apprehensive about replacing all the caps inside the GG. It came as a welcome relief to discovered someone who was offering a refurb service on Ebay. After exchanging emails, I discovered James was no stranger to consoles. With an impressive 400 serviced Game Gears already to his name. I felt happy letting him do the job. Usually I would have undertaken the task myself. However its wise to know when to stand back and bow to experience. I had two repaired sound boards to my credit, compared to James and his 400 fully refurbished consoles.
In all the refurb took only a couple of weeks, when my GG arrived back. It was like a totally different console. I can not begin to describe the difference the
refurb has made. The screen quality is vastly improved. Originally I had assumed that was how all GameGears looked. As it turned out, the failing caps where contributing to the problem. The sound is now at least 3 times louder thanks to James doing a thorough job on the sound board.
He also repairs Atari Lynx consoles and was kind enough to service my Lynx II after it stopped turning on.
James is worth his weight in gold and I recommend any retro gamer with a poorly console to seek his help. You will find him on ebay via his username “Gearforgames“.
New old things in the post!!
Posted: August 7, 2012 Filed under: Handheld, Retro gaming | Tags: 8400gs, Atari, itx, klax, Lynx 1 Comment
Over the weekend I was on ebay looking at video cards, low profile PCI-E cards that will fit inside the Nomad, to replace the bog standard on board Intel 945GM. It’s a great little video chip, but it can’t handle much in the way of gaming. So time to find something that will do a better job, such as the Nvidia 8400GS 256mb which I found on ebay for the staggering price of £10!
Ok it’s a dated video card and not really aimed at heaving gaming, but lets face it with an intel core2 duo 1.66mhz, my expectations are not that high. However, a half decent game of Fallout3 would not be that bad!
Also in the post I have received a copy of Klax for the Atari Lynx, expect a review and screen shots. Plus some information on where you can get your Lynx fixed for around £10 and get back good as new.
Keep on geeking!
GamesBritannia REPLAYED @ Magna
Posted: July 8, 2012 Filed under: BBC Micro, Classic, Commodore, Handheld, Linux, Retro gaming, Vintage Computers | Tags: Amiga, BBC micro, indie games, raspberry pi, Replayed, retro gaming Leave a commentWhen I heard the Magna center in Sheffield was holding ‘Games Britannia: Replayed’ I knew it was going to be something special. Arriving a little before 3pm on the Saturday, I walked in to the main hall and was instantly at home.
In one corner was a collection of BBC’s micro’s mostly model B’s from what i could make out. I later discover they had been used for a Beeb class room, teaching school children to program. Mix amongst the Beebs a crowd was now gathered, it didn’t take long to discovered why. In the center of the crowd was Eben Upton and his wife Liz speaking about the Raspberry Pi. Both of whom I later found to be very approachable and pleasent.
Pitched as the modern day Beeb, the Raspberry Pi is well worth taking note of. Standing to put you back £25, this all in one computer is powerful enough to surf the net, watch movies, do school work, play games and even use as a tv multimedia center like an AppleTV. If you hadn’t guessed by now, the Pi is a pretty versatile computer. Especially when you take in to consideration its size, 85.60mm x 53.98mm x 17mm. Not much bigger then a mobile phone.

Raspberry Pi, taking the term Pocket computer literally
Being introduced to the Upton’s by a friend of mine, who also happens to be the guy behind the Raspberry Pi logo. I have to confess I did not know until later, who I was being introduced to. Both where warm and happy to chat. It was interesting to hear the various questions people had been asking them about the Pi. Such as “How do I hook it up?”
Questions like these to me, highlight a growing ignorance some people suffer when it comes to technology. Beginning with OSX, Apple computers have become one of the least complicated systems to operate. The user has to carry out only the most minimal of maintanence. In order to keep the computer running properly. The majority of the work being carried out in the background by the computer.
Could it be that this aim to improve productivity and reduce how hands on the user is with their computers up keep. Has led to a generation of people, who think using a computer is as complicated as operating their DVD player. If we rewind to the beginning of the 80’s. People where buying the newly released Sinclair ZX Spectrum in kit form, as a means to keep costs down. With an instruction manual and soldering iron, they would spend weekends building their newly aquired computers. Today this sort of activity is unheard of, which in my opinion is a pity. Speaking from experience, there’s a lot to be said for building a computer system from scratch.
Snes/Sega/Amiga/Vectrex
I can honestly say I have never been surrounded by so many consoles. The sheer number and variety was overwhelming. NES, Snes, Saturn, Dreamcast, VCS, A500, CD32, C64, C128, Spectrum, yes there was A LOT! My first console to try was an old Vectrex, this iconic console still has a strong following even today. Having seen how much these babies sell for online, I was amazed it was simply sitting there in a dark corner, silently inviting passers by to play with its bright vector graphics.
You can read about consoles all you like, but nothing beats sitting in front of that vivid screen and using the antiquated controllers to blast incoming missiles, as the hail down to flatten your cities. The Vectrex was everything I had read it to be and then some. For an old console, I was quite content to let the show pass me by, while I blasted away with my missile defense system.
I was truly in heaven, however don’t be fooled. It was not all seen through roses tinted glasses. Indeed several of the consoles I tried, sported very unique spins on the common joystick. Something we all take for granted, but which took money, time and research to evolve in to what it is today. It strikes me as no surprise that the VCS 2600 was so popular. The single button, 8 axis controller was simple to use and easy to operate. Unlike several controllers I attempted to game with while at the event. I found Donkey Kong on the CBS ColecoVision to be something of a challenge to play at first, compared to the copy I have on my VCS 2600, which is a doddle to play.
Back in the fledgling years of the gaming industry, everyone was scrambling to get their units in to families homes. Be that with addictive software titles, impressive graphics or down to earth cheapness! A strategy which was used by many at the time and still employed today. This battle for a piece of the action, led companies to try all manner of tactics to lure in buyers. One of which was the joystick, incorporating multiple function buttons in to the base, must have seemed like a one up, from the humble Atari joystick. However most of these offerings, sufferers from being chunky or awkward to operate. In the end, the dear old 2600 joystick would out lived them all.
Settling and old score
Back in the mid 80’s my parents picked me up a Texas TI-99 at a jumble sale. It was the first computer I’d ever owned. Sadly it hadn’t come with any software, which eventually led to it being shoved in a closet. Ever since then, I’ve wanted to play on a working example of the TI-99, just to see what I was missing out on. Many a night had I spent messing on my second hand computer with no games, it wasn’t because I was sad or desperate for a computer, only a year later I found myself with a shiny new C64. The TI-99 with its black keyboard and shiny metal case was a thing of wonder to my 8 year old eyes. Opening the door to a whole new exciting world. Playing on my best friends Spectrum +2, I had seen what computers where capable off and I wanted in.
Playing Parsec on the TI-99 was a dream come true and I truly had a blast playing on it. Having read about Parsec in a issue of Retrogamer, I was pleased to find it was everything I had read. The unit I played on was fitted with the add-on voice synthesizer, which comes in to its own when playing Parsec, giving you a female voice reporting the next wave of enemy ships. It was truly unusual to hear such a human sounding voice, emanating from an 8 bit computer. The TI-99 maybe have to be added to my wishlist of old computers.
Meeting an old friend
Wandering the main hall, what did I come across next, but an Amiga 1200, which someone had left trying to load ‘The NewZealand Story’. An A500 game on a A1200, oh dear, oh dear. By sheer coincidance, I know from first hand experience, that this game does not favour some A1200’s running 3.1 rom’s. Even with relokick, it freezes during the loading process. Whom ever had left the A1200 loading, must have been unaware of this.
As I sat there, I couldn’t help but chuckle at the irony of coming to Replayed, have dozens of machines to choose from and sit in front of yet another Amiga. As it happened, my choice of location could not have been better. When a young couple stopped to admire the Amiga and ask me if NewZealand story was working. Being in my element, I explained what was wrong. Which then led them to ask if I was working at the event, I said no and went on to explain my history with Amiga computers and the Lincolnshire Amiga group. As it turned out, the woman’s father had introduced her to Amiga’s at an early age and NewZealand story was her favourite game. Which made the taunting disfunctional copy on the A1200 a real pity. Informing her of Amiga Forever, an Amiga emulator you can run on a modern computer. I pointed out that getting to play her favourite childhood games wasn’t beyond possibility.
Shareware…erm Indie Games!
During my roam around the hall, I found a stall showing off indie games. The two games I tried where of a surprisingly good standard for homebrew games. While support extends for only Windows at present. The rep promised they where working on supporting both Mac and Linux platforms. Paying for software on Linux perhaps goes against the Linux open source ethos. So its to be seen how this takes off.
I’ll end now with photos from the event.


