Raspberry Pi & Flying Toasters
Posted: August 11, 2022 Filed under: Uncategorized | Tags: afterdark, Macintosh, rpi, screensaver Leave a commentOver the weekend I was sitting in front of the ApplePi doing a little writing and surfing. I walked away for a while and when I came back the screen had blanked out. This is what Raspbian has done since it was installed and up until then I’d not really thought about it. However on this occasion it got me thinking back to the old days of elaborate screen savers, procedural graphics, matrix scrolling text and flying toasters. Anyone who ran AfterDark on their Mac back in the 90s, will vividly recall these flying chromium effigies and on the Amiga it was dancing lines. By 90s standards the black screen was duller than a rainy bank holiday, surely there was some way to spruce things up, that wouldn’t cripple the RPi3?
Consulting the Tinterweb
As what often happens in these situations, my train of thought led me down an internet rabbit hole, researching what screen savers were available for Linux, plus what would work on the limited resources of a RPi3. I do have a Pi4, but haven’t gotten around to installing it in the ApplePi, as with many things, it is on my “to do” list.
A cursory search online led me to xscreensaver, which offers a vast library of different screen savers, but most importantly one amongst them is titled “flying toaster”. This can’t be a coincidence surely, someone just happened to name one after an Afterdark screen saver?
When you initially install xscreensaver, it comes with a limited selection of built-in savers, if you’re betting Flying Toasters wasn’t amongst them, you’d be right. The interface itself doesn’t offer any advice regarding how or where to download the missing savers. So once more I turned to the internet and after a little searching, discovered this tutorial.
(https://pimylifeup.com/raspberry-pi-screensaver/) Most of it tread ground I’d already covered, however at the bottom the author was kind enough to include the commands for installing the additional screensaver data. In total the whole package and extras will occupy less than 100mb on your SD card, which isn’t bad when you consider how much it offers. Okay, by 90s standards 100mb for a screen saver is a little excessive, in fact it’s more than the average hard drive found in an Amiga back in the day. But that was then and this is now and as I write this, I’m already planning to upgrade the SD card in the ApplePi to a 128gb mSATA drive, once the RPi4 is installed.
Overall, xscreensaver takes up very little room on your SD card and in my opinion offers something a little more fun than a blank screen. While they once protected your CRT from screen burn, today’s modern flat panels have no such issues and the humble screen saver is more for decoration, than anything else.
Now you’ve read all that, let me walk you through the installation. First open a terminal window on your RPi and enter the following.
“sudo apt-get install xscreensaver”
Once your RPi has finished installing, you should find you now have a “Screensaver” option under your Prefs menu bar. If you like, load it up and take a look, you’ll notice a list of screen savers down the left panel, most of which will be greyed out. When you’re ready, enter the following command to finish installing the full package.
“sudo apt install xscreensaver-data-extra xscreensaver-gl xscreensaver-gl-extra”
And that’s all there is to it, you can load up the Screensavers window and select from a vast list of options, customising to your heart’s content. If you’re like me, you’ll get a buzz glancing across the room and catching glimpses of those silly toasters flying across the screen.
Until next time, keep on geeking!
Tandy TRS-80 Disk Video Interface
Posted: March 28, 2020 Filed under: Vintage Computers | Tags: 8bit, disk video interface, dvi, m100, portable computer, rex manager, Tandy, TRS80 2 Comments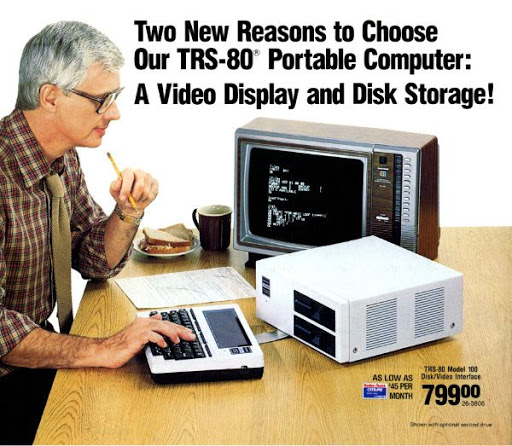
I’ve owned a TRS-80 M100 portable computer for a few years, ever since I grew fed up with the poor screen on my Amstrad NC100. The M100 is hands down a superior machine, the display is bigger and clearer and unlike the NC100, which is essentially a Wordprocessor with some organiser functions. The M100 is a true portable, programmable laptop computer. In fact it’s embarrassing to compare it with even modern devices, such as my laptop or iPad. Neither of which can hold a candle to the 40hrs battery life which the M100 boasts on just 4xAA batteries. Yeah people can scoff all they like, so it has no internet connection, so what? Is that really a bad thing when you’re trying to focus on writing? Social media is so intrusive in our daily lives, that I’ve even bought an

Essential kit the REX module
old Nokia 5130 to get away from the never ending ping of annoying notifications.
Shortly after getting my M100, I bought a REX expansion module. It’s kind of a ROM / memory expansion for the M100,
Allowing you to load custom ROM images, such as word processors, disk managers and spreadsheet applications. It also lets you dump active memory to an image file. Which can be handy for backing up your files, especially in the highly unlikely event your batteries should fail. The REX has served me well for years and I’ve had little reason to upgrade, until last September when Ken Pettit offered up a batch of NADSBoxes. Almost as rare as hen’s teeth, these storage boxes are beyond handy if you use an M100. Offering portable mass storage on SD memory card, they plug in to the RS232 port on the rear of the M100 and work flawlessly. Before I took possession of my own NADSBox, I had to justify the $195 expense. Once I had it and was using it with my computer, I was converted and wondered how I’d managed without one. If the REX offers reliable internal storage, the NADS eliminates the need to use a serial cable ever again. Letting you to transfer files to and from your desktop computer via memory card.
You would think with these additional peripherals, I’d be well setup and have little need for anything else. After all, what else can you do with an 80s portable 8bit computer? Well how about hooking it up to a monitor?
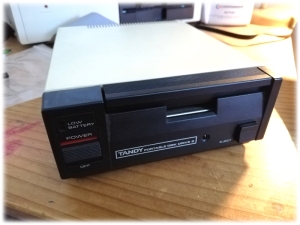
Disk Video Interface
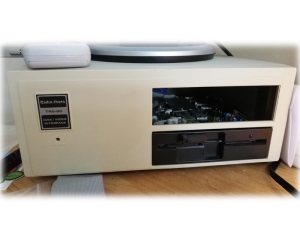
Tandy Disk Video Interface with single floppy drive
As it turns out, Tandy, never one to miss a trick, saw a market for promoting the M100 as not just a portable computer, but a home computer. And why not? In 1984 the M100 sold in the states for over $1000 (£691). While around the same time, Clive Sinclair was selling the ZX Spectrum in 16k & 48K variants for £125 in the UK. Admittedly the Spectrum wasn’t portable, but just like today, back then people bought primarily with cost in mind. Expanding the M100 into a desktop was a smart move by Tandy, even though they had a successful line of home computers. So the Tandy Disk Video Interface or DVI for short, came in to being. Equipped with single or dual 170k 5-1/4″ disk drives and capable of 40-and 80-column composite video output (for monitor or TV). Priced at $799, the DVI wasn’t that much cheaper than buying a M100 or full computer setup, with monitor and printer. However it’s a difficult product to categorise, simply because there isn’t anything else like it. In ’84, if you owned an M100 and were perhaps using it as your primary computer, you already had an investment in the product line. So expanding on your existing computer kit probably made perfect sense, just as it would today. However if you owned a home computer and only used an M100 when out on the road, the DVI probably seemed like an expensive accessory. Keep in mind that all you need to recover files from the M100, is another computer with a serial port, null modem cable and some software. In a December ’84 review for Creative Computing, David H. Ahl wrote.
If your main application is text editing, an alternative to the Disk/Video Interface is a disk load program like ones available from Kensington Microware and Portable Computer Support Group (PCSG). For example, Disk + from PCSG lets you save and load files back and forth between the Model 100 and a desktop computer through the RS-232 port. Those files can then be edited with a word processing package on the desktop machine. Complete with cable, it costs about $120. Many desktop computers, including the IBM PC (and clones), Epson QXz-10, and TRS-80 Model III and 4, are supported.
At the time of it’s release, it seems the Disk Video Interface received a lukewarm reception. Throughout the decade, computers were forever improving, only a few short years after the DVI was released, Apple revealed the Macintosh to a theater of speechless journalists and computer enthusiasts. Even by the time it was released, I think the DVI struggled to offer enough to get Tandy users opening their wallets and coughing up the dough to shell out. The 80s computer market was a cut throat, make it or break it horror story, companies appearing over night and then gone a year later. One that springs to mind is the Osborne Computer Company, who had a promising line of portable computers, but within a matter of year face bankruptcy.
My own adventures with the Disk Video unit came about shortly after last November (2019). During a conversation on the M100 mailing list, I got to talking to a fellow user who was selling a working unit, albeit missing a floppy drive cover and the original link cable. In fact the only detracting factor was he lived in the United States and so shipping to England was going to cost more than the device itself. But what sort of computer nerd would I be, if I let a silly thing like extortionate shipping stop me? You don’t have to be nuts to enjoy this hobby, but it does help!
It took several nail biting weeks for the DVI to arrive, all the while, the seller and I fretted over the state it would arrive in. Thankfully Jim had gone above and beyond the line of duty, packing the DVI so well that you’d think it was being loaded in to a rocket bound for the ISS. Much to my relief, it survived and it was fully working! With a little help from a step down transformer, converting UK 240v to US 120V, I was able to power it up. Eventually I plan on swapping out the original 120v PSU, but with Covid-19 raising havoc across the globe, it might be some time before the transformer I ordered on Aliexpress can arrive.
The Initial Thoughts of a Newbie
I’d like to point out that my views here are based on using a DVI over the course of a few days. I am by no means a TRS80 M100 guru, I use mine mainly for writing blog articles and stories for my play by email role playing game. That being said, I’d like to think the 5 years I’ve own my Tandy have at least place me in a position where my opinion has some value.
I think the first thing I’d like to address is how the DVI hooks in to the computer. On the underside of the M100 is an expansion socket for optional ROMS as well as a user port which connect directly to the system bus. At present I’m not entirely sure how the DVI and M100 detect one another, but if I was to hazard a guess, I would say the user port shares the same pins as the ROM socket. So the DVI acts kind of like a sophisticated external ROM expansion, which additional rudimentary disk handling and video display. I’ll have to consult the user manual and the M100 mailing list to be sure. Fortunately one of the wonderful things about the M100, is it has a healthy and active community behind it.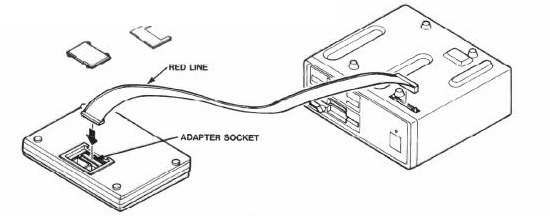
When I first plugged everything in, it was hit and miss and pretty unreliable to use. But I’d known this before buying and was already in the process of getting a new cable from Arcadeshopper. Sadly the one thing both cables had in common was their length. For some bizarre reason DVI link cables are only about 30cm long, which is alright IF the M100 is directly in front of the DVI. But if your like me, and have your monitor sat in a corner with the DVI underneath, you’ll find the cable is laughably inadequate for the job it’s meant for. Luckily for me, I’m not the only M100 user with this problem and after a brief discussion, it was suggested I find myself a 40pin IDE extension cable. Thank goodness Tandy went with a cable that’s easy to find and not some proprietary thing. Getting a cable was easy and I was able to extend the link cable by another 30cm. Finally I could have the M100 on the desk directly in front of me, while the DVI sat in the corner to my left on the desk. Thanks to a half decent keyboard, using the M100+DVI isn’t that much different to using any other Micro Computer. In fact given my experience using 8bit computers, the DVI isn’t that bad, in fact I’d go as far as to say it’s pretty impressive by the standards of the time. Bearing in mind in the early 80s most home users could only afford an 8bit micro, as IBM compatibles were still prohibitively expensive. While I can only speak for the range of computers I used back then and own today, I have to say the DVI turns the M100 in to a very acceptable word processor, which is what I primarily use a computer for. If I were to compare it to a 128K Spectrum +2, the first thing I’d say is the text is far more legible than anything I’ve been able to squeeze out of a Speccy. Next if I compare it to say a C64, a computer that was extremely popular in the states, it certainly offers a comparable experience. My word processor of choice on the C64 is mini officer II. Mainly because it’s uncluttered and saves in PETscii, the Commodore equivalent to ASCII and as such is easier to read on modern Windows PC’s. Back in ’84, a C64 with a printer and monitor would probably have cost as much as a DVI. If you look at the capabilities of a C64 or one of Tandy’s own home computers, you begin to see why magazines reviews at the time were not exactly bowled over. The DVI was only ever going to appeal to a niche market in my opinion, but what it does it doesn’t do half bad. Yes it does have some short comings, the disk format is not cross compatible with the Tandy Portable Disk Drive, the DVI will fail to load whilst certain ROMs are resident in memory. Before I could get the DVI to load, I had to uninstall the manager for my REX module as it apparently occupied a part of memory needed by the DVI. However one could argue that at the time the DVI was released the REX didn’t exist, so such a problem might not have been as common as today.
Portable Storage
Floppy disk drives while convenient were not exclusive to the DVI alone. Tandy released the Tandy Portable Disk Drive & TPDD2 for the M100. An external 3 1/2″ floppy drive that would work off batteries or 6v mains. Ironically the technology behind the TPDD is actually a re-branded Brother FB-100, which were used in a range of knitting machines, later adapted by Tandy for use with the M100. Today we take for granted the standardisation of technology and peripherals, where as back in the 80s such things were yet to be established.
TANDY Portable Disk Drive 2
As a result the DVI and the TPDD are not cross compatible with each another. Having the ability to save data to the TPDD while on the go, only to load up later at home on the DVI, would certainly have been convenient. It’s only unfortunate that Tandy didn’t feel the same way. Chances are the FB-100 was cheap to buy and re-purpose, using the existing disk format saved money. Otherwise Tandy would have had to develop custom firmware to make the TPDD backward compatible. You can’t blame Tandy, they weren’t the only company up to such shenanigans. One only needs to look at how the Sinclair Spectrum handles handshaking over RS232, to see another example of cost cutting.
Final Thoughts
My brief spell with the Tandy Disk Video Interface hasn’t been all that bad, this entire document was written on mine over one evening. Half written in 40-column and the rest in 80-column, just to compare the performance. The latter fits more on the screen, but suffers with sluggish performance when it comes to editing. This could also be due to the size of the document, which left me with about 6k free when I was finished. I’d certainly use the DVI again, I’m still undecided how useful it will be as writing platform. I can’t deny it improved the overall writing experience on my M100, which is not to say isn’t that bad, far from it. The benefit of using a monitor over the M100s liquid crystal display certainly has it’s plus sides. Especially in an evening when others members of the household are trying to get to sleep and you’d otherwise have the main lights on so you could see the LCD screen. Incompatible disk formats does make transferring files from the DVI to PC something of a challenge. When I had finished writing this article, I had to disconnect the DVI, soft reset the computer and then reload the REX manager in to ram. My main concern was with only 6k of memory left, would there be enough space to reload the REX. Thankfully there was and I was able to use TRSDOS to copy my document to my NADSbox and from there transfer it off SD card to the desktop PC. So while the Disk Video Interface does make for an excellent typing environment. Recovering the fruits of your toil feels akin to pulling an exceptionally large rabbit out of a small hat.
Until next time keep on geeking!
ApplePi Update, now with ADB
Posted: September 26, 2019 Filed under: Apple, Macintosh, Raspberry Pi, Vintage Computers | Tags: adb, Macintosh, raspberry pi, rpi, teensy Leave a commentGreetings dear readers, today we are going to cover something I worked on at least two years ago but always felt there was room for improvement. I’m of course referring to my Apple Classic, super charged with a Raspberry Pi3b motherboard inside. Now before I continue, I want to make one thing clear, I only mod old computers that are beyond repair or have been gifted to me by friends in a state worse than death. So no working or repairable system is ever broken, we don’t rip SID chips off working C64’s around here you know! Anyone found doing so would be given a stern telling off and sent to bed without any beer!
So where was I? Ah thats right, the Apple Classic! So last time we visiting this topic, I had been gifted a partially modded Classic and by partial, I mean it had everything floating loose inside the case and was in dire need of TLC. The amp cut out when you cranked it up or worse took the screen out and the RPI2B was awful slow, emulating an old mac on it was not a nice experience. It now sports a reasonably nippy Pi3B over clocked to 1.3Ghz, emulating an 020 mac the Pi doesn’t even break a sweat, idling at about 45 degrees for both the CPU and GPU. Seriously I’m sat here typing all this on AppleWorks, running Mac OS 7.5.3 and it’s pretty much like using a supercharged Classic on steroids.
I might have to cover compiling and using Basilisk II on a Raspberry Pi as there isn’t that much written online about getting a decent build. It took me a few false starts until I was able to get the emulator working without mouse stutter. This could just be down to the fact I was trying to use a RPi2, which should theoretically be powerful enough, but past experience with my AmigaPi has taught me things are never straight forward.
Ever since I finished or almost finished the ApplePi, I’ve wanted to do more. I wanted to fit an internal ADB socket so I could use a real Apple keyboard for a start. Luckily there is code available online and with a £7 Teensy 2.0 board, I was able to solder together a USB – ADB adapter. ADB is a funny socket, in that its the same pin out as S-video, which means picking up connectors isn’t that hard. Plenty of people have made these adapters but most the time they’re either inside the keyboard or inside a tiny external box. That’s all well and good, but firstly you’re modding the keyboard so that it’s no longer ADB and secondly, I lose USB pens to my sofa on a monthly basis. I’d lose my keyboard adapter and not be able to type on my ApplePi! For me there was no question how I wanted it, the ADB port would go on the back of the computer, as part of the custom laser cut rear I/O shield. It wouldn’t be a true Apple + Raspberry Pi hybrid without ADB nestled along side the USB ports.

My Keyboard of choice Apple Keyboard II
For this mod I opted to use the source code by Shay Green (https://github.com/gblargg/adb-usb), while his code doesn’t include mouse support like some others did. I had think whether using a single button mouse was really all that practical in a modern Linux environment. I think I’d eventually tear my hair out with it’s limitations.
All in the Code
Programming the Teensy board isn’t that hard, you can do it on a Mac, Windows, Linux and the Raspberry Pi. To program a Teensy on a Pi you’ll need something called “Teensy Loader” (https://www.pjrc.com/teensy/loader.html). This software makes programming the tiny boards a breeze. On their website it says to run the program from the linux terminal, however I found this to be a fiddly method, constantly typing the same command in each time. Instead I made a script that allowed me to click an icon to load it up right away. Using a text editor of your choice, Nano (from within the terminal) or Text Editor from

Teensy 2.0
the desktop. Create a text file in the same directory as teensy loader, call it something like “Teensyflash.sh”. Inside the text file paste the following, leaving out the speech marks.
“./teensy &”
Save the file off and close the editor. Now assuming you still have the window open, you should see a new file called “Teensyflash.sh”. Right click on the file and select Properties and then select the Permissions tab. Next to the “Execute:” field, click the drag down menu and select “Anyone”. Click the “ok” button to close the window and save your changes. You’ve now told Linux this file is an executable, so next time you double click on it, Linux will ask if you wish to run it. Tell it yes and the loader should pop up, voila no terminal commands involved.
Using a Teens 2.0 not 2.0++
Unpacked, Shays program is designed to run on a Teensy 2.0++, if you have one of those fine skip this part. However I had a Teensy 2.0, the same board I used to make my custom USB Amiga Joystick last year. The two boards use different chipsets and as such will not run the same programs, you have to compile a HEX specific to 2.0 and 2.0++. If you wish to use a Teensy 2.0 board, you will need to edit a file before you can compile your HEX. Inside the “adb-usb-master” folder, you should find a file called “Makefile”, open it with a text editor and edit it to look like this.
#MCU = at90usb1286 # Teensy++ 2.0
MCU = atmega32u4 # Teensy 2.0/Pro Micro
#FLASH = teensy_loader_cli -mmcu=$(MCU) -w main.hex # Teensy
FLASH = avrdude -p atmega32u4 -c avr109 -P /dev/ttyACM0 -D -U main.hex # Pro Micro
Save the file off and close it, the program is now ready to compile for the Teensy 2.0.
I’m not going to bother covering using Teensyflash, as there is plenty of information online covering the subject, however I do wish to briefly go over building the hex file. This is essentially the program you are going to load in the memory of the Teensy, without it your dead in the water. When I first tried to compile Shay’s ADB software, my Raspberry Pi threw a fit, telling me I was missing files. It took me a while to nail down what I was missing, running the following command in the Linux terminal did clear up my problems.
“sudo apt-get install libusb-dev gcc-avr binutils-avr avr-libcapt-get install libusb-dev gcc-avr binutils-avr avr-libc”

heat shrink, prevents shorts
I think Shay’s code might expect the command line version of Teensy loader to be present in the same folder as his code, because after my Pi successfully compiled the hex, it threw up an error about not finding Flash. Don’t be too concerned about this as the HEX has still been created and is ready to load in the GUI loader.
Once you have Teensy Loader up and running, it’s just a case of loading in your HEX file, pressing a button and a mouse click later the program is stored on the tiny board. With the code loaded in the memory of the Teensy, it’s just a matter of wiring the correct pins together between the board and the four pin s-video connector. Given the size of the connector, I highly recommend using some heat shrink around your solder joints. This will prevent any of your wires shorting and frying your Teensy or Keyboard. A Data line is no place to stick your 5 volt input and certain components might take offense and die as a sign of protest. Then my friend you be wading in the brown smelly stuff without any wellies on! Don’t forget to solder a 1k resister between the data line and your 5v. Apparently some ADB cables suffer with signal drop and the 1k resister helps, if a jobs worth doing, do it right and fit a resistor!
After it was all wired up, I had to modify my rear panel as there was no  hole for the ADB port. With a lot of cursing and armed with a dremmel, I was able to make a half decent circular hole, just wide enough to accept the end of the ADB cable. Oh a word on plugging your Teensy to your computer, make sure you use the cable that came with it. I made the foolish mistake of using a spare mini USB cable I had laying around, the darn thing wouldn’t load up properly. Twenty minutes spent testing for breaks in my wiring and it all came down to a tiny USB lead.
Conclusion
When it works, the ADB-USB adapter is amazing, switching from a Bluetooth Apple Keyboard to an original Apple Keyboard II is a massive difference. It feels better, keys are spread out and in general I’m not finger typing any more. It also looks a million times better in front of the ApplePi, seriously you would be forgiven for thinking it was a real Apple computer when Basilisk II is running. Shay Green has my thanks for posting the code

A new panel to cover those holes.
up that made this hack possible. Were it not for him, I wouldn’t be sitting here typing to the sound of klacky keys! Thanks dude!
Next up I shall be designing a rear panel to cover the holes left behind by the old power switch and power socket. In their place, I plan of installing a control panel for the IPS screen, allowing me to change the brightness, contrast etc.
Raspberry Pi 4 Released
Posted: June 25, 2019 Filed under: Raspberry Pi | Tags: Pi4, raspberry pi Leave a commentCrikey it doesn’t seem so long ago that I was buying a new shiny Pi3 for my AmigaPi and now there’s an all new model out, sporting improved video, CPU, more RAM and no more USB bus bottlenecks, Finally!
I can’t wait to review this bit of kit, but for now, just had to show off some pictures comparing the new board with a boxed Pi3b+
This is the 4gb model, which I think will be going either in the AmigaPi or the Apple Classic, which is a surprisingly good computer for typing on, even with a Pi2b. So imagine upgrading to a Pi with near desktop performance, mind officially blown.
Do you have a project for the Pi4? One that previous models didn’t permit you to do? The additional onboard RAM will undoubtedly make a huge difference to certain projects. I’m excited to see how much of an improvement will make to emulating a PSone or N64, especially with the new VideoCore VI GPU.
So let’s have a look at the packaging!
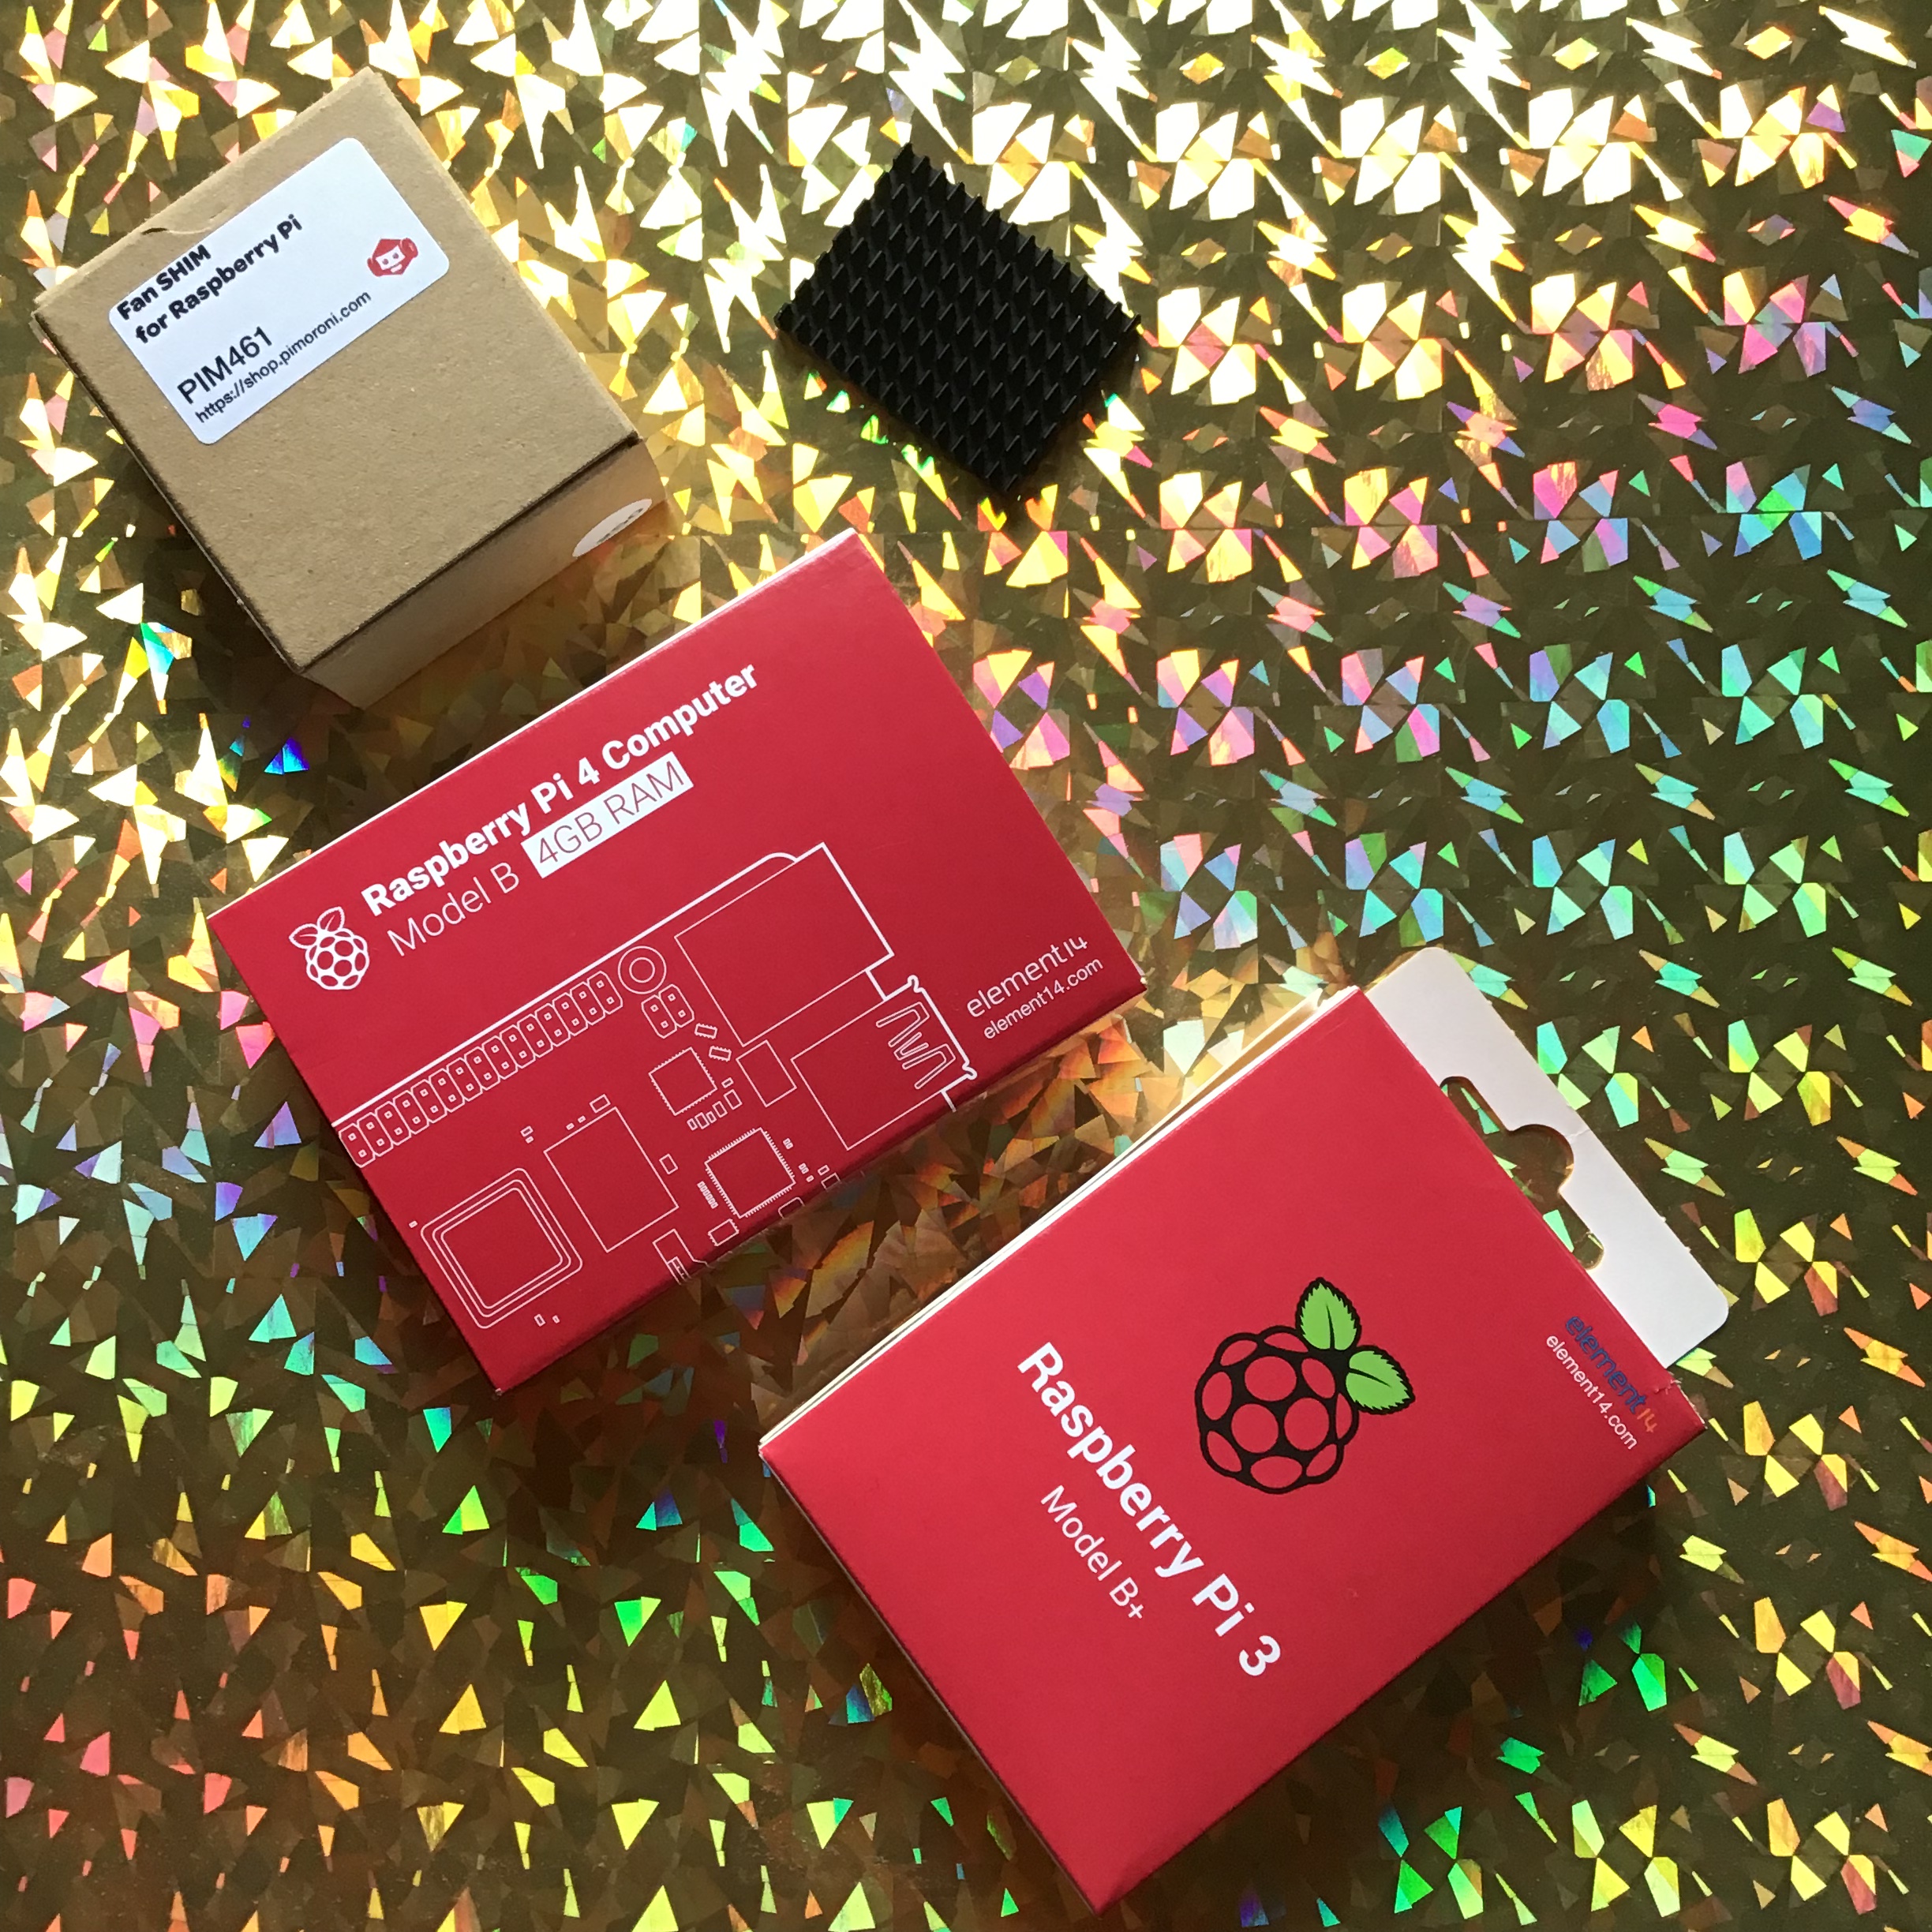
New Pi4 beside Pi3b+
Not only has the Pi seen a make over, so has the packaging. Included in the shot is a fan SHIM from Pimoroni and a Pi4 heatsink, which it is now highly recommended you use with the new computer. Heat has always been an issue for the Pi, especially the original Pi3, however the Pi4 now sports a full 3A PSU resulting in a little more heat that we’ve seen in previous models. Passive cooling is fine for light workloads, but for most of us that use the Pi for intensive work a chunky heatsink is a must. The stock Pi heatsink is fine, but the bigger you go, the better the heat will be drawn off the CPU and the less CPU throttling you’ll see.
Now let’s open the boxes up and have a butchers inside shall we?
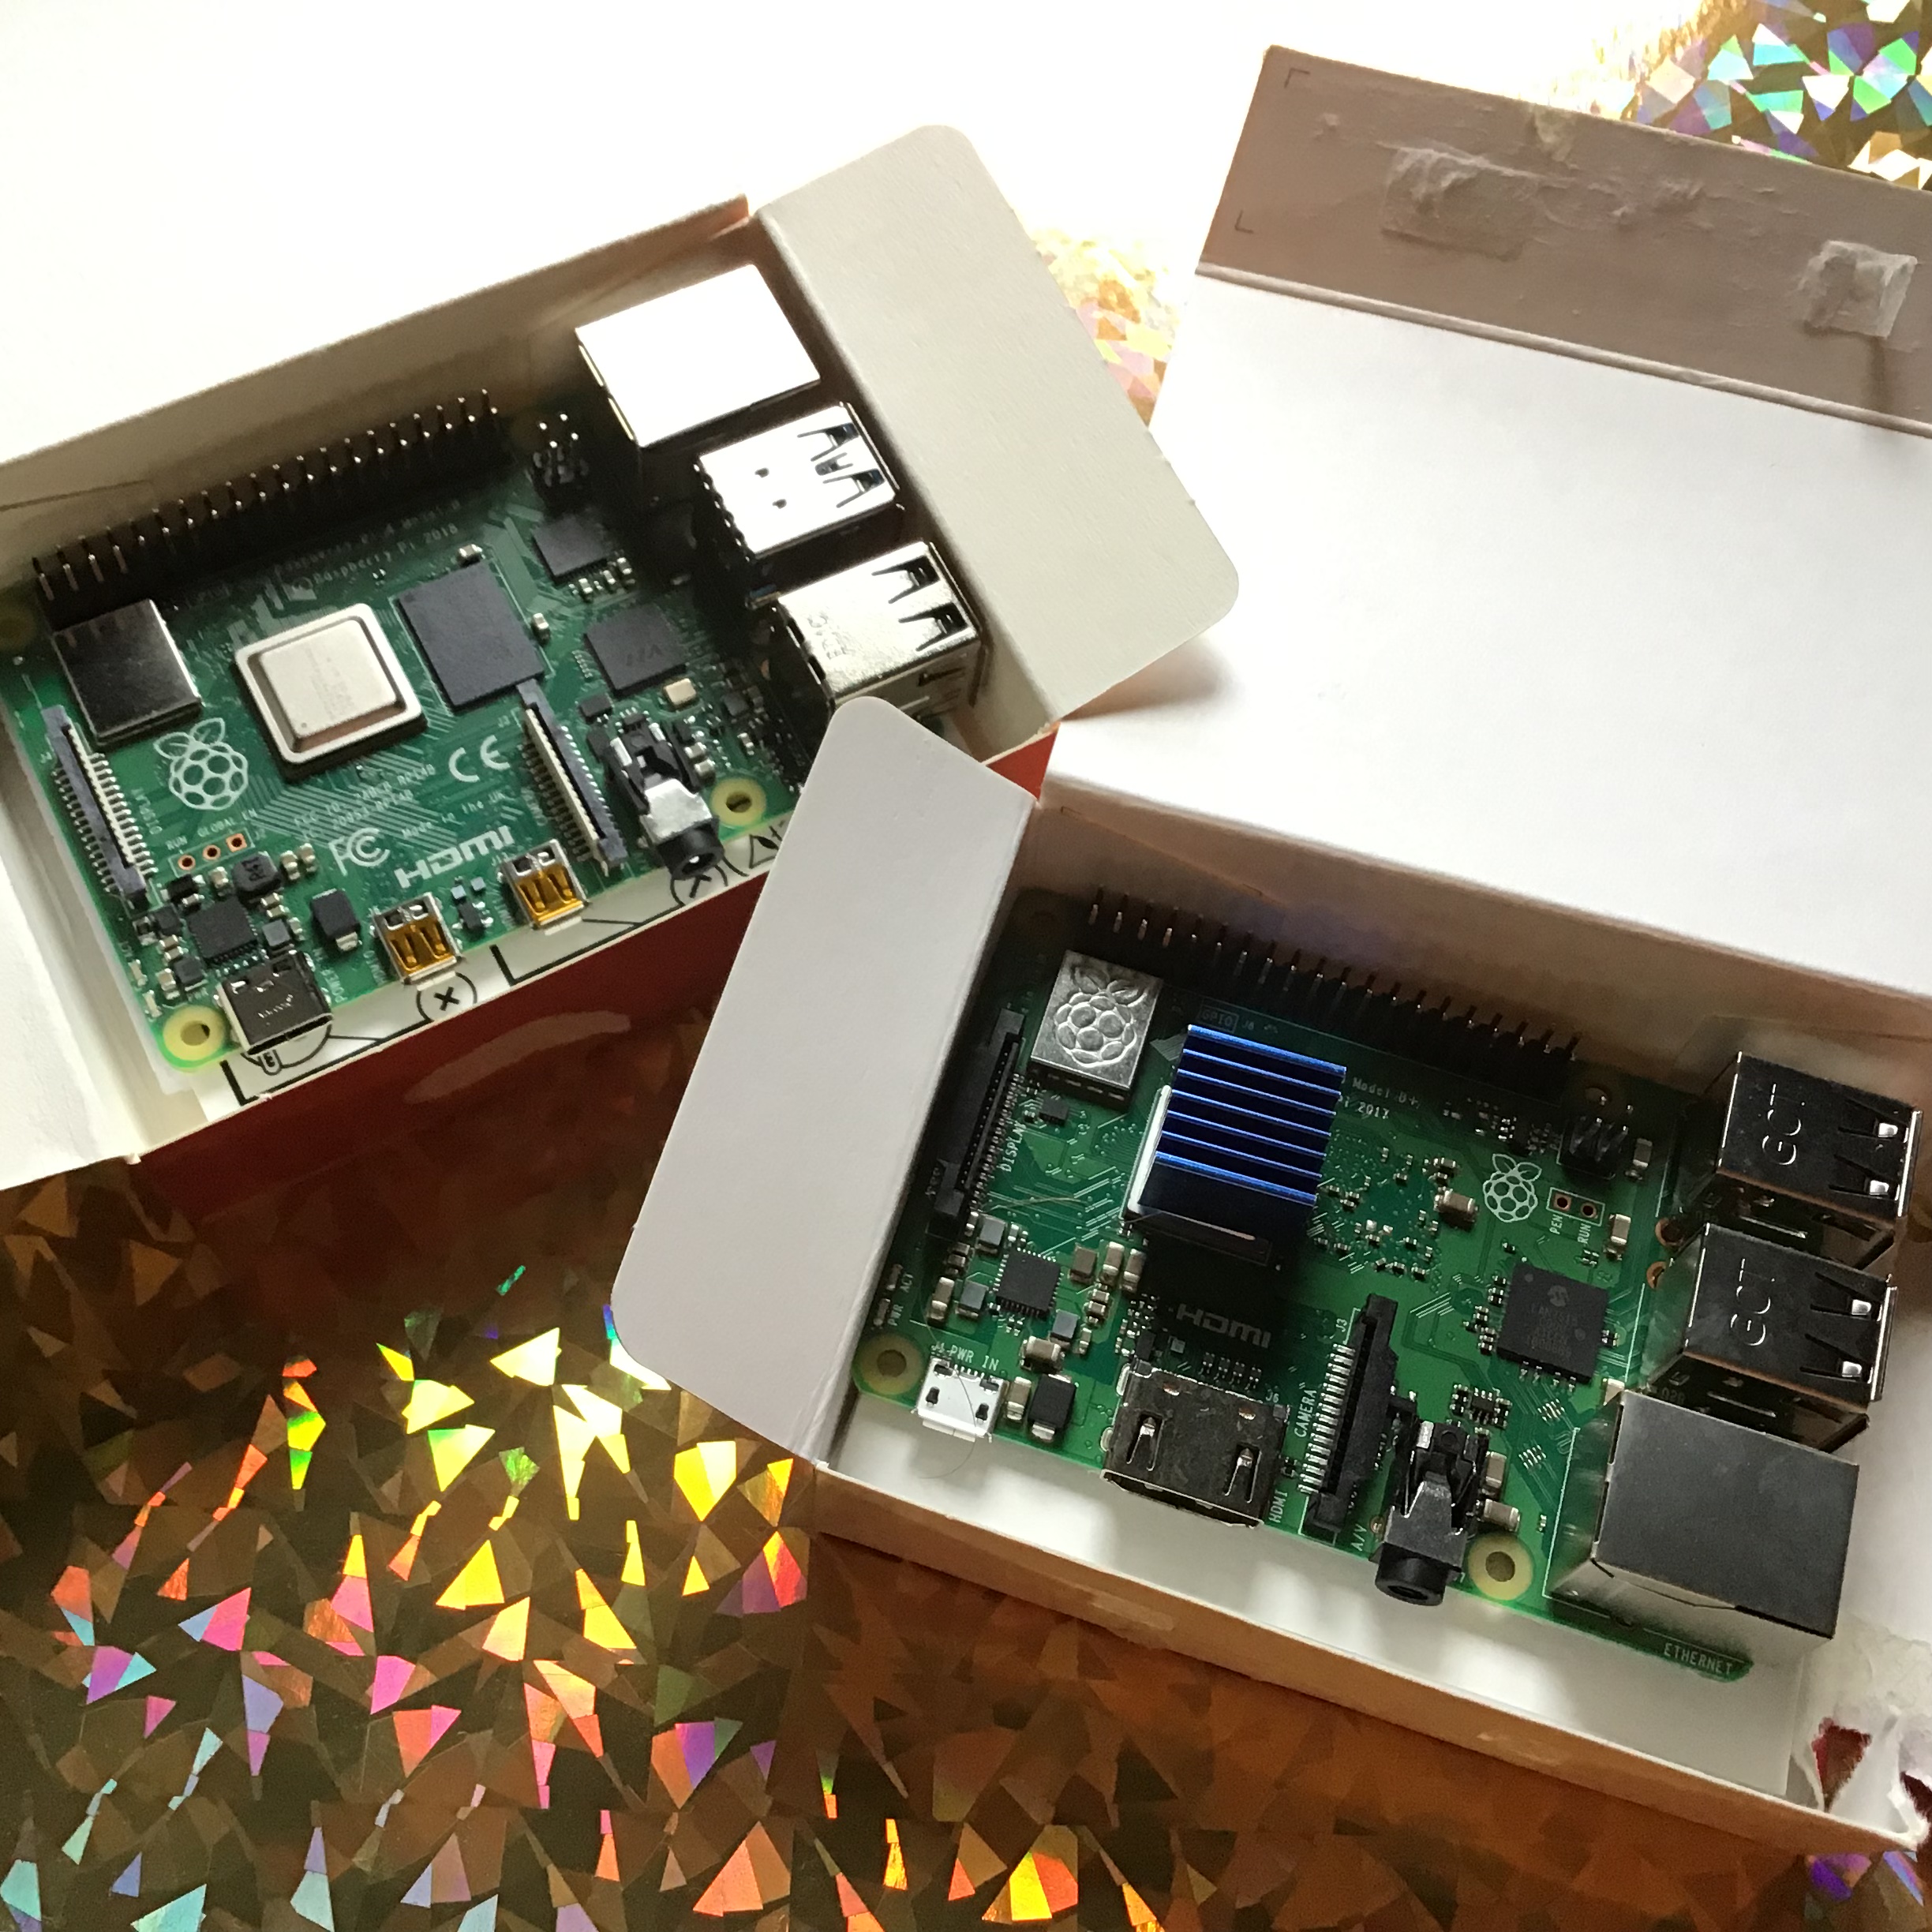

Side by side it’s immediately obvious the Pi4 has seen more than a little bit of tweaking, the PCB is clearly larger and the USB, Ethernet ports have swapped places. Indicative of the fundamental changes the foundation have made to the Pi and the SoC, improving bandwidth to approximately 5Gb/s, not to mention introducing full Gigabit Ethernet and USB 3.0. The latter of which will come in handy for anyone booting Raspbian from an external hard disk
I be making a more detailed write up soon, including some testing to see how it performs.
But for now, let me end it with a nice close up on some silicone!
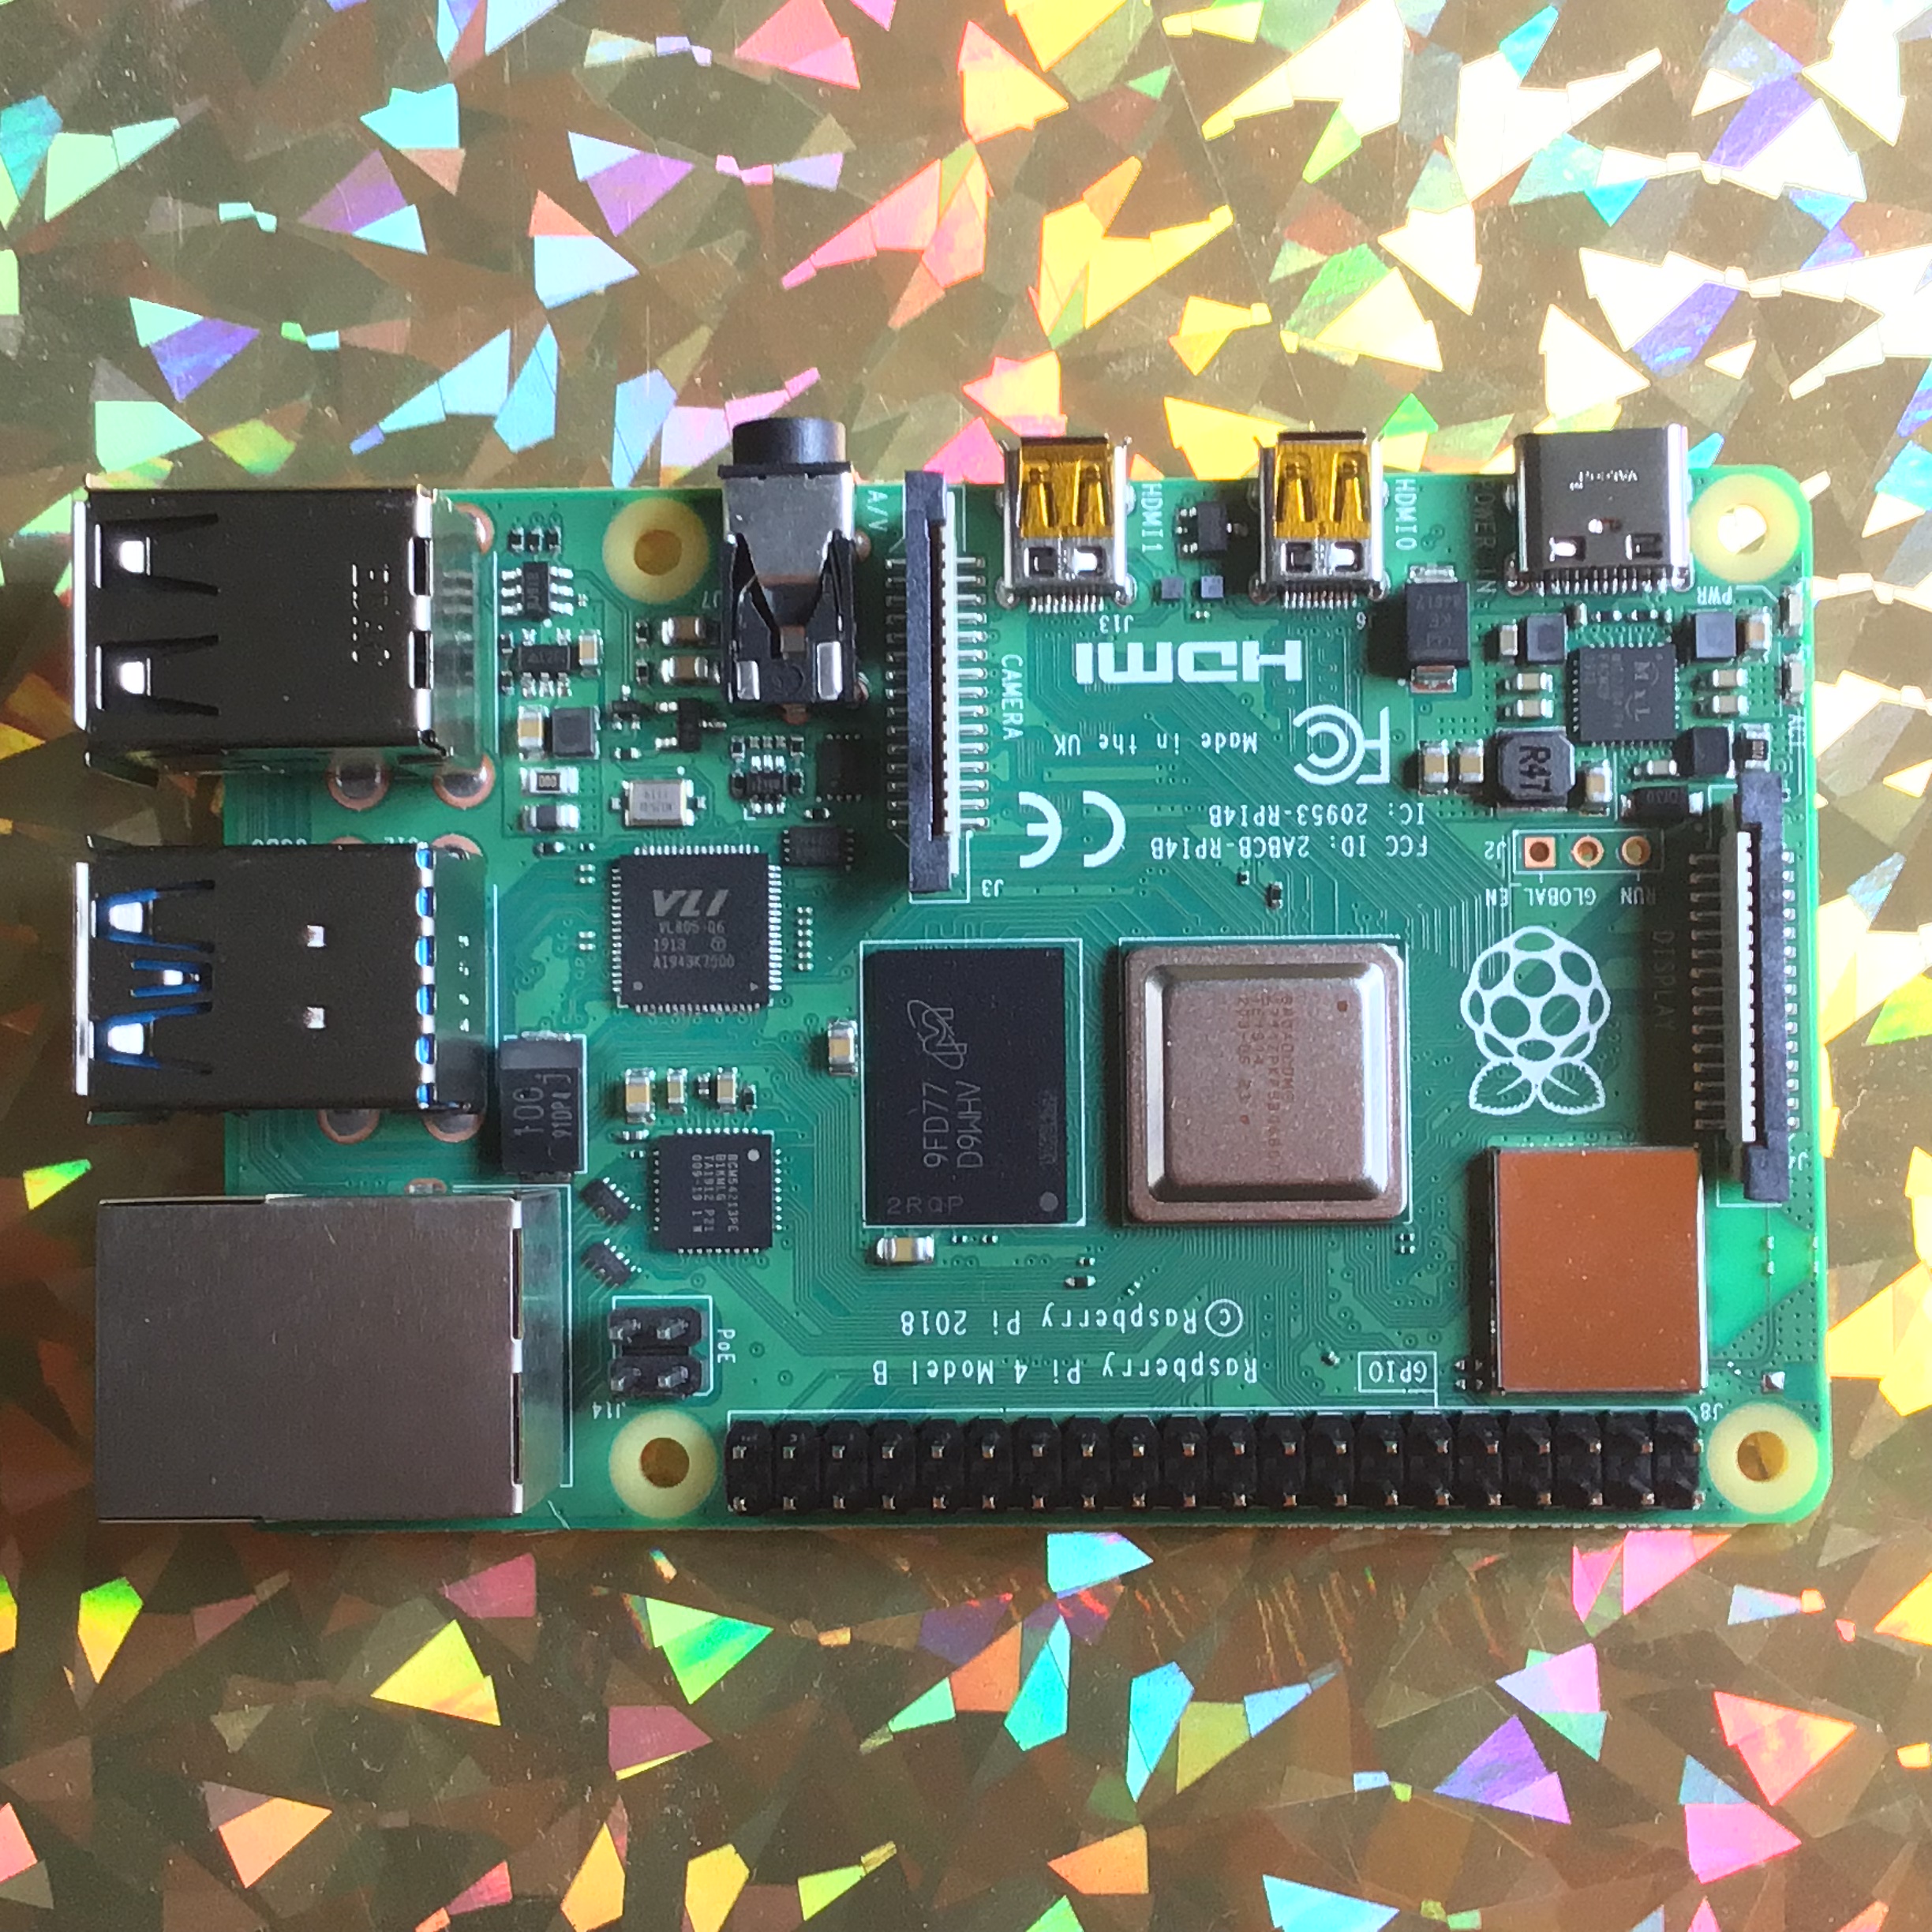
Till next time, keep on geeking!
Psion II LZ Repair
Posted: December 14, 2018 Filed under: Handheld, Uncategorized, Vintage Computers | Tags: LZ64, organiser, psion, psion II, Psion LZ, repair 3 Comments
I thought I would post this sooner than later, as this is something I’m presently working on.
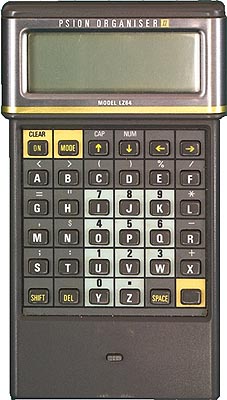
For those who might not be familiar, the Psion II was an early form of pocket organiser produced and sold by the British firm Psion. During its lifespan the organiser went through several versions. Beginning with the CM, a very basic unit with just 8kb of memory and ending with the top end LZ64, which has a 20 column 4 row display as well as whopping 64kb ram.
As part of an ongoing series of pocket computer reviews I’m writing, I have covered several models of the Psion II. Sadly the LZ64 suffers from a persistent and quite irritating whistle, which I believe comes from aging capacitor.
Today I removed all but two of the nine electrolytic caps inside my LZ in a bid to rid my unit of the blasted whistling. Here you will find some info on the capacitors I removed and their location on the PCB. If you own an LZ or LZ64, this information should be useful. As always the same rules apply, you repair your own gear at your own risk. If you set your shirt sleeve on fire, pour hot coffee on the cat or fall out with the postman, you can’t blame me! I’m simply providing this information as is. Hopefully it will result in a silent LZ, except for the for the odd beep and click of course!
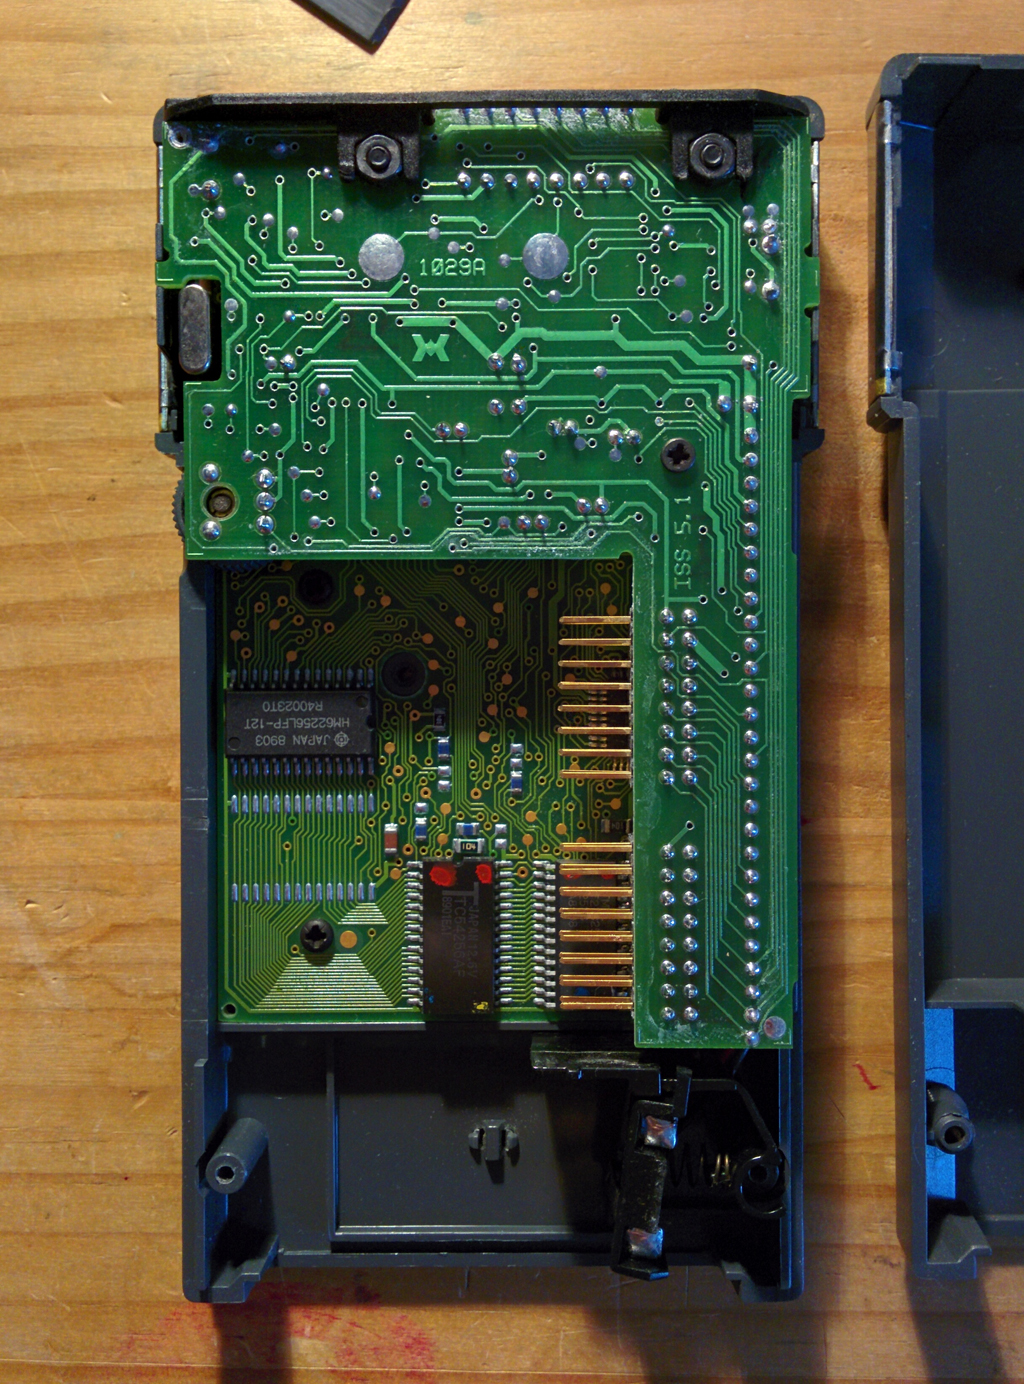
Fig.1 A single screw holds the top PCB in place
After you’ve removed the screws and popped open your Organiser, you’ll find the motherboard screwed to the front half of the case. Laying the device face down, unscrew the top board which is held in place by a single screw (see fig1).
The main logic board is still connected to the keyboard via a ribbon cable just behind the pins for the ROM slots. This cable is pretty stiff and will take some gentle persuasion so as to bend the logic board up enough to remove the screws holding the keyboard PCB to the front case.
Once you have the boards removed turn them over so you can view the logical board the right way up. Remember to handle the two PCB’s with care, after all they are 30 years old and tend to be delicate.
You should now see something similar to fig.2. Note the already exposed pins below the cluster of caps, this is because one of the 25v 10uF capacitors has already been removed from the board.
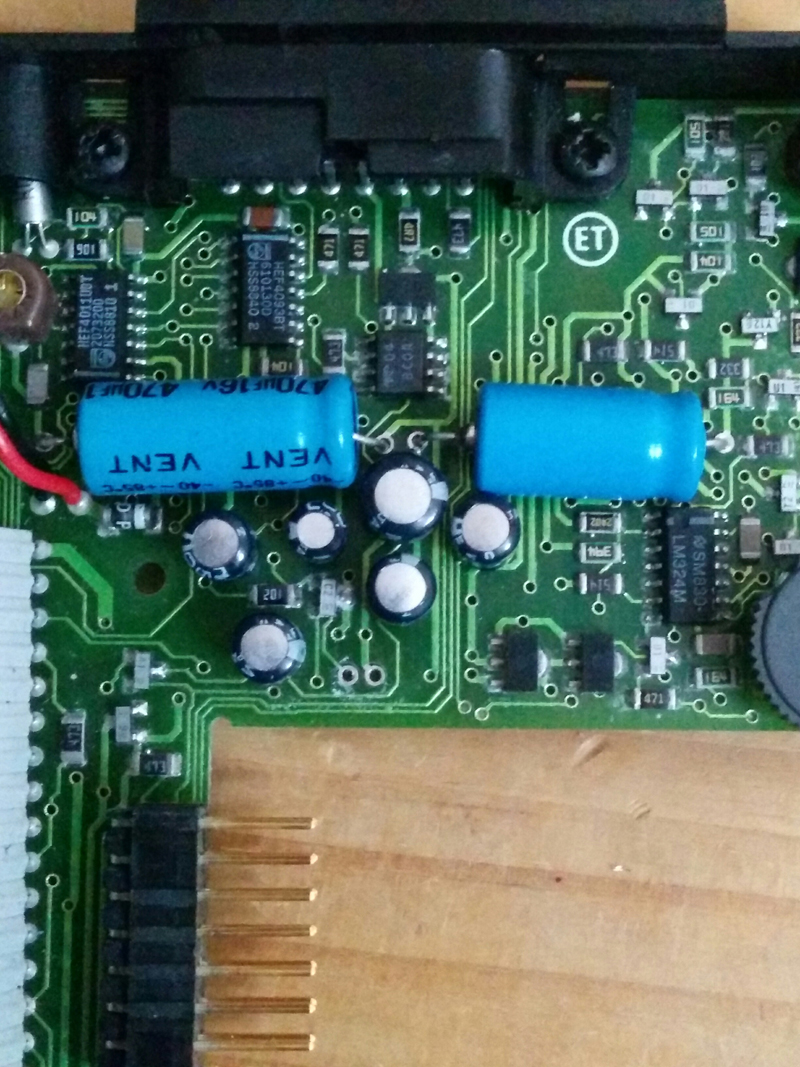
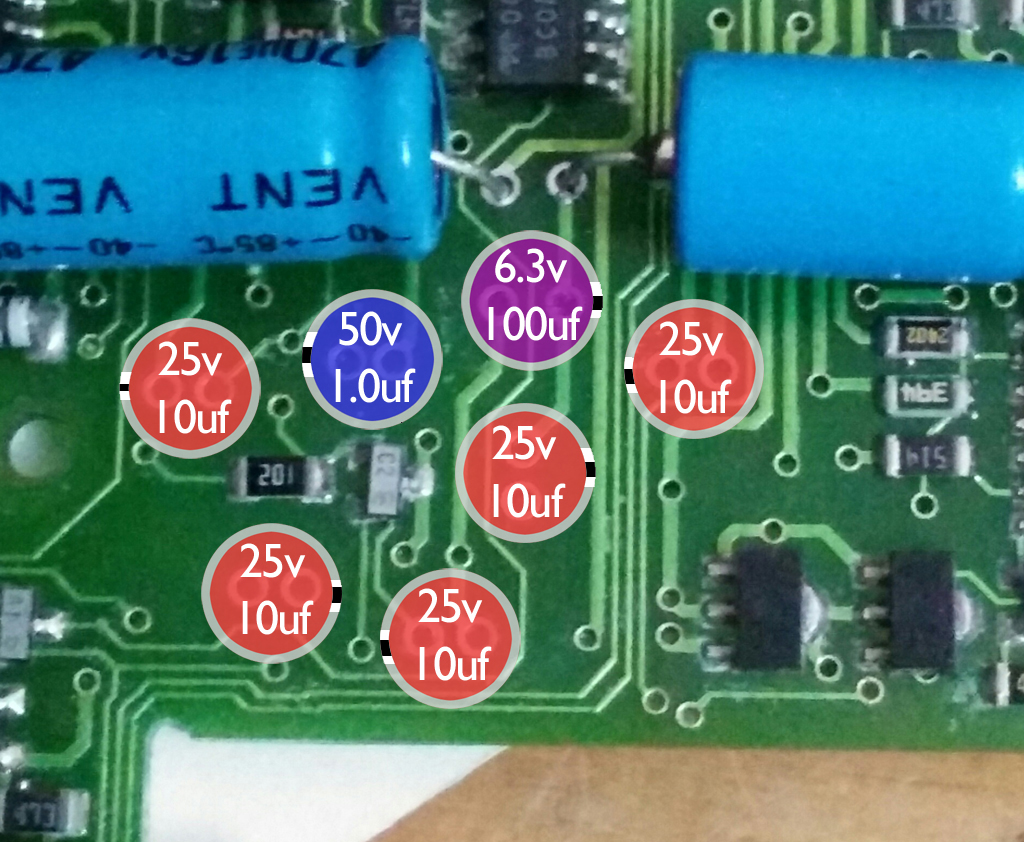
Using an already warm soldering iron, I removed each cap, recording their values as I went along.
Of the seven radial electrolytic caps, the LZ has;
5x 25v 10uF
1x 50v 1.0uF
1x 6.3v 100uF
For now I’m leaving the two large axial caps in situ, as I want to try the LX with radial caps replaced but the axial caps remaining. If the whistling persists this might indicate which caps are the culprit.
Until the new caps arrive there isn’t much more I can do, so I shall leave you with this pretty diagram, which shows the values and orientation of each cap.
-Keep on geeking!
Palmtop and Palm PCs Part One
Posted: December 8, 2018 Filed under: Handheld, Uncategorized, Vintage Computers | Tags: 200lx, dos, hp, palmtop, pocket pc Leave a comment
image courtesy of http://www.200lx.net
Whether you owned one or lusted after them on the shelves at Tandy or Dixons, during the late 80s and throughout the 90s, the personal assistant (or PDA) reigned supreme to anyone after a portable computer but not wanting spend the hefty price tag of much larger, more powerful laptops. Covering the history of these devices would cover more than a fair few articles alone and is a little beyond the scope of what we are going to do today.
Last year I was lent a Hewlett Packard 200LX by my friend Darren, who thought I might get a kick out of using this tiny DOS compatible palmtop. As it happens, he was right. Playing around with the 200LX has been interesting to say the least, even leading to the purchase of a Psion 3a for my own personal use.
The HP boasts a chiclet keyboard similar to those found on calculators and industrial equipment and features many of the same functions found on modern keyboards today, such as functions keys and a numerical keypad for quick data entry.
While using the HP, I have to admit I’ve held something of a love/hate relationship for the keyboard. In the beginning I struggled to type on it with any proficiency, often mashing the keys with my apparently podgy fingers. Only by the second week did things begin to change and suddenly I found myself typing with relative ease. I’d still occasionally catch the wrong key but overall I could turn out text at an acceptable pace. I wouldn’t say the 200LX is the best device for writing, blogging or any decent jaunt of typing for that matter. As a note taker it isn’t half bad, but to be honest there are better options available, but we’ll get in to that later.
The QWERTY keypad takes up roughly a third of the physical width of the device with a numerical pad occupying the remainder. What you’re left with feels awkward and slightly squashed to use. I can’t help thinking this might have been avoided had the designers simply used a full size keyboard, assigning the number pad down the right side, accessible via an FN key, a feature that was not unheard of in the late 80s and which is still used by laptop manufacturers today.
image courtesy of www. keesvandersanden.nl
Setting aside my issues with the keyboard, the 200LX is actually a very capable portable PC or as it was known back then, IBM compatible. Written in gold above the screen is reads “Palmtop PC-2MB RAM”, that isn’t a gimmick or HP trying to use some fancy words to make the 200LX sound better than it is. The 200LX is as much a PC as any IBM XT, running DOS 5.0 on an 80186 compatible HP Hornet CPU. You can run a variety of DOS programs ranging from early DOS versions of Microsoft Word & Wordstar, extending even to a few old CGA games. Just don’t go expecting Wolfenstein or Doom, as I honestly struggled to get much more thank Zork to work for me. Sadly the display on the 200LX doesn’t lend itself well to fast moving graphics, ultimately suffering with motion sickness inducing screen blur. That being said, it doesn’t mean you can’t have some fun with the tiny computer, just so long as you work towards the machines strengths and not its weaknesses.
It’s due to DOS support that the 200LX, as well as the 95LX and 100LX are still popular today. Should you happen to own industrial equipment such as a CNC machines that uses DOS specific software to input data. A HP Palmtop might offer a compact, inexpensive means of communicating with your machines without the need of a bulky desktop computer or laptop. In addition both the 100LX & 200LX are capable of reading from compact flash adapters through their PCMCIA ports, making it easy to transfer files to and from the device without need of the data cable.
The 200LX also comes equipped with an IR port, offering the latest in 90s wireless data transfer. By today’s standards the baud rate is lacklustre and you’ll be hard pressed to find much to interface it with. There were some compact infra red printers manufactured back in the day, which I believe will link up to the 200LX.
Overall the 200LX has some good points about it, which include
-Decent Display
-Long Battery Life on 2xAA batteries
-Built in DOS 5.0
-PCMCIA port
-Rugged design
Software
The 200LX comes packed with an impressive list of built-in applications;
- Appointment Book
- Application Manager
- Database
- Filer
- HP Financial Calculator
- Lotus 1-2-3 release 2.4
- Memo Editor
- Notetaker
- Pocket Quicken
- Phone Book
- World Time and Stopwatch
All of which does not include any software you can choose to load from compact flash. Aside from all the available DOS software you can run, there is also a library of HP specific titles to install. Once loaded in to the memory of the 200LX, there it will remain until such time as it is deleted or the device is reset. Access to a limitless DOS library obviously has its advantages, which makes the Palmtop such an appeal device.
Taking all that in to account you could be forgiven for overlooking some of the devices other failings. Were you looking to buy one today, the 200LX still retains a relatively high asking price as a bit of collectable retro kit, valued anywhere between £50-£140.
Personally I’d find it hard to justify paying more than £60 for one of these devices, as great as they are, there are better examples of pocket sized computing. In fact while I was writing this article I discovered they addressed my issues with the keyboard in a later model, doing pretty much what I had suggested. Other companies such as Atari, Amstrad, Psion, Sharp had devices which rivalled the HP Palmtop PC. While some were less compact than others, each took a stab at offering portable computer for users on the go. Only a few however offered you an IBM compatible computer that fit in your inside coat pocket, fewer still did it as well as HP had with the 95LX and later models.
Stay tuned for the next part of the article, when I take a look at another pocket portable, the Psion Series 3.
Keep on geeking
MegaPi Zero
Posted: May 24, 2018 Filed under: Linux, Raspberry Pi, Retro gaming | Tags: emulationstation, megadrive, pi zero, raspberry pi, raspbian, rpi, Sega Leave a comment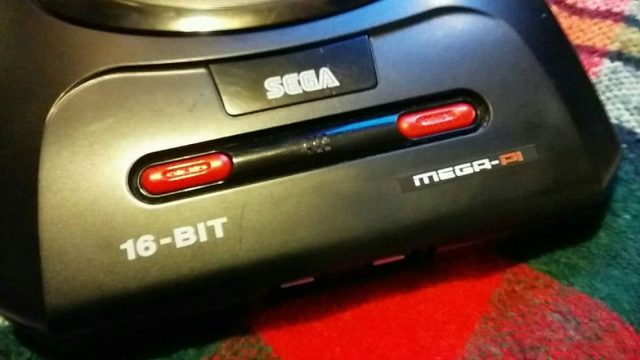
The MegaPi
Not long ago I bought myself a NESpi and was telling a friend about it. She went on to ask me if there was a Sega equivalent, as her brother was an avid Sega fan growing up. Sadly I had to tell her there wasn’t but that added, that building such a console wouldn’t be that difficult, me and my big mouth. Thus I found myself with a new project on the drawing board, added to all the other projects I was tinkering with. When will I learn?
Having built the NESpi and my Picade, I knew EmulationStation could easily accommodate my needs. Not only can it emulate the MegaDrive, but the Master System, GameGear and SegaCD as well. The only real question was what platform I would use for all the grunt work. A Pi3 seemed a little overkill, true it would handle anything thrown at it, but it also hiked up the cost of the build and I was trying to keep to a budget. I might have been able to pick up a second hand Pi2b, however they seem to sell close the what they cost new. I didn’t want to go down the clone route as support isn’t as good, so that left me with one option, the Pi Zero. I’d never tried using a Zero for playing games, messing about with electronics yes, but gaming just seemed a little to demanding for BCM2835 processor. However if you read up on the Zero, for such a tiny board, you realize its actually quite powerful. Clock at 1Ghz, the CPU is approximately 40 percent faster than the same chip inside the original RaspberryPi. Tests have shown the Zero operates roughly four times faster then the original Pi. While I was never going to see Pi2 performance, it would hopefully be enough to emulate the MegaDrive. It seems a little crazy that a 1ghz 32bit processor shouldn’t be capable pf running 30 year old software, but we have to keep in mind, that the Zero is being call upon to accurately emulate a whole console. Translating sound, display, input on the fly, into something close to the real thing.
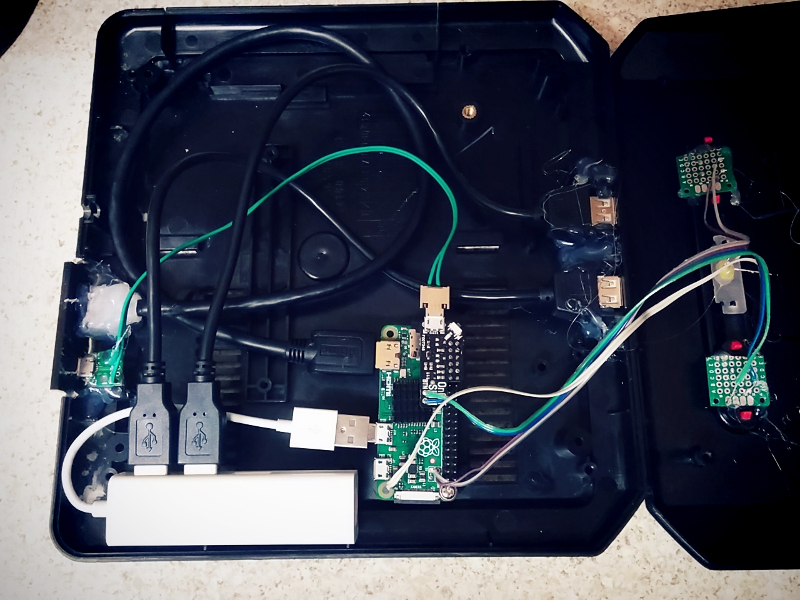
Building
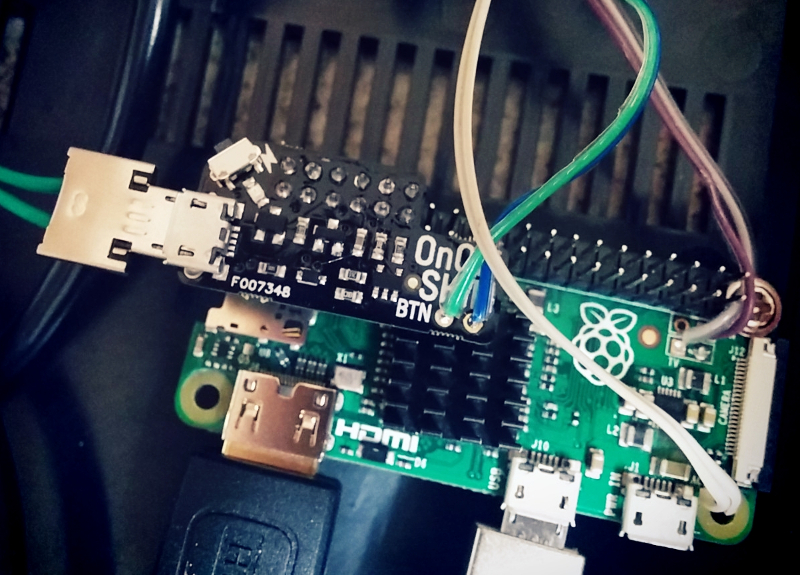
From the beginning my intention was to alter the MegaDrive very little, in fact I wanted to replicate the consoles original functions. Allowing the Power and Reset buttons to work pretty much in the same way they had before. I was able to make this possible using Pimoroni’s on/off shim, this tiny board sits atop the Pi’s GPIO header and allows you to safely shutdown the computer with the touch of a button. It also comes with through holes, allowing you to solder your own button to the board. The shim is pretty versatile, you can either use the included header block or solder the shim directly to the GPIO header, thus freeing up the GPIO pins if say you wanted to use another HAT, like a PHAT DAC. Once installed, for the shim to function you must plug power in to it directly and not in to Raspberry Pi. That way power is being fed through the shim in to the Pi via the GPIO header, putting the shim in control of feeding power to the Pi. The added bonus to all of this, is that your bypassing the Pi’s annoying poly fuses.
With the power sorted out, the next step was the Reset button. The Zero, like other Pi’s comes with a pair of through holes labeled ‘RUN’. If you short them, the Pi’s CPU will halt what it’s doing and reset the system. Ordinarily this isn’t something I would recommend doing regularly, as you run the risk of corrupting your SD card. However, if your running a Pi and for what ever reason it locks up. If your only input devices are two joypads, a reset button might just be what you need to get back on track. This was first time I’d ever wired up a reset button on the Pi and later was thankful I had, as on one or two occasions EmulationStation locked up because I’d done something stupid.
Out of the box, the Zero comes with only a single micro USB port, which isn’t much good if you want a two player game of GoldenAxe. To work around this problem, I used a compact USB hub, specifically suited for the Zero as it came with molded micro USB connector and not a full size USB plug. I then used a set of cables to extend two USB ports to the front of the console, where the joystick ports had once been. I also made a custom power lead, one end going to the rear of the console as a dedicated power socket and the other going in to the on/off shim. Always use thick gauge wire when extending the Pi’s power socket as it only take a little voltage drop for the dreaded ‘undervolts’ icon to appear in the top right hand corner of your screen.
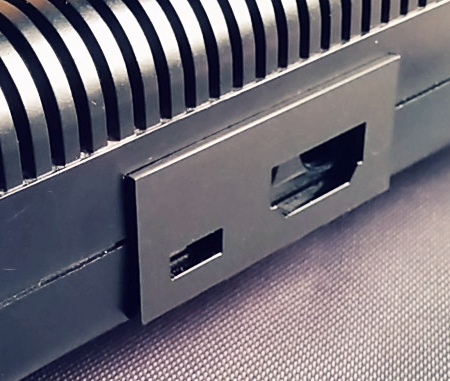
For the rear panel of the MegaPi, I designed a custom I/O panel to replace the Megadrives existing RF and Power Jack with micro USB and HDMI. After cutting out the existing panel, I hot glued the laser cut acrylic panel in place, along with the cables coming from the Zero. I applied a copious amount of glue to both sockets, especially the HDMI port as I found it a little tight when I was hooking up my TV.
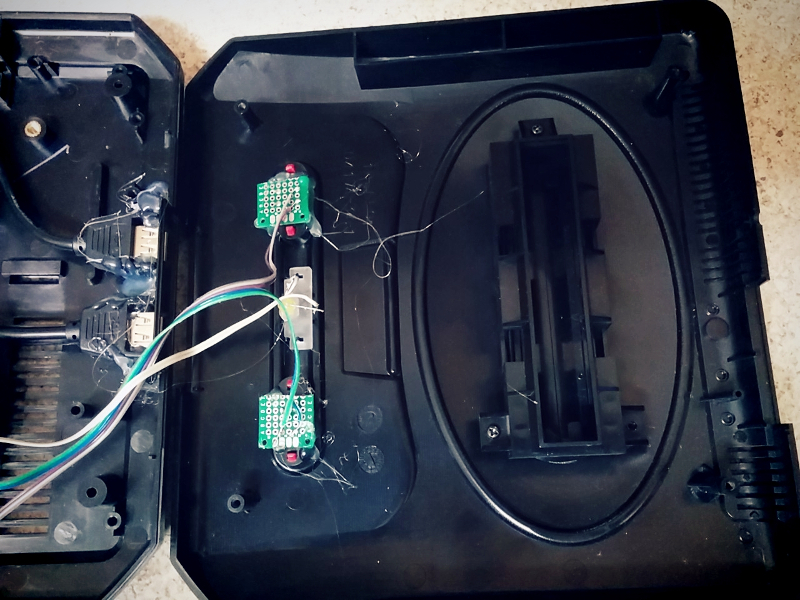
Press My Buttons
I’ve already mentioned how I was able to get functional Power and Reset, but getting both to work with the cases existing buttons was a challenge unto itself. First I began with two tall 6mm tall micro switches, which I soldered to strip board and later trimmed to fit the area under both red buttons on the case. It took a little trial and error, trimming the height of both micro switched until they worked properly with the buttons. When I had both working to my satisfaction, I used my trusty glue gun to affix them to the underside of the top lid. Glue guns are by far, the makers best friend!
With the both switches in situ, all that was left to do was connect them up to the pi itself. A quick test, proved both worked as desired and so the next task was setting up the software.
EmulationStation
Without a doubt, building the Megapi would have been a very different story if it were not for EmulationStation. Setup and configuration of this software has been made very simple, allowing even the most inexperienced to follow it. Configuring the Sega style USB controllers I’d bought was a little fiddly but trial and error eventually prevailed and I had both working as desired. I was even able to setup a custom loading screen and Sega themed booting screen. The first time I came to try out a game, I was really surprised by the performance. The Zero handled most games I threw at it, struggling only once or twice, I doubt very much it could handle any of the 32x or SegaCD titles. But as a bog standard Megadrive it copes pretty well, better then a £5 computer really ought to. But it just goes to show what good value the Zero is and what it possible with such a cheap, tiny computer. I’m really glad the foundation developed the Zero, with the increasing speed of the larger Pi3b and now 3b+, it stands as an affordable foot in the door. Had the Zero not be around, I probably would have tried to buy a cheap second hand Pi2. For the simple fact that the Pi3 was too expensive and powerful for my needs. That being said, I’m not even certain the larger Pi form factor would fit inside the MegaDrive II case.
Conclusion
This was a fun project and not one I would have made had it not been for my friend asking. Truth be told, once built, I grew really attached to it and was sad when it came time to hand it over for my friend to give her brother. From what I gather though, he really loved his birthday present. Hopefully he’s reliving his childhood, maybe even having a mate over for a few beers a game of sensible soccer or Sonic and Tails.
The on/off shim is available via the Pimoroni website at
RPi SD Card Failure & Booting from USB
Posted: February 8, 2018 Filed under: Linux, Raspberry Pi | Tags: boot raspberry pi from usb, linux, pidp8i, raspberry pi, rpi Leave a comment
Card corruption isn’t anything new on the RPi, if your a Raspberry Pi owner it is a fair bet that you shall encounter it eventually.
Over the years ever since owning my first Pi, I had to deal with the occasional segmentation fault. But I’d never encounter a full blown SD card failure until the other day, when quite unexpectedly the PiDP8/i decided to have a system melt down. The first signs indicating something wasn’t quite right, was when I discovered my fail2ban jail log was corrupt, full of complete gobbledygook. After a reboot of the server, I discovered everything was back to normal or so it had seemed. The next indication problems lay ahead was when I noticed files I’d previously deleted had reappeared on the SD card. Now if there’s one thing Linux is good at letting the user do, it’s delete precious files without much chance of recovery. I once deleted an entire partition of my hard drive by mistake and yes, spent what was left of the night reinstalling Xebuntu. Linux is a powerful OS in the right hands but for the experienced it can be a steep learning curve of mistakes and mishaps.
After spending a full day working on my SD card, I discovered sure enough that the internal 8GB card had died a death. I read from the drive, but could neither format or re-partition it.
So what now? Well my next step is going to be getting my hands on a new SD Card, but I’m not so certain I feel comfortable using it as the primary storage on my PiDP8/i server. Everything I’ve read online indicates using SD cards for prolonged periods is not a great idea, mainly due to the limitations of the technology which doesn’t lend it self to constant read / writes. It’s worth remembering that ever since the first compact flash drive, memory cards were originally intended for cameras and PDA devices, neither of which really hammer the SD card unlike Linux. SD cards have a finite number of read / writes, from the time you plug it in, your memory card is degrading. On a short time project this isn’t a problem and there is evidence to suggest capacity does play a part, with larger cards such as 32, 64 and 128gb lasting longer then 8gb ones. Still if I want my server to be online 24/7, I’m better off finding a more reliable and permanent solution.
A hard drive is one I guess, but a little bit overkill for the tiny PiDP8/i. Which is why I’ve spent the past few days looking up ways to boot the Pi2 model b motherboard from a USB flash drive. Research suggests boot time will be faster and reliability significantly better then using SD. So in my next article I’m going to cover the process of setting up a RPi2 model B with the OS installed on USB pen. If your a Pi3 owner you have two choices, you can follow what I’m doing and it should work just fine. But unlike earlier models, the Pi3 can boot directly from USB by altering the OPT within firmware. Once enabled the Pi will search SD and USB until it finds a bootable partition.
Christmas Picade Giveaway
Posted: December 6, 2017 Filed under: Raspberry Pi, Retro gaming | Tags: cabinet art, picade, raspberry pi Leave a comment
Greetings to all you t’interweb surfers, its that time of year again and here at ByteMyVdu we like sharing the festive spirit. I say we, but really it’s me, muggins sitting at the keyboard doing everything, using the royal ‘we’ just sounds better!
Over the past 12 months I’ve built a PiDP8i, a RetroFlag NESPi, Modded a 60s radio and played about with a Sinclair QL. I’ve also built another Amiga 600Pi, refined the designed and improved on what I did the first time around and after all of that, I’ve yet to upload it to my site.
All that aside its Christmas, a time for good will and giving friends and family gifts wrapped in pretty paper. So as a thank you to the poor soul who accidently set their home page to my site, I’m releasing a spanking new set of Picade cabinet artwork. Drawing inspiration from the 80s, these templates will turn any unadorned Picade in to retro throwback. I’ve been asked a couple of times over the past year about my Picade art, so I decided to make some new never seen before templates. There’s already quite a few out there on the Pimoroni forum but a lot of them are either using copyrighted material or trying to replicate an existing arcade cabinet such as Asteroids or Bubble bobble. That’s alright, but I wanted something a little more unique to the Picade, hopefully that’s what I ended up with. Either way I hope someone out there will have fun with them, Merry Christmas you guys! 🙂
Legal fluff – These templates are offered as is and are strictly intended as freeware, for none profit purposes.
https://drive.google.com/open?id=0Bw_gYOWg5M0dWFZGYVdSb0FoeVk

Aint Afraid of No Ghost!
Posted: October 27, 2017 Filed under: Uncategorized | Tags: Halloween Leave a comment
Wishing Everyone a Happy Halloween!

And of course so 8bit to get you in the mood!
