MegaPi Zero
Posted: May 24, 2018 Filed under: Linux, Raspberry Pi, Retro gaming | Tags: emulationstation, megadrive, pi zero, raspberry pi, raspbian, rpi, Sega Leave a comment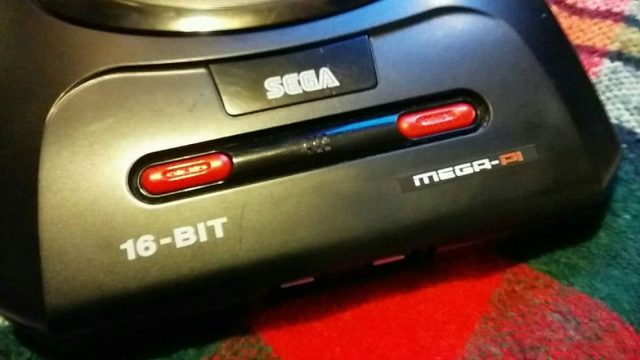
The MegaPi
Not long ago I bought myself a NESpi and was telling a friend about it. She went on to ask me if there was a Sega equivalent, as her brother was an avid Sega fan growing up. Sadly I had to tell her there wasn’t but that added, that building such a console wouldn’t be that difficult, me and my big mouth. Thus I found myself with a new project on the drawing board, added to all the other projects I was tinkering with. When will I learn?
Having built the NESpi and my Picade, I knew EmulationStation could easily accommodate my needs. Not only can it emulate the MegaDrive, but the Master System, GameGear and SegaCD as well. The only real question was what platform I would use for all the grunt work. A Pi3 seemed a little overkill, true it would handle anything thrown at it, but it also hiked up the cost of the build and I was trying to keep to a budget. I might have been able to pick up a second hand Pi2b, however they seem to sell close the what they cost new. I didn’t want to go down the clone route as support isn’t as good, so that left me with one option, the Pi Zero. I’d never tried using a Zero for playing games, messing about with electronics yes, but gaming just seemed a little to demanding for BCM2835 processor. However if you read up on the Zero, for such a tiny board, you realize its actually quite powerful. Clock at 1Ghz, the CPU is approximately 40 percent faster than the same chip inside the original RaspberryPi. Tests have shown the Zero operates roughly four times faster then the original Pi. While I was never going to see Pi2 performance, it would hopefully be enough to emulate the MegaDrive. It seems a little crazy that a 1ghz 32bit processor shouldn’t be capable pf running 30 year old software, but we have to keep in mind, that the Zero is being call upon to accurately emulate a whole console. Translating sound, display, input on the fly, into something close to the real thing.

Building
From the beginning my intention was to alter the MegaDrive very little, in fact I wanted to replicate the consoles original functions. Allowing the Power and Reset buttons to work pretty much in the same way they had before. I was able to make this possible using Pimoroni’s on/off shim, this tiny board sits atop the Pi’s GPIO header and allows you to safely shutdown the computer with the touch of a button. It also comes with through holes, allowing you to solder your own button to the board. The shim is pretty versatile, you can either use the included header block or solder the shim directly to the GPIO header, thus freeing up the GPIO pins if say you wanted to use another HAT, like a PHAT DAC. Once installed, for the shim to function you must plug power in to it directly and not in to Raspberry Pi. That way power is being fed through the shim in to the Pi via the GPIO header, putting the shim in control of feeding power to the Pi. The added bonus to all of this, is that your bypassing the Pi’s annoying poly fuses.
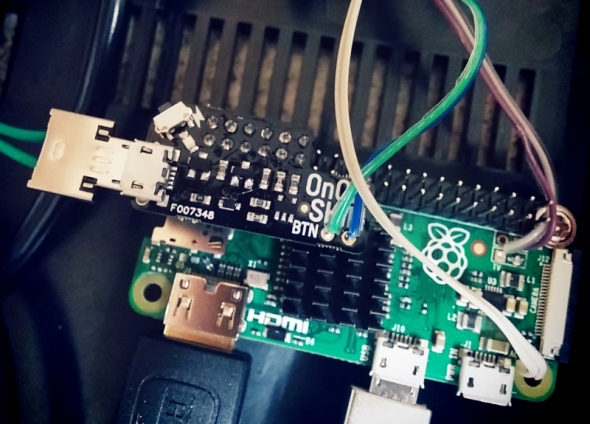
With the power sorted out, the next step was the Reset button. The Zero, like other Pi’s comes with a pair of through holes labeled ‘RUN’. If you short them, the Pi’s CPU will halt what it’s doing and reset the system. Ordinarily this isn’t something I would recommend doing regularly, as you run the risk of corrupting your SD card. However, if your running a Pi and for what ever reason it locks up. If your only input devices are two joypads, a reset button might just be what you need to get back on track. This was first time I’d ever wired up a reset button on the Pi and later was thankful I had, as on one or two occasions EmulationStation locked up because I’d done something stupid.
Out of the box, the Zero comes with only a single micro USB port, which isn’t much good if you want a two player game of GoldenAxe. To work around this problem, I used a compact USB hub, specifically suited for the Zero as it came with molded micro USB connector and not a full size USB plug. I then used a set of cables to extend two USB ports to the front of the console, where the joystick ports had once been. I also made a custom power lead, one end going to the rear of the console as a dedicated power socket and the other going in to the on/off shim. Always use thick gauge wire when extending the Pi’s power socket as it only take a little voltage drop for the dreaded ‘undervolts’ icon to appear in the top right hand corner of your screen.
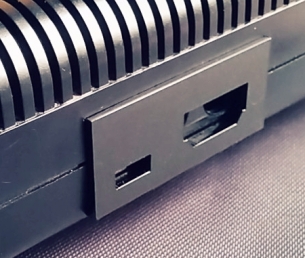
For the rear panel of the MegaPi, I designed a custom I/O panel to replace the Megadrives existing RF and Power Jack with micro USB and HDMI. After cutting out the existing panel, I hot glued the laser cut acrylic panel in place, along with the cables coming from the Zero. I applied a copious amount of glue to both sockets, especially the HDMI port as I found it a little tight when I was hooking up my TV.
Press My Buttons
I’ve already mentioned how I was able to get functional Power and Reset, but getting both to work with the cases existing buttons was a challenge unto itself. First I began with two tall 6mm tall micro switches, which I soldered to strip board and later trimmed to fit the area under both red buttons on the case. It took a little trial and error, trimming the height of both micro switched until they worked properly with the buttons. When I had both working to my satisfaction, I used my trusty glue gun to affix them to the underside of the top lid. Glue guns are by far, the makers best friend!

With the both switches in situ, all that was left to do was connect them up to the pi itself. A quick test, proved both worked as desired and so the next task was setting up the software.
EmulationStation
Without a doubt, building the Megapi would have been a very different story if it were not for EmulationStation. Setup and configuration of this software has been made very simple, allowing even the most inexperienced to follow it. Configuring the Sega style USB controllers I’d bought was a little fiddly but trial and error eventually prevailed and I had both working as desired. I was even able to setup a custom loading screen and Sega themed booting screen. The first time I came to try out a game, I was really surprised by the performance. The Zero handled most games I threw at it, struggling only once or twice, I doubt very much it could handle any of the 32x or SegaCD titles. But as a bog standard Megadrive it copes pretty well, better then a £5 computer really ought to. But it just goes to show what good value the Zero is and what it possible with such a cheap, tiny computer. I’m really glad the foundation developed the Zero, with the increasing speed of the larger Pi3b and now 3b+, it stands as an affordable foot in the door. Had the Zero not be around, I probably would have tried to buy a cheap second hand Pi2. For the simple fact that the Pi3 was too expensive and powerful for my needs. That being said, I’m not even certain the larger Pi form factor would fit inside the MegaDrive II case.
Conclusion
This was a fun project and not one I would have made had it not been for my friend asking. Truth be told, once built, I grew really attached to it and was sad when it came time to hand it over for my friend to give her brother. From what I gather though, he really loved his birthday present. Hopefully he’s reliving his childhood, maybe even having a mate over for a few beers a game of sensible soccer or Sonic and Tails.
The on/off shim is available via the Pimoroni website at
Handheld consoles of the 90’s. The Good, The bad and the unappreciated.
Posted: April 23, 2012 Filed under: Handheld, Retro gaming, Uncategorized | Tags: Atari, Battery pack, Gameboy, GameGear, Lynx, Sega Leave a comment
The original Nintendo Gameboy was released in Europe on September 28th 1990. The second-hand held device to be produced by Nintendo, after their Game & Watch series in the early 80’s. Selling some 64.42 million units worldwide, the Gameboy cemented itself as an iconic piece of the early 90’s.

Officel Sega Battery Pack, even clips on your belt!
The Gameboy was not without competition from rival companies such as Atari and Sega. Both had hand held consoles out at time, the “GameGear” and “Lynx”. Boasting colour graphics and backlit screens, you’d be forgiven for thinking these where superior consoles, in many ways they where. The Atari Lynx was the first gaming console with hardware support for zooming & distortion of sprites, allowing fast pseudo-3D games (ref wiki). However the technology of the time meant both consoles would be forever faulted for battery life issues. The Gameboy with its monochrome screen and no blacklit could run for 10-11 hours on 4xAA batteries, where as the Game Gear and Lynx could only manage 4-5 hours with 6xAA’s, This would plague both consoles throughout their lives. Both companies offered optional rechargeable battery packs to overcome this limitation. But these where often cumbersome and heavy to carry around with you.
As I own both the Gameboy and the Game Gear, I have to say I like both consoles for separate reasons. The Game Gear is great for sitting around the house and having a quick game of Sonic or Columns. The backlit makes it a breeze to use, I don’t have to worry about having a light source to see what I’m doing. The stock LCD screen does have a slow refresh rate resulting in blurry sprites if things are moving fast on the screen. This can be pretty bad on the eyes, but I’m guessing it was a limitation of the technology of the day. My Game Gear also has a third party battery pack which clips to the rear of the console. Unlike Sega’s official rechargeable pack which clipped to your belt.

Atari Lynx, ahead of its time?
I wasn’t aware of this product until doing a recent search on Google. I can’t help but puzzle why Sega went this route when other companies where producing better products for the Game Gear. My battery pack is shaped with grips for holding the console, which I personally find improves my hold on the console.
The Atari Lynx is one of those consoles I’ve never got around to owning. When it first came out, i remember going for the GameBoy. I can even remember them on the shelves of our local Beatties (oh i feel old!) Not actually owning one, I can only offer much hands on knowledge. But from what i have read and a look at the spec’s the Lynx was perhaps overlooked to quickly by the average kid of the 90’s. In terms of specifications, it offered far much more than the Gameboy and was priced better than the GameGear. If I get my hands on one, expect to see a review dedicated to the Lynx!

Sega GameGear, a good console if you can endure the sometimes headache inducing display.
The Gameboy is not without its short falls. The monochrome liquid crystal display which Nintendo choose for the Gameboy was often criticized by its rivals and also by the general public for it’s poor visibility and low resolution. Many third-party products were produced during it’s life to address problems, such as clip on lights and screen magnifying viewers. Yet these required more batteries. As a teenage I would often take a pack of batteries along with me when travelling. You always needed them!
The only thing which saved the Gameboy from the likes of Atari and Sega in the 90’s was the battery life and the quality games that where available. My opinion of the screen has not changed since I was 13, it’s just plain rubbish!
When the Gameboy colour was released many including myself, criticized Nintendo for not addressing the backlit issue. In 1998 Nintendo released the Game Boy Light, only available in Japan. It was almost the same size of the Gameboy pocket and used an EL backlight, very similar to that used in wrist watches. It would not be until 2003 when Nintendo released the Gameboy Advanced SP would be see a lit screen and even then it was front lit! In part Atari and Sega where ahead of their time.
