The Raspberry A600PI AMIGA
Posted: November 6, 2015 Filed under: Amiga, Commodore, Linux, Raspberry Pi, Retro gaming, Vintage Computers | Tags: Amiga, Amiga Pi, commodore, raspberry pi 27 Comments
What do an Amiga A600 and the Raspberry PI have in common? Well at the time of their release, both were considered small micro computers. So what do you get when you combine the quad core power of a RPI-2 Model B and the compact design of an Amiga 600? In theory, a compact quad core Amiga, that runs Linux. But that’s just a theory right? No one’s actually gone to the trouble of making such a freaky hybrid have they? Well actually yes, in fact plenty of people have been putting Raspberry Pi in all sorts of things, ranging from Spectrums, C64s, toasters and pants. Ok I made that last one up, but you just wait, the day is coming when someone will develop digital ‘smarty’ pants. That day is coming my friend. Most of the time the A1200 and A500 are utilised for modding purposes, most likely because of the space afforded in both machines.
Measuring in at 14” by 9.5” and 3” high, the A600’s small size works against it for modding purposes, it also lacks a full size keyboard, so there is no numerical pad. Even back in 1992, the A600 came under fire from people criticising the short comings of its design. For a machine intended to replace the aged A500+, it did a pretty poor job in many respects. Later the managing Director of Commodore UK, David Pleasance, would describe the A600 as a “complete and utter screw-up”

David Pleasance – Not the A600s biggest fan
As a kid at the time, I recall thinking the A600 looked like a waste of time compared to my expanded A500+. It wasn’t until later that year, when I saw the A1200 in Amiga Format, that I began drooling. Fast forward 23 years and here I am staring at a 600 case, wondering what I can do to it. In my head, I was picturing a useful Linux machine capable of going online, playing games and running UAE (Ultimate Amiga Emulator). I had a Keyrah sitting on the shelf begging to be used, so what am I to do? Initially, I did nothing. Back when the Raspberry Pi was first released, it was intended for hacking LEDs & light sensors together or acting as the brains inside an electronic project. It wasn’t meant to be a desktop computer, it simply didn’t have the memory or power to handle it. Gradually, the Pi evolved, more RAM was added, the design was refined, software was optimised, until finally the Foundation released the Raspberry PI 2 Model B. Upgrading the tiny computer with a quad core Arm Cortex A7 processor, this update opened the door to variety of new possibilities, including my shelved Amiga project.

The RPI 2 Model B is a beast compared to the B+
The Pi is very affordable when you compare it to other SBC boards. It also has the benefit of a rich and active community. Not to mention the copy cats that have emerged since its release. While some people might critisise them, I think it’s ace – competition is healthy. Children are once again wiring up things to their computers, learning how to program, learning LOGIC. Some of these kids might go on to shape our future and possibly develop the next breakthrough technology. But in the meantime, here at ByteMyVdu, we are more interested in seeing if a RPI2 can be merged with 20 year old Amiga…So read on and find out.
In the Beginning
Even before I started drilling or ordering parts, I knew one thing for sure, I wanted the hack to be neat, not just that, I wanted the Amiga PI to look no different to a regular Amiga. I wanted people to see it sitting on my desk and think it actually was an Amiga running Linux. But how to go about it? After all the RPI has vastly different ports to the Amiga. Instead of serial and parallel, we now have USB, and in place of composite there is VGA or if you prefer DVI / HDMI. There is also the RJ45 port, allowing you to hook the PI up to your network. Back in the day, the Amiga used serial or a PCMCIA modem to talk to the outside world. One thing was for certain, the back of the Amiga was going to look vastly different with all the new ports and connections, utilising the existing holes cut in the case would only end up looking odd.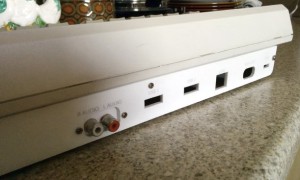 So I decided to craft a new back panel from 3mm acrylic. Taking measurements of the rear panel of the A600, I spent a Saturday designing a vector on my Macintosh Classic. Originally I’d been planning to write an article for BMV about the Manchester Play Expo, but the idea popped in to my head that it would be more fun to design the back panel. Surprisingly the process was very easy and transferring the design over to the main computer went without a hitch. So anyone who says that 68k Macs are useless really needs to have a rethink.
With the back panel cut from white acrylic, I began buying the cables necessary to extended the ports of the PI to the rear of the Amiga case. I shopped on eBay for all the things I needed, while Amazon might have stocked them, I wasn’t so enthusiastic about buying from them after being burnt in the past.
The list of parts I needed was as follows
- 1x Panel mountable, RJ45 extension cable
- 2x Panel mountable USB extension cable
- 1x Panel mountable Micro USB female to male cable
- 1x 3.5mm stereo to female RCA phono cable
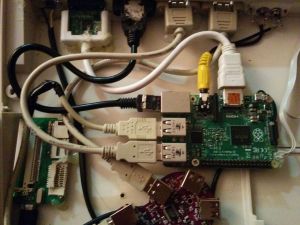
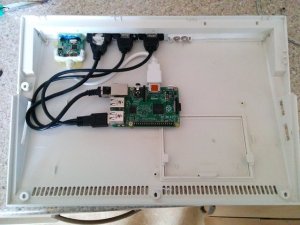 With all the cables together, I went about installing the new back panel. Having already cut out the back from the Amiga case, I offered the new panel up to see how it look. Fortunately for me, my measurement had been pretty good and the new panel fit nicely against the back of the A600. Once the case was together, it was time to attach all the cables, screwing and gluing them in place where needed. While doing this, I discovered a handy Y shape USB splitter on eBay, turning one USB port in to two. It was only after I had installed the cable, that I discovered the splitter was only good for charging. No matter what I hooked up to the ports, nothing would appear. The only device that DID work was a mouse, pretty much cementing the fact, that the cable was complete rubbish. Luckily I’d bought two USB extension cables prior to seeing the splitter, so it was just a case of swapping the cables around. Even though I had glued the splitter in place, I was still able to extract it. With the new cables installed, I now had two fully working USB ports on the back of the case. As for the USB splitter, it went in the bin. The next step was installing the Keyrah. This little device from IndividualComputers turned the Amiga keyboard in to a USB device, enabling me to use it on the PI, so it was important I found space inside the Amiga to accommodate the PCB. Imagine my surprise when I discovered the joystick ports on the Keyrah lined up perfectly with those on the 600 case. I’m not sure whether this was intended, needless to say it made installation easy. The Keyrah does sit rather close to the floppy drive, which might cause problems in the future, should I wish to fit a disk drive. Later models of the Keyrah have a slot for connecting the keyboards ribbon cable, but mine is an early revision. So instead of a slot, the contacts are printed on to the PCB and a bar is used to hold the ribbon cable in place. All I shall say on this earlier design, is that I understand why they changed it. Every time I open the AmigaPI the ribbon cable would move, taking out the keyboard.
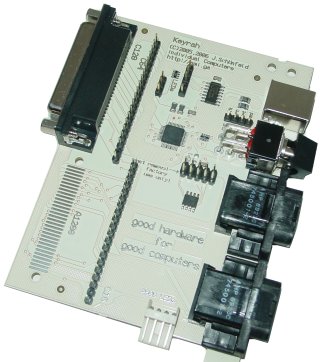
Keyrah, handy kit so long as you leave it alone.
Because of the limitations of the A600 keyboard, the Keyrah has an on board switch, that swaps between two keymaps. Essentially giving you access to a full keyboard. Because the Keyrah resides inside the Amiga, I’m not sure exactly how they expect me to access the switch. Unless I was meant to cut an ugly hole just below the floppy drive, hmm I don’t think so! Perhaps at a later date, I will wire up a new switch and mount it on the back of the Amiga. One final aspect to wiring up the Raspberry PI with the Amiga case, was case lights. In what has to be the most hairy bit of soldering I’ve done. I removed the surfaced mounted LEDs from the Raspberry PI to gain access to the solder points below. Then using some IDE cable, I attached wires from the motherboard directly to the legs of the LEDS. Holding my breath, I turned the machine on and what do you know, the power and drive light came on. Not the sort of soldering I want to do on a regular basis, as my heart was in my throat the entire time I was soldering to the tiny PI board.
Power

Yes, they work!
The combined power requirements of all these devices undoubtedly pushes a PI to it’s limits, at it’s best the PI has 1.2A devoted to the USB bus. If one or two of your devices are power hungry, the 1.2A cap can quickly become annoying. The only solution is to use a powered hub, which is exactly what I did. Due to the limiting space factor, I tried to avoid using as many connectors as I could inside. Instead opting to chop the ends of cables and solder the wires directly to the points on the hub. The PI hub has a 5v 2A port dedicated for powering the PI, so instead of using the intended USB cable, I soldered wires straight to the 5v and ground. I then soldered them to the power points on the PI motherboard, just below the micro usb power port. I also converted the power socket of the hub in to a female micro USB socket, which I glued to the back panel of the Amiga case. This meant I could continue using PI specific power supplies.
Feeling Wired
Soldering all these wires together, I made a very rookie mistake, by not taking in to account the resistance of the wires on the whole circuit. This became apparent the first time I booted up the PI. Even though I was using an official Raspberry PI psu, the square rainbow under volts icon appeared in the top right corner of the screen. Running a volt meter over the ground and 5v pin on the GPIO port, I discovered it was reading around 4.5v, not the 5.15v that I was expecting. If there is one thing I learnt during this build, it is that USB cable makes a poor substitute proper gauge wire. If you want to reduce high levels of resistance, make sure to use a decent gauge wire.
I learnt this lesson the hard way, leading to me to rewire everything a second time. After which the voltage over the GPIO port was restored to just over 5v. The original psu for the PI hub is rated at 5.2V 2A, which is more then enough to power a PI under normal circumstances. In the AmigaPi’s current configuration, it appeared just enough to power everything, the under volts icon appears whenever the rear ports are in use. With this in mind, a 3A power source will likely be on the cards.
Software
War, never been so much fun!
Under the hood the AmigaPI runs the latest version of Raspbian, I have also installed UAE4ARM, the lastest Amiga emulator for the Raspberry PI. Not only does it receive regular updates, but it quite possibly the fastest Amiga emulator you can get on the PI. Configuring it to work can be a little tricky and keyboard support is not all there yet, but anyone who spends time reading on the Raspberry forum have little trouble getting it running.
There are a surprising number of Linux games available for the PI, ranging from Doom clones to arcade Galaga, you can even get point and click adventure games such as Beneath a Steel Sky. All of these work fine with the Raspberry Pi and are definitely worth a look at. DOSbox is also available I’ve yet to test it out, so I can’t say how good it is at emulating a DOS machine. But if UAE is anything to go by, it will hopefully manage 486 games without breaking out a sweat.
Being a Purist
As I mentioned earlier, I wanted the AmigaPI to look like an Amiga, with working Joystick ports, a functional floppy drive and PCMCIA port. Admittedly the rear of the computer looks different, but that couldn’t be avoided. The PI doesn’t have a serial or printer port like the Amiga, nor does it have an composite or RF connector. The only option I had was to give the new back panel an Amiga feel, which is why the power connector is in the far corner, why is has phono connectors for audio and two USB ports, in place of the old serial and parallel ports. The floppy drive is still a work in progress, as the floppy to USB adaptor I bought is sitting on my desk untested. Until I have a new power supply, I don’t wish to risk corrupting the SD card by causing a brown out. But hopefully in the near future the familiar click of a floppy drive will return to the old A600 case. Fitting the Amiga PI with a PCMCIA port seems a little redundant to me, as I had an old CF card reader kicking around, I decided to compromise. After all, when my A1200 isn’t on WIFI, it spends most of its time with a CF card adaptor stuck in the side. Equipping the AmigaPI with CF, meant I could easily transfer files, pictures, mods and ADFs back and forth between the AmigaPI and my regular Amiga’s. Something I envisioned being pretty useful at LAG meetings, when we are taking pictures of the meeting.
Final thoughts
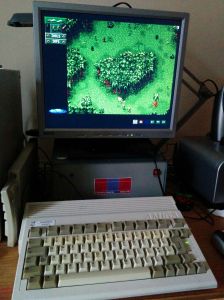
I honestly can’t believe I’ve finished this project, that I’m sitting here at this moment, typing on what looks like a regular Amiga 600. Except the badge bares a berry shaped logo and next to it, reads Raspberry A600PI. Ok it’s not a next generation Commodore product, but then when are we likely to see that happen? The reason people are still rocking Commodore products is because of the mindset behind them. The passion that drove the team who made the Amiga, still lingers, the embers faintly glowing from a fire that blazed decades ago. All I know DO know, is that I get a certain buzz from using a computer that fits inside a keyboard. Unlike my Windows 7 tower, I can thrown the A600PI in my bag and take it with me and who knows, maybe even play a game of Sensible Soccer over at a mates. Yes its dirty filthy nostalgia but on top of that, it’s turning the PI from a mass pile of wires, in to a compact, usable computer. I only have to connect power, VGA and mouse to get the AmigaPi up and running. Everything I need, is self contained within the confines of the A600 case. With a regular PI, I have to find my VGA to HDMI adaptor, WIFI dongle, powered hub, keyboard and mouse, before I even begin to think about powering it on. In short, its a real faff, but not any more!
So if you’ll excuse me, I feel the need to play Cannon Fodder now, till next time keep on geeking!!
No Amigas were harmed during the making of this project, but one ropey looking, long dead 600 was given a new brain.

Nice job, but how did you connect the keyrah to the pi, if you lined up the keyrah joystick ports, without running a USB lead outside the case?d
Hi there, the keyrah has an onboard USB connector. It was a simple job of hard wiring lines to the underside of the pcb.
Hmm. I’m not the world’s greatest solderer, and no electronics genius but I don’t suppose you have a diagram?
Thanks.
Actually i have a photo, i will make an update on my site.
Thinking about throwing an ARM dev into a netbook, your project is really inspiring; thank you so much for sharing!
My pleasure, glad to know someone found my little corner of the Internet!
wow! nicely done! any chance you could put a full list of what was used in the end? (and maybe where the various bits were bought from… or a guess!) i know you did a quick list, but a full list would be nice! im now seriously considering doing this myself! the thought of creating a phoenix from the amiga… yay!
btw, sorry for bn a bit thick (!!) but which Rpi os is it running on? is it a “turn on, straight into the amiga os” build or a boot into raspberian and then start an emulator?
Hi there
The AmigaPi is running the lastest distro (jessie) from the Foundation. While I could probably set up Linux to boot straight in to UAE4ARM, it wouldn’t be awefully useful. The AmigaPi was intended to be a useful desktop PC, emulation is fun (who doesn’t enjoy playing Stunt Car Racer) Raspbian is far more useful for modern day tasks.
I plan to write a further article covering the AmigaPi, so keep your eyes peeled.
that is a good point! why have a gigantic wall of pc when you can have better in the form of an amigapi! you can do better with rpi than windows any day (well thats my opinion anyway!) and the rpi is more fun… especially when you can make a retro modern self built… well, reborn phoenix from the ashes like you have!
cant wait for the next article! 😊
With a RPi2B or even a RPi3, the AmigaPi becomes a very capable machine. Alright, it will never beat my quad core tower, but I do find I have more fun using it. Playing with the Linux Terminal, figuring out how games work. For £25, the Rpi is an amazing little machine that will let you learn a lot.
I love this, Brilliant!!!
Glad you liked it, I plan on covering the AmigaPi further 🙂
This is an awesome project! I’ve always wanted an Amiga, still have some old C-64’s and empty shell from a Commodore Plus -4 (has keyboard, no main board). This may be a great project to bring the C-Plus4 a new life.
Really nice and inspiring job, amiga 600 resurrection would be my dream
would you mind sharing your backpanel over your blog?
thanks
Hi Jerome, thank you. I’d seriously encourage you and anyone who is thinking of building their own, to look at learning Inkscape. It’s free, fairly easy to use and the end results can be ultimately very rewarding. I would be happy to cover how I made the back panel.
I’m into the old publisher 2003 for instance, will look at learning inkscape. i could get my real scale backpanel soon, maybe in plexyglass. Would you mind sharing you hdmi2vga brand ? Seems to works well by the picture.
Hi there Jerome, mine was a bog standard fleabay find. It doesn’t sadly have a brand, not even the PCB inside the case had any writing on it.
Here is a link to one that looks like mine, before I took it apart and stuck it inside the case.
http://www.ebay.co.uk/itm/Input-HD-HDMI-to-Output-VGA-Cable-Converter-Adapter-for-Laptop-PC-DVD-TV-Monitor-/262384403886?hash=item3d175445ae:g:2xIAAOSwubRXDe0M
[…] https://bytemyvdu.wordpress.com/2015/11/06/the-raspberry-a600pi-amiga/ […]
Hi mate, you don’t happen to have any specs or drawings for the new rear panel you made do you?
Thanks
Hi there
I can provide you with the dimensions, but can’t release the vector for the back panel.
resurection of this 🙂 i am trying to get my keyrah to work with my pi3 but it does nothing, i assume it is just a case of attaching the a600 ribbon to the keyrah and then running a usb cable from the pi to the keyrah? am i missing something?
Justin, sorry for the late reply. You probably figured this out, but I’ll respond anyway. 1st question, which Keyrah are you using? As far as I’m aware there are two revisions of the keyrah. Rev 1 is a pain in the butt to use and requires tightening the ribbon cable down with nuts. My experience with this unit is, what a pain!! You have to be really careful lining up the ribbon cable to the pcb and then not over tightening the nuts. Because it flexed and bows the pcb and prevents full contact. Rev 2, now we are talking! There are two ribbon connects on the keyrah 1200 and 600, make sure your inserting the ribbon cable the right way around. Clean the edge of the rubbon with rubbing alcohol. clean away an crud or particulates that might interfere with a clean connection. If that doesn’t work, try your keyrah on another computer, make certain the darn board works first so your not chasing your talk around in circles for nothing.
Hope this helps
“nor does it have an composite”
You’ve probably figured this out since you’ve written this article, but the Raspberry Pi does indeed output composite video via the 3.5mm jack.
It does indeed 🙂 thank you for commenting, always welcome the input!
Great post. What I love about the whole Amiga ‘thing’ is that this post was 5 years ago and I’m reading it and thinking, “I’m doing that with my 600 case”. Awesome. Thanks.
I may use a RPi 4 though and there are some nice 3d printed items on ebay that are ready made now.
Amiga – it’ll eventually die when Sol goes supernova 😉
Hi there, thank you for your kind comments. All the best with your own AmigaPi!
So are you still using your PiMiga? Or have you given it up, or maybe even developed it further?