
Atari Lynx Screen Mod By McWill
Posted: April 21, 2017 Filed under: Atari, Classic, Handheld, Retro gaming | Tags: Atari, Lynx, mcwill, screen mod, screen replacement Leave a comment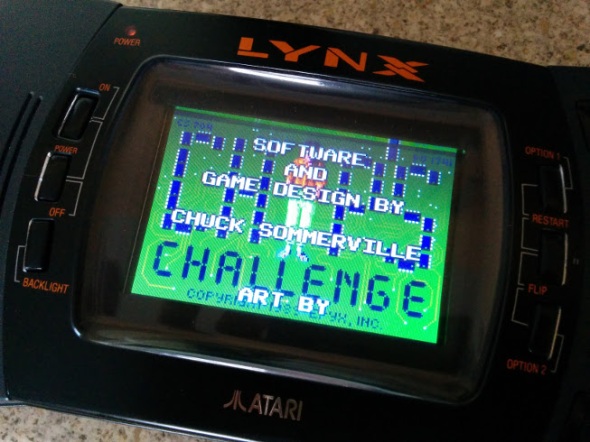
The Atari Lynx arrived on our shelves 27 years ago in the winter of 1989, only two months after Nintendo released the Gameboy and a year before the Sega’s colour handheld the GameGear saw light of day. Featuring the first backlit colour screen on any portable gaming device, the Lynx boasted accelerated 3D graphics.
Developed by former Amiga designers R, J Mical and Dave Needle, the ‘Handy Game’ came about after former Amiga manager David Morse approached them about designing a portable gaming system for Epyx. In 1989 faced with financial difficulties Epyx found itself partnered with Atari Inc, who agreed to handle production of the ‘Portable Colour Entertainment System” leaving Epyx to handle software development. Between 1989 and 1995 the Lynx was reported to have sold 3 million units world wide, but ultimately failed to beat the Gameboy even though technically superior in many ways. The Lynx is a fantastic system to add to any collection with 72 games released officially, varying from run of the mill to great titles like Chip’s Challange,

Lines the bane of any Lynx owner
Todds Adventures in SlimeWorld and California Games. However like most systems from this time its not without problems, the most predominant of which is screen failure. Usually this appears first as one or two lines running vertically or horizontally across the screen, more follow until the display is unusable. The root cause of this is the ageing ribbon cable that links the logic board to screen, over time becoming fragile and brittle. As it is an integrated part of the LCD display the only way in which you can cure the fault, is by swapping to screen for a new one. Which wasn’t a problem back when the Lynx was new, but in 2017 you might be faced with a problem, that is until now.
A Proper Solution

Stock screen looking less then great.
On AtariAge back in 2015 a user by the name of McWill came up with an interesting solution to solve the problem that had been plaguing so many Lynx owners. By developing his own custom display board he was able to replace the old failing screen with a modern LCD which not only offered superior picture quality but an optional VGA out. Unsurprisingly the board was an absolute success with Lynx owners far and wide, who finally had the means to repair their ailing consoles. Last year I was lucky enough to buy one of McWills kits, the board requires some self-assembly and a reasonable understanding of how to solder is needed. McWill does offer and installation service for those who don’t feel confident installing the kit by themselves. I was completely blown away with the image quality, which is ten times better then the original 90s LCD. The picture is sharp and the back light more linear, the full screen is now illuminated and gone is the incandescent tube glow of the original florescent light. The new screen uses modern EL technology which has come on leaps and bounds from when the Lynx was originally released. Ghosting and trailing has been significantly reduced, if not illuminated compared to the original 90s screen. If like me you’re accustomed to viewing your games on the old screen, seeing them for the first time on the new one can be a pleasant if not slightly shocking experience. I was honestly left wondering how the heck I’d managed for so many years without McWills screen mod.

McWills screen, there’s no denying the difference.
Priced at around 100 Euros the kit isn’t cheap however if you figure in the fact you’re getting a custom printed PCB and LCD its actually not bad value for money. The PCB is well made and laid out easy enough for even the budding amateur to follow. However the single sheet manual could have been written a little better as I stumbled to following it wiring to the TPR solder point. The wiring for this can depend on your model of console and what I didn’t know at the time was that I needed to close a jumper on the custom PCB. Labelled in small print as JMP1 in the printed manual its easy to miss and nowhere else is it referred to by this name. For instance here is an excerpt from the instructions.
‘For LYNX-II with chipset 1 (C104129-001) you have to use TPR (testpoint 27) only. For using TPR jumper is closed, for using RES jumper is open !’

Well laid out, McWills screen mod is relatively easy to install.
The instructions feature several diagrams with all the solder points labelled with names such as GRD, TPR, RES, CL2. I’m not entirely sure why the solder point is referred to as ‘Jumper’ and not JMP1, but it definitely threw me and I was left poking around the board until I consulted AtariAge. There I thankfully discovered I wasn’t alone and others were also being thrown by the same issue. This isn’t to say the manual is bad because it isn’t, only that it could probably benefit from a slight bit of revision to prevent others from getting stuck. Fortunately Marco aka McWill is a very helpful and friendly chap and after shooting him an email I was back on track.
Assembly will probably take you a couple of hours and I certainly advise taking your time and not trying to rush it. Some of the soldering can be fiddly, especially when it comes to attaching wires to the display pins on logic board. Using a fine tipped soldering iron is highly advisable. For wiring I used a good old trusty IDE cable, fine enough to fit on the small traces and flexible enough that i can manipulate the screen and board without working loose a connection. You will need to remove seven components from the main logical board before you can begin hooking in the new screen. You may also have carry out a 5 Volt check after removing the require components, so as to make sure the board isn’t exceeding 5.45 volt.

A fine tip is your best friend when soldering these pins
According the instruction the screen mod also has the ability to emulate the scan line effect of the original Lynx display, however I’ve been unable to get this to function. Not that I think I would really use it as the crisp look of the new display is pleasing enough and the games simply look amazing. If your Lynx is looking a little tired and you fancy giving it a face lift, I highly recommend getting one of McWill’s kits. While admittedly pricey, it will likely out live the life of the Lynx itself and beats replacing one old screen for another. As it’s only a matter of time before the ribbon cable degrades and your left looking for yet a replacement from a donor system.
Until next time, keep on geeking!
Off The Spectrum!
Posted: February 20, 2017 Filed under: Classic, Retro gaming, Vintage Computers | Tags: internal CF, Sinclair QL, speccy, Spectrum+, tasword Leave a comment
Hi folks!
In my continuing mission to fiddling with my QL and Spectrum, I was hoping to write an article pitting the two systems against one another. All of that seemed to been scuppered when it appeared that getting Tasword on my +2 would be a painful ordeal. While I do own the software on tape, getting any sample documents off on to the PC would have been a challenge to say the least. Fortunately my friend Zetr0 came to the rescue and with some programming wizardy, I now have a fulling working version of Tasword on my internal compact flash drive. So expect to see an article explaining all real soon!
Over the weekend I attended the Retro Games Fair in Leeds, if you havent been I highly recommend a visit. While a little packed there are some fantastic bargains and the atmosphere is warm and cheerful. I came away with a selection of games, including Knightmare and Dragons Lair for the Speccy.
For more info check out the following link
Slow posts, Free Computer and Game Reviews
Posted: May 7, 2015 Filed under: Amiga, Classic, Commodore, Retro gaming | Tags: a500, Amiga, game review, n64, return to atlantis Leave a commentThings have been a little quiet here on BMV, but that isn’t to say that there hasn’t been any geeky goings on behind closed doors. At a recent Amiga club meeting, a member of the public brought in their old Amiga rig and software. Left to gather dust in their attic, they brought it to LAG hoping to find it a new home. By sheer coincidence I had brought along my own Amiga 500 Plus to the LAG meeting, along with an external hard drive I was trying to install games to. Having owned an A500 back in the day and only ever used the floppy drive, I was eager to experience all the IDE goodness. Sadly my Amiga was choosing not to work with the GVP expansion, so when the offer came of a free boxed A500, I jumped at the chance. When I opened the boxed, I discovered it was complete, with manuals and polystyrene packaging, just as it had been the day it was sold. From what I gather the A500 is faulty, so I will have to check it out when I can get around to it.
Along with his A500, the gentleman brought in two boxes worth of Amiga games. Sifting through them, I found titles such as Desert Strike, Monkey Island, Rocket Ranger and Castle Master. All classic games in their original boxes. I goes without saying that a number of the games ended up coming back home with me and it’s a sure thing I will be reviewing them here on my blog. Sure there are plenty of places online filled to the brim with Amiga game reviews. But as I seldom review games, I figured what the hell, why not have a go. Besides that is what ByteMyVdu is all about, talking, discussing and reviewing everything old bit of computer kit I can get my grubby hands on.
In the next couple of weeks, I’ll be writing about repairing or trying to repair an Nintendo 64 and also doing a review of “Return To Atlantis”, one of the games acquired at the LAG meet.

Till next time, keep on geeking!
Heating & Good Ventilation
Posted: May 3, 2015 Filed under: Amiga, Classic, Commodore, Linux, Retro gaming, Vintage Computers, Windows | Tags: custom built computer, home computer, MSI Fuzzy, xubuntu Leave a commentNomad Update
A couple of years ago I wrote an article on BMV about a retro themed computer I’d built, designed to look like a Z80 Micro computer from late 70s. The build went pretty well and overall I have to say it was a success. The front panel even had blinky lights! But like many prototypes, there were one or two unanticipated bugs. Today’s article will cover the biggest of them all: heat, and how its ultimately in your own best interest not to ignore it. So pull up a chair, grab a hot beverage and lets get the party started.
Linux offering a serious alternative to Windows
At the heart of the Nomad is an MSI Fuzzy 945GM2 motherboard, fitted with an Intel Core Duo T5500 central processor and 2GB of DDR2 memory. By today’s standards the hardware isn’t very impressive, but powerful enough to run old DOS games, emulate other systems and still provide a decent working system. Windows XP Professional, while not so safe online, is still the best option for running most old software, while still being able to run Photoshop and Illustrator. Due to XP’s vulnerability on-line, I installed Xuntubu along side it, so I had a secure platform for surfing the Internet. Seriously if you have never considered Linux and you are moving away from XP, then I couldn’t recommend it enough. It’s free, open source and runs really well even on a system with limited resources. I also discovered that interfacing my TRS80 M100 via serial is much less of a headache through Linux, than it ever was using Windows.
For those of you that may have missed my earlier article, I originally used an ABS plastic enclosure to house the Nomad. At the time I thought the case would be fine, but later discovered the motherboard was cooking inside the tiny case. So much that the hot glue I had used to construct part of the case has melted and one of the SATA cables was stuck to the underside of the top lid. Using a digital thermometer I’d built, I discovered the inside of the case was reaching close to 85 degrees! Ouch!
Nomad Part 2 Taking Shape
So it was back to the drawing board, I could either find a larger case or replace the MSI board with something cooler, such as a dual core Atom board. Having past experience with Atom chips, my feelings towards them was a little jaded. As low cost CPUs go, they serve a purpose, but I’ve never found them to be that impressive in a desktop environment. I’ve seen Atom based systems advertised as compact desktop replacements, but in my experience, that is a load of old twaddle. Atom powered machines are little more than Netbooks that have been stuffed inside a compact desktop box and we all know what happened to the ill fated Netbook! Using an Atom board was simpy out of the question, for a start I was doubtful it would handling emulating a Spectrum, let alone a Commodore Amiga. I had to stick with using the Fuzzy board, so I needed to find a better case to house the guts of the Nomad. Thanks to the popularity of the Raspberry Pi, eBay is now flooded with project boxes and kits catering for hackers and builders alike. Unlike before when I struggled to find even one case, I was now faced with a torrent of cases to choose from. It still took me over a month to find a decent case that still had that ‘Altair’ look. Advertised as a Raspberry Pi enclosure, I have to say the seller was being modest.
The New Nomad?
To This!
You could probably fit 20-30 Pi inside the one case. Constructed of metal, it would be perfect for the Nomad v2. Cutting out the back and front panels proved to be a challenge, but I had faith in my trusty Dremmel. The new case was double the price of the original plastic enclosure, but for a metal case it was still relatively cheap.
Once it had arrived, I began the process of transferring the guts from the old case to the new one.
Disaster…Panic…Death
A month after the Nomad v2 was built, it randomly stopped working. At first I wondered if my fears come true, that exposure to high temperatures in the old case had damaged the components, leading to the main board giving up the ghost. Exhausting every theory, I couldn’t figure out for the life of me what was causing the machine not to work. In the end, I took the machine over to friend’s, hoping a fresh pair of eyes would see something I hadn’t. Thankfully this paid off, unlike me, my friend Peter went straight for the power supply. Not the one inside the machine, but the external brick I was using to supply 12v to the computer. I’d been so convinced heat had damaged something, I’d overlooked the simplest answer. I later realised I’d overlooked the load the Nomad was placing on the external power supply. The motherboard, CPU and drives needed at least 125watt’s and the power supply I was using fell short by a long way. Before rebuilding the Nomad, I sat down and calculated the systems power requirements and bought a PSU and ATX Pico adaptor better suited to the system. Overall the rebuild has been a success and I always get a special buzz when someone asks about the odd looking machine on the desk.
Building A Z80 Computer
Posted: September 18, 2014 Filed under: Classic, Vintage Computers | Tags: Build a computer, computer kit, cp/m, z80 2 Comments
Today building a computer is pretty straight forward. You can go online or to your local computer store to buy the parts you need. Then its just a matter of assembling it all together and installing an operating system. Never once will you need to break out a soldering iron.
Back in the late 70’s and early 80’s, when personal computers were just taking off. Many companies such as MITS, Apple and UK company Sinclair, offered their computers in kit form or pre assembled. The latter option was often very expensive to the average person. To save money, many chose to build the computers themselves. This is an aspect to computers which I feel is missing today. I admit, the complexity of the modern personal computer precludes this from happening. However, as computers such as the Raspberry Pi have demonstrated. There are still plenty of people, young and old a like who enjoy electronics and tinkering with gadgets.
The Rpi comes pre-built and is far more complex then your average 8 bit micro computer. Trying to cobble one together yourself would be quite a challenge, if you have degree in computer science you might have chance. For the rest of us, there surely must be an easier alternative? A computer simple in construction but capable of running productive programs and even perhaps games?
Last year I took it upon myself to search the net, looking for such a computer kit. What few I found ranged from overly complex to down right simplistic. There didn’t seem to be any middle ground. I was looking for something similar to a ZX Spectrum or MIT’s Altair, something that was like the kits you could buy in the 80’s. Sadly I couldn’t find anything and eventually shelved the idea.
It was some months later while talking to a friend of mine via IRC chat, that he revealed he was building a Z80 CP/M computer. CP/M uses ASCII characters to display information on screen. Before DOS came about, it was the leading operating system of the 70’s and 80’s. While not as graphical as say a ZX Spectrum or BBC Micro. CP/M was an industry standard for running business software.

CP/M OS of choice for many in the eighties.
Z80 Computer
My friend Alexis had designed a simple Z80 computer, which at it’s heart uses a ATMEGA324PA and Z80 Processor. The PCB comes fitted with serial, IDE, PS2 and composite ports.
Once the computer is build, it can be hooked up to a regular television. You can also connect an IDE device such as a hard drive or better still a compact flash card to store all your data. CP/M software is small, even a 512mb CF card would be more then enough to store every CP/M program you’ll ever need.
The ATmega chip is extremely impressive, it not only handles the on-board serial port and keyboard, but also acts as a stand alone terminal. The on-board Z80 sees the Atmega just as it would any other terminal interface. In turn the ATmega displays the information via composite video.
Ironically this sort of terminal connection is how many mainframes such as VAX and DECCA, worked back in the 70’s. Anyone who has seen Tron, will be familiar with how the characters in the film had to login to the system to access programs. Essentially this is how the ATmega and the Z80 work on the board Alexis has designed.
Once I have all the components, I plan to write up the build of this awesome little board. If anyone has any questions, please leave me a comment.
Keep on geeking
Recent Purchase WordStar 3.40
Posted: August 22, 2014 Filed under: Classic, Vintage Computers, Windows Leave a comment
If I said I was going to the seaside, what is the first thing that pops inside your head? Ice-cream? Soft drinks? Sandy beaches? You probably would not think yard sales, charity shops and vintage computer software. Well that’s how we roll at BMV, never stopping in our quest to find old bits of computer paraphernalia. On this occasion I discovered a boxed copy of Wordstar 3.40. The box comprises of one thick reference and installation manual, another thinner training guide and a starter kit containing two floppy disks.
A Little History
 Some of you may or may not be familiar with Wordstar. You can be forgiven for not recognising the name. But what if I told you writers such as George R.R Martin (Game of Thrones), Arthur C. Clarke (Space Odyssey) and Robert J. Sawyer swear by the software? Released in 1979, Wordstar became one of the most widely used Word processors during the early 80s. Amongst its strengths was the fact the software was not computer specific. Originally developed for the CP/M operating system, Wordstar was intended to run on just about any CP/M computer, regardless of brand. Later in 1983 with the rising popularity of DOS based computers, Micropro released a new version, Wordstar 3.0. A direct port of the CP/M version, 3.0 retained many of the original keyboard short cuts making it easy for CP/M users to continue using the software on a newer DOS based platform.
So What?
Wordstar’s distraction free environment
You might be wondering why I’m bothering with such an old piece of software and not using Microsoft Word. It’s true using Word with it’s easy to use GUI and icons would probably make things very easy, mainly because I have been using Word since I was in my teens. But should I rule out other ways of doing things, just because I’m accustomed to one way? Personally I like variety, I also like DOS and old software; DOS, old software and old computers. If there is a theme or purpose to my blog, it’s to show people that there are still ways to get things done using old hardware. Distractions like Facebook and the internet can sometimes get in the way of productivity. Goodness knows I’ve lost track of time while pottering around on the net, getting very little done in the process.
So today, armed with a cup of coffee, I sat down with the Nomad running Wordstar via DOSbox. After an hour or two I was able to get this entire blog entry written. Admittedly it will need proof reading before I upload it to WordPress, as I do not have the Spellstar add-on. Learning the keyboard layout will be the hardest challange. IBM compatible machines do not have the same keyboard layout as early CP/M computers, so not everything is where you might expect it to be.
If I have one gripe about Wordstar, it would be the default blue page background which I find hard on the eyes while typing. For the vast majority of the time, I found looking down at my keyboard helped. Which in turn caused me to focus on my typing and actually improved my typing speed and decreased my typos… well, to at least a small degree.
So for me, Wordstar 3.4 scores 6/10
Pros
– Uncluttered
– Lots of functionality
– Distraction free typing
Cons
– Old, needs DOS or DOSbox to run
– Lack of customisation e.g altering the display colours
– Keyboard layout takes some getting used to
If you want to check out the computer the original version of Wordstar was written on, then follow this link

If you fancy trying out Wordstar, then why not try this freeware alternative:
Games Britannia Replay Event
Posted: July 19, 2014 Filed under: Classic, Raspberry Pi, Retro gaming, Uncategorized | Tags: games britannia, mame arcade, picade, raspberry pi, replay, retro gaming Leave a comment
It’s not often that I see a decent retro gaming event here in my home town, but on the rare occasions that it does happen, you can be certain that I’ll try to attend come hell or high water. The 29th and 30th of June saw the Games Britannia host an event at the Sheffield Millennium Galleries.
I have to confess, it isn’t the first place I would think of holding a retro computer show, as the venue is better known for its art display. To the credit of the organizers, it worked well, albeit with one small drawback. I thought the layout was a little too widely spread, the two key areas of the event being located at either end of building. If you have problems walking, this might have caused a problem getting around to see everything.
The main function room held a selection of tables, offering everything from electronic kits, books and novelty items. Venturing further in to the room, I found several tables displaying computers and consoles from the 80s and 90s: Spectrum +3, Amiga CD32, Sega Dreamcast to name but a few. It was disappointing not to  see such gaming classics such as Pong on show, but given the age of hardware, it is understandable why collectors would be reluctant to let 100 strangers play around with a 30 year old console from their collection. It was surprising to see the original Xbox amongst the consoles on display. Released in 2001, I still find it hard to consider this console retro, even though so many other gamers seem to do so.
The encounter was slightly painful, given the recent death of my own beloved Xbox and my failure to rescue it from the jaws of oblivion. However, this didn’t stop me from enjoying a game of Outrun. Having only ever played this game on Commodore 64 and at the arcade in the 80’s & 90’s, I had never played the XBox version of this classic. After 10 minutes, I was sold. This is a game that needs, nay, demands to be in my games collection. Not only did it still feel like the original, but also retained some of the arcade feel. As I carried on around the room, I  noticed another line of tables set up with familiar consoles such as the SNES, Sega Master system and Atari Jaguar. I discovered this was part of the 2014 Classic Gaming Championships, hosted by Replay Events.
Entry was free, contestants pit their skills against other gamers, playing games such as Super Smash TV, Tetris, Paperboy, California games and Tempest 2000. Not one to turn down a challenge or the opportunity to play computer games, I entered myself in to the tournament. I knew my Achilles heel would prove to be Tetris and Paperboy, two games I have never been able to master. Each player was assigned an observer, who made sure no cheating or bug exploitation took place. My observer was probably around the same age as the SNES I was playing on, so it came to no surprise when he revealed little to no previous knowledge of the consoles I was playing on. In fact my score might very well have been better, were it not for the fact we discussed gaming throughout my turn. Mostly he asked me questions, while I tried to give answers as I played. What was the most popular game on the Mega Drive?
Questions like that have been known to start brawls, everyone has a favourite, some might say Sonic, Streets of Rage or Street Fighter II. He seemed surprised to discover Street Fighter had been released first on the Mega Drive and SNES, having believed it was a recent game, released for the PSone and then the PS3 Network. It’s things like this that makes me grateful for Replay putting on events. Educating the average gamer about the history of games and consoles.
By the time I had finished, my score for Paperboy, Tetris and California games really had me wondering if I’d even be on the scoreboard. So you can imagine my surprise to see my name up in third place overall. My score on Tempest 2000 (103616) certainly attributed to this placement. Having only ever played the arcade version, I found the remake for the Atari Jaguar to be a real solid offering. Even the infamous Jaguar controllers did not seem to hamper by game play. By the end of the day, my position had slipped to 12th place overall, but am I sad? No not really, I had great time, playing games and hopefully enlightening another mind to the fun that can still be had with retro games.
On a Walkabout
While on my way to check out the Pimoroni table, I stopped by Appytimes, who were showing off their latest title “Zombie Piranha”. The demo on show was specially made for the Games Britannia event in Sheffield. Speaking to their representative, I discovered the games had been heavily influenced by 16bit games from the 90s. Anyone who plays “Zombie Piranha” will see this almost from the beginning, as there are hints from several different games peeking out. I couldn’t help but draw comparisons with James Pond and Ecco the Dolphin. The controls are simple, the difficulty is not too steep. All around well worth installing on your phone or tablet if your wanting a quick gaming session while waiting for the bus. At the time of writing, “Zombie Piranha” is still available for free download via Google Playstore.

Like James Pond meets Ecco The Dolphin, very fun
By far the most interesting table at the event was that of Pimoroni, the Sheffield based company had come to the event with a bang. Showing off not just one but five working Picade units. Anyone who has been following my blog will know I have reviewed boards in the past in preparation for the up coming release of this awesome DIY arcade kit. Running PiMaMe, the model B RPi performs surprisingly well. In the time since I looked in to running Mame on the RPi, things have most certainly progressed. The Pi has gone from performance underdog to solid contender. So much that I plan to load PiMaMe on the BMV RPi to see what games will run and wont run.
Picade
Comprising of laser cut, powder coated MDF, customizable decals, original arcade hardware joystick & buttons, LCD screen and custom Arduino Leonardo. The Picade is the must have kit for anyone who has ever felt the urge to build their own arcade cabinet or put their Raspberry Pi to good use. However the Picade is not designed solely for the Raspberry Pi. Indeed, one only needs to look at the rear of the unit to find mounting holes for Odroid and mini ITX motherboards. Having only recently finished shipping units to their kickstarter backers, Pimoroni are now aiming their sights on selling the Picade commercially. Prices are still to be announced, but estimates place it around the £200 price range. Given everything that comes in the kit, BMV feels really buzzed about the future of the Picade.
Completed, the cabinets looks like baby versions of their full size cousins, right down to the clicky sound of the joystick and buttons. Forget using a USB joypad to play Pac-Man, the Picade offers a tactile arcade experience straight from the comfort of your living room. Designed with swappable graphics and mounting points for different boards. Pimoroni clearly foresee the needs of some customers to customise their units and apply their own unique mark. While I was using one, I also kept thinking what graphics I would use and if I could illuminate the banner above the screen. Seriously you can’t help yourself once you realise the dream of having your own arcade cabinet is less a dream and now more a reality.
Keep on geeking
Breaking News
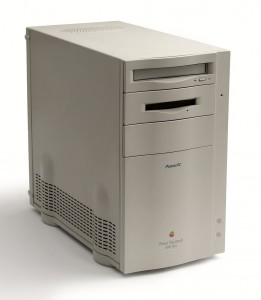
Posted: February 23, 2014 Filed under: Apple, Classic, Macintosh, Vintage Computers | Tags: apple, no boot, PM8500, power macintosh, PPC, repair 1 CommentITS ALIVE!!!!
Dear readers, as some of you will be aware, I’m something of an avid fan of old Apple Macintosh Computers. My first Apple computer was non other then the might Power Macintosh 8500. A technical power house of it’s day, offering impressive video editing features.
Over the past 2 years, I have on and off been trying to bring back my 8500 from the dead, after it decided one day not to boot. I’ve bought parts, ram, CPU’s and still nothing would bring it back to life. Imagine my joy when today I finally got it to BOOT UP! Has the old Apple “Boing” ever sounded so sweet!
That is all for now, as i return back to working on this beloved computer and getting it back in full working condition!
Amiga Yahoo Email
Posted: September 26, 2013 Filed under: Amiga, Classic, Commodore | Tags: A3000, Amiga, commodore, email, OS4, yam Leave a comment
In the next few weeks I shall be looking at setting up a yahoo email account on an Amiga 3000 and Micro AmigaOne running OS4.1
After learning recently that my Yam guide had failed a fellow Amigan, I have decided to get the proverbial finger out and cover setting up email more thoroughly.
If anyone has any questions or would like me to cover something specific, please feel free to send in a message. I would love to hear from you!
So until next time, keep on geeking!
Atari 2600 Composite
Posted: August 29, 2013 Filed under: Classic, Retro gaming, Vintage Computers | Tags: 2600, Atari, atari composite, modding Leave a comment
Last night I hooked the Atari up and it became apparent that using the console on my new 27″ IPS television is not going to be a match made in heaven. In fact the picture was terrible, even for RF input.
So in the next blog i hope to cover a blog, converting an Atari 2600 lite PAL unit for composite output.
Watch this space and keep on geeking.
